Wednesday 30 June 2021

Powick Bridge

In an idle moment this morning I set up and played my Powick Bridge ECW scenario, which is another I thought would be a fun test for my Portable Wargame changes. This scenario has troops having to recover from surprise by rolling a 5+ on a D6, which would affect how many activation dice their side got to roll. And it also had a large portion of one side appearing as reinforcements.

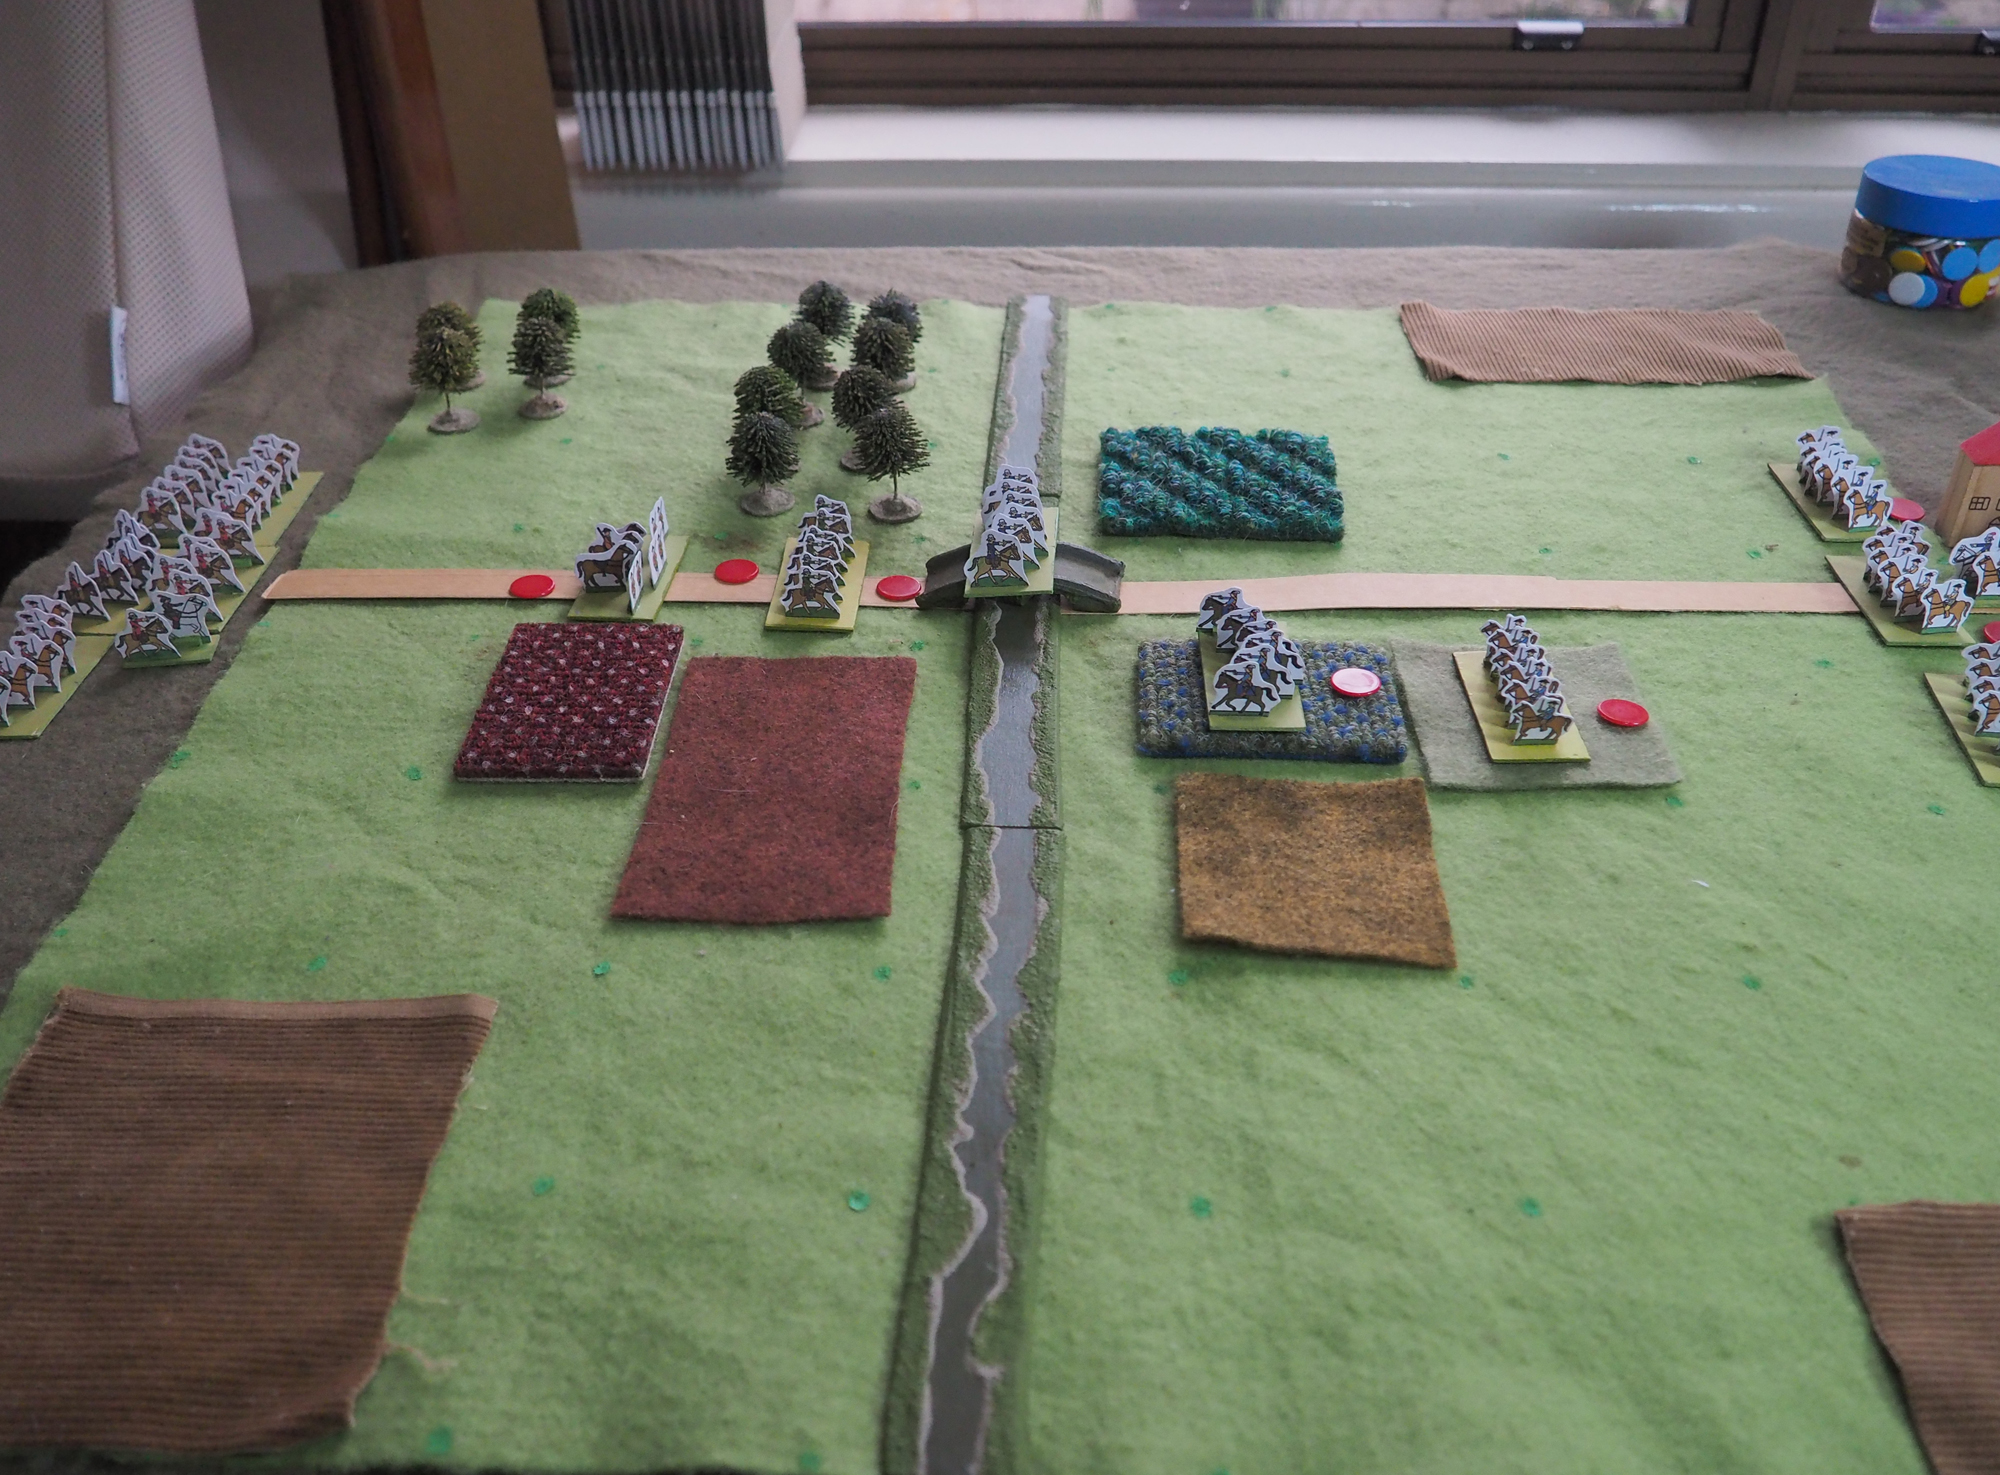
Here's the setup. To the right are the Royalists, under Prince Rupert. All of their troops are on-table; some horse along the baseline, and two units of horse in the fields near the bridge.

To the left are the Parliamentarians; two units of horse and some dragoons, moving down the road and crossing the bridge. The two sides have just spotted each other, so every on-table unit is surprised.

Off table to the left are five more units of Parliamentarian horse, which will appear on a score of 5 or more from the second turn onwards.

Off-table units and surprised units did not generate activation dice.


Parliament went first, and two of their units recovered from the surprise.


Their horse pushed over the bridge and hit one of the Royalist cavalry units camped in the enclosures. The dragoons followed up onto the bridge.


The Royalists slowly recovered from their surprise. Their horse attacked out of the enclosures and drove their Parliament foes across the road. However Prince Rupert became convinced that Parliament had forced another crossing further along the river, and briefly rode off in that direction before receiving news that this was a false alarm.


The Parliamentarian vanguard was destroyed. Their dragoons pulled back from the bridge, and more horse attacked across the river.


The Royalists easily held the attack and countered, their horse now well organised on their side of the river.


Parliament's meagre forces were pushed back.


But when all seemed lost, their reinforcements arrived. Their commander led an attack which halted the Royalists at the bridge.


Prince Rupert rashly led his men in the attack, pushing past the bridge and deep into the enemy horse.


Parliament's inexperienced troops fell back before this attack, and their force reached its breaking point. However they passed their first morale test, and kept fighting, despite the loss of their commander. They charged, and the lead unit of Royalist horse fled.


And Rupert fell! The Royalists were shaken, but not broken. They attacked the dragoons in the enclosures lining the road, inflicting more casualties. This was too much for the Parliamentarians, who fled.


This was a fairly easy win for the Royalists, although there was a danger of everything coming unstuck towards the end. This scenario is very random, with no side being sure what forces they have available early on. The bridge forces the action onto a narrow frontage as well, making the combats there critical.

The varying number of activations worked fine, and there was some moving and replacement of commanders to use up actions as well. All in all a quick and fun game.

Sunday 27 June 2021

Ripple Field Again

It's been a bit of a slow gaming week here, so I haven't posted much. My game of HOTT on Thursday was cancelled thanks to libertarianism, which was disappointing. And I've been occupied with a bit of photography as well, which has at least been fun.

Anyway, we're in a two-week COVID lockdown here in Wollongong, so with no chance of going out anywhere today I thought I'd have another go at the Ripple Field scenario I put together last year. In this action, William Waller, with a small force of shot and horse, defends a low ridge outside the village of Ripple against a stronger Royalist force under Prince Maurice. It's a nice attacker/defender scenario, with unequal forces and I thought it would make a nice test for my new activation system.

Here's Waller's defenders - some shot and artillery on the hill, dragoons in the enclosures to their right  and horse behind the hill read to respond to the Royalist advance.


Somewhere beyond the village to the right is another unit of shot, marching in as reinforcements.


The Royalists - four units of horse and two of shot.


The Royalists led with their horse, sweeping around Waller's right flank. Haselrig's veteran horse was waiting for them.


Meanwhile the Royalist shot advanced towards the ridge.


The Royalist horse got into serious trouble when they were trapped by dragons in the nearby enclosures.


Meanwhile Waller led the reserve horse in a counter-attack off the ridge against the advancing Royalist foot.


Prince Maurice led the foot in an attack on the hill that saw Waller's men fall back. 


On Waller's right his horse and the dragoons were holding off the more numerous Royalist horse. But the position on the ridge was failing. In the village you can see the recently arrived reinforcements.


Soon it was all over. Waller's position was untenable, and despite having inflicted some casualties on the Royalists his force broke and fell back, harassed by the enemy horse.


Victorious Royalists on the ridge.


Later in the afternoon I set it up and played it again. This time the Royalist horse attacked Waller's right with even more vigour.


The dragoons were on the hill this time, and were easily scattered by a wild cavalry charge led by Prince Maurice.


The Prince led his horse to the very outskirts of Ripple, where they were stopped by some recently arrived shot, who seriously wounded him. Prince Maurice was quickly carried from the field.


However Royalist advance was unstoppable. Waller's men fell back from the ridge in good order, and he organised his shot in defensive positions around the village.


But Haselrig's horse had routed, and the Royalist horse swept in from the east, scattering Waller's shot.


With nowhere to turn to, Waller surrendered.

So the Royalists won both times, but then this isn't really a balanced scenario; they have the edge in both numbers and quality and, whilst Parliament has some terrain advantages, they don't have the numbers to cover all of the ground.

The activation system gave a fast, free-flowing game, and in both games caused upsets when a side didn't get enough activations to do everything they needed to do. There were no random events in the first game, but the second one saw a Royalist horse unit unexpectedly withdraw, and their commander out of action for a turn. Both sides also got to rally hits off units. So thee was a nice degree of unpredictability, without the events dominating the game.

Wednesday 23 June 2021

Savage Kobolds

I simplified my Kobold warband, and gave it another outing against the Dwarves this lunchtime. I didn't take any pictures though.

The simplified warband is:

1 x Kaptain - Q3 C3 - Leader, Savage
10 x Warriors - Q4 C2 - Savage

In this game they wiped the Dwarves out with no loss. Some of it was down to the Dwarves getting some terrible activations, but a lot of it was simply down to the Kobolds being able to mob individual opponents with four or five attackers, and easily defeat them. The Savage trait meant that they scored a few gruesome kills and, whilst the Dwarves pass morale on a 2+, they got enough failures to break up their force and allow the Kobolds to pick off isolated individuals.

NB: The above warband is 306pts, which is fine because the Dwarf one I was using is the same. If you're playing strictly to 300pts, drop Savage from the leader.

Song Of Kobolds And Dwarves

I played a quick game of 'Song of Blades and Heroes' yesterday, since the figures were still to hand from Thursday's games. I used a similar Dwarf warband to the previous game, but with fewer traits and higher combat values:

Chief - Q3 C4 - Short Move, Steadfast, Hero
4 x Warriors - Q3 C4 - Short Move, Steadfast
2 x Musketeers - Q3 C2 - Short Move, Steadfast, Shooter (L)


Against them was a mob of Kobolds:

Kaptain - Q3 C3 - Leader, Difficult Target
6 x Warriors with Hand Weapons - Q4 C2 - Gregarious
2 x Warriors with Spear - Q4 C2 - Gregarious, Long Reach
3 x Warriors with Axe - Q4 C2 - Gregarious, Savage

The Kobolds were massed into a couple of groups, with the aim being to swamp individual Dwarves.


Both sides advanced slowly. The Dwarves were making for the gap between the wood and the rock outcrop where they could form a solid line and avoid being surrounded. The Kobolds moved both of their groups up.


With a leader and the gregarious trait the Kobolds could move one group per turn fairly actively. They charged the Dwarf at one end of the line - the Kobolds with hand-weapons and spears pinned him, leaving the savage axe-wielder to make the attack.


The Dwarf simply recoiled.


The Dwarves responded by counter-attacking, and got a gruesome kill on one of the Kobolds. The rest fled.


But their being gregarious paid off again, and they quickly regrouped, then went back into the attack.


But another gruesome kill saw them scatter again.


Once again they regrouped and went into the attack.


This time they were able to knock down one of the Dwarves ...


... and inflict a gruesome kill of their own. But the steadfast Dwarves were mostly unconcerned.


The Kobolds moved to capitalise on their success, but they were taking casualties.


The remainder of the Dwarf warband had worked its way around the rocks and now attacked, led by the musketeers.


Another gruesome kill saw the Kobolds pushed to over 50% casualties, and have to take two morale tests. Most of their warband fled and I called the game at that point. The Kobolds had lost about nine of their twelve warriors, whilst the Dwarves had but a single casualty.


The Kobolds are tricky to use - you have to coordinate their attacks to get maximum outnumbering, and then resolve one of more combats with some decisive weapons. Unfortunately despite massing their attacks they couldn't convert their advantage to actual kills. However the Dwarves did seem able to do this, picking off Kobolds on the edge of the mob in one-on-one fights. And a morale check always saw the group break up. Still, I shall persevere with this entertaining Kobold warband.

Friday 18 June 2021

Song of Blades and Heroes

Victor came down to Wollongong yesterday evening, and we played Song of Blades and Heroes, something I've not had out in a long while. 

We did have some initial confusion, because whilst Victor had said that we'd be giving the Revised edition a go, I somehow interpreted that as the Advanced version, and designed my warbands accordingly. Revised is simply the 5th edition of the basic game, and doesn't have the more detailed traits of Advanced. Anyway we sorted out how to play the various things I'd selected and settled for the basic game. To be honest I'd looked through Advanced and decided that it was too fiddly for my tastes anyway.

In the first game I took Uruk Hai against a small, elite, force of Elves. I tried to use terrain to avoid their missile fire.


And laid down some fire of my own with crossbows (we ported them across from Advanced rather than try to rejig them as a set of basic game traits). They fire more slowly than the Elven bows, but had better range and hit modifiers. 


I sent in my berserker to pick off one of the archers. He got knocked down and killed. Embarrassing.


The rest of my warriors went in. They didn't do so well. The Elves had the high ground, and a gruesome kill saw the Uruk Hai scatter back to their baseline.


We regrouped around the crossbows, whilst the sneaky Elves wandered through the woods.


There was a scuffle, and Elf was knocked down, but the Uruk Hai leader was also killed. This took my warband over 50% casualties and, with the leader lost, forced a second morale test. The Uruk Hai fled.


For our second game Victor took some Orcs, whilst I used Dwarves. He rushed across the board with group activations, whilst the Dwarves seemed content to sit on their baseline and send forward a single musketeer.

The rest of the Dwarves did get their act together, and a fighting line developed.


Another gruesome kill! And despite being steadfast the Dwarves had terrible morale rolls, and scattered, giving the Orcs plenty of free hacks.


By this stage a troll had joined the fight. The Dwarves came close to killing it, but not quite. This seemed to be the theme for their whole fight - almost, but not quite.


The Dwarves were broken up by morale checks, and the Orcs mobbed them.


Only their 'hero' managed to flee the massacre.


So it's obvious that I've really forgotten how to play this game, despite playing plenty of other games using the core system over the years. The Revised edition seems pretty good, so I'll probably invest in a copy. It seems to have just enough chrome to be interesting, but is not overloaded with fiddly detail like the Advanced version.

Thanks to Victor for organising the game.

Of course what I'd really like to see is a revised and clarified edition of BattleSworn.


Related Posts Plugin for WordPress, Blogger...