Friday 30 November 2012

Rome vs The Barbarians

I missed last week's Black Powder game at the Gong Garage Gamers, but this week we were promised the related Hail Caesar, the basic mechanics of which, I am assured, are much the same. So I was looking forward to this as a useful training exercise; Ancients isn't a great favourite of mine, but Black Powder looks to be worth the effort of learning to play (if only so I have a stab at taking part in a big Gettysburg game being organised locally next July).

Some email discussion showed that, by pooling of resources, we could throw together some suitable armies. Ralph, who would be running the game, isn't really up on Ancients either, so wanted to do a simple Roman/Barbarian fight. various people brought figures from their collections, which were thrown together into units which, whilst not resembling anything historical, looked like masses of men.

Peter was bringing most of the figures, but tends to turn up later in the evening, so we improvised a quick intro game; three units of Men With Spears were classed as Roman auxiliary infantry, and a force of four Barbarian warbands were pitted against them.

Being bearded, I took the Barbarians. Initially they seemed to be commanded by an all-girl morris-dancing group:.


However we swapped that for a more conventional chariot.

Caesar commanded the Roman invaders. Obviously.


Barbarian tactics are not subtle - I charged. Or I charged one mass anyway; not knowing how combat worked I didn't want to commit the whole army until I'd seen how things might pan out:


Things didn't go too well. The Barbarians made a tactical withdrawal:


With nothing left to lose I just chucked everything in, and achieved a push-back on the other flank:


There was some hard fighting in the centre as well:


But on the whole the Barbarians failed to break the Roman line. However since one of their units was now behind its starting position, and the others hadn't advanced, I claimed victory on the grounds that the Romans controlled less of Germany than when they had started ...


This week's Guest Star is the pterosaur the role-players had drawn on the white-board in their room:


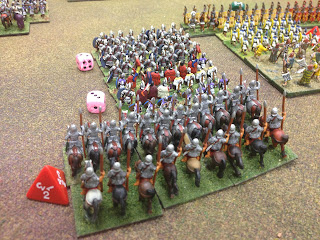
Meanwhile Peter had arrived and sorted out two armies from his collection of figures. On one side we had some Romans who mostly looked like Romans - legionaries, some auxiliaries, a few archers, cataphract cavalry and a couple of units of artillery. On the other side were barbarians, made up of whatever figures we had left. Some of them were quite colourful, suggesting that the land being fought over would become, 1700 years later, Riskovia. Caesar and I took the Barbarians (which gave me an excuse if we lost if nothing else) whilst Peter and John handled the Romans. Ralph adjudicated and looked startled as we asked him complex questions:


The Barbarians had cavalry. I commanded it. Any Staines Wargamers reading this will know that this cannot end well ...


A good start. As my cavalry plodded slowly forward (I said 'Charge', but they obviously misheard me), one unit took a single hit from some long-range artillery fire. And routed.


The Roman firing-line: artillery and archers. This is what my troops were advancing towards.


My surviving cavalry failed to charge again:


Indeed the Romans got so bored waiting for us to attack that they came to me instead. We discovered that, whilst on paper the difference between their cataphracts and the barbarian cavalry isn't that great, in reality those lances and that extra point on the save gives them quite an edge:


Whilst Caesar thought about tactics with his infantry I just did what Barbarians do best with mine - I got stuck in:


Here's my wing of the Barbarian army falling back, or being pushed back. Getting stuck in is a high-risk strategy:


On the other flank John moved his artillery into an enfilade position. The Roman artillery really gave us a taste of what ACW Black Powder might be like; they caused us no end of trouble:


Caesar decides to fight. And actually does OK:


However the Roman cavalry, having polished off their Barbarian counterparts, now smacked into the back of my warbands. Not good.


At this point we called time. This was our dead-pile:


And this was the Roman's dead-pile - I did for the artillery unit, whilst Caesar managed to break some legionaries:


No amount of clever writing can claim a Barbarian victory. we lost. Big time.

I think we all enjoyed the game, with its sweeping, and non-fiddly, moves. The big handfuls of dice can make combat very random sometimes, and the Roman artillery was stupidly lucky in rolling sixes (which force a morale test) so seemed to do damage far in excess of their numbers. I'm looking forward to trying the system  in a period with guns, now.

Thanks to John, Caesar and Peter for providing figures, and to Ralph for organising the game. I just brought my dice, tape-measure and a camera.


Wednesday 28 November 2012

Battles And Leaders

A couple of things I have been considering for my ACW Portable Wargame variant (because it's starting to diverge from the original a bit now) are commander quality and what I shall call, for want of a better word, Elan.

Charge!
Commanders can, to some extent, represent individual officers, but with the rather abstract nature of the Portable Wargame, they could represent an overall quality of command of the force as a whole. The fact that their only effect is to give bonuses to units they are with or adjacent to creates a kind of focus - the point on the battlefield where the commander is present is, to some extent, the point at which that army is making its main effort. This is very much the principle of behind how officers work in Maurice, for example.

This offers some possibilities for reflecting commander quality. The obvious one is to increase the bonus they give, but given the D6 nature of the Portable Wargame this is probably a bit extreme. There's no real way of reducing the bonus of a poor commander (make it zero and the commander has no purpose) and a +2 on firing, close combat and rallying is rather excessive. Another possibility is to vary the command radius, but increasing it for good commanders means that they are less likely to put themselves in danger - one of the side effects of the commanders 'adjacent' effect on a square grid is that they are best deployed in the front line so they can influence the unit they are with and those to both sides, but at the risk of being shot.

However if we consider that the commander is a point of focus of the army's activities, then it's easy to see one way of reflecting superior and inferior commanders - the ability to rapidly shift that focus and wrong-foot their opponent. This could be done by varying how far a commander can move - an average commander moves 2 squares, but a poor commander could be given only a 1 square move, whilst a good one gets a 3 square move. In that way a good commander can suddenly shift his influence from one side of the field to the other, whilst a poor commander will tend to be stuck with whatever plan they started with.

Another possibility is, of course, the initiative roll, which determines who acts first after the common artillery fire phase. There's a slight advantage to going first (you get to recover from, or exploit, the effects of the artillery fire before your opponent), so a simple reflection of commander quality would be to give a force with a good commander a +1 and a force with a poor one a -1.

I have also been considering how to reflect some of the desperate, and sometimes successful, charges of the Civil War. To this end I have considered the possibility of giving both sides a number of points of Elan - maybe one for each unit the force starts the battle with, maybe less. Whatever, it should be a finite resource. When a unit initiates a close combat it may spend a point of Elan to add one to the die roll (although do this before the defender rolls to add an element of risk, of course). In addition a defending unit may opt to spend two points of Elan to add one to their roll, simulating a desperate defence. The relative costs should slightly favour, and encourage, the kind of aggressive attacks the war seemed to produce.

This game is starting to acquire a life of its own, and I feel I really need to write it up properly and give it a name. Unfortunately all the best names for American Civil War rules have been gobbled up. I shall have to give it some thought ...

Tuesday 27 November 2012

I'm A Liebster Blog


I am, it appears, now a Liebster Blog. From what I can understand this is an award that one blogger gives to other favourite blogs with the proviso that the blogs so honoured have less than 200 followers. Having received the award I am supposed to dish one out to five other blogs I think you should be looking at. This in no bad thing to be doing; it's always worth having something that drives traffic from one blog to another.

I got mine from James of The Dancing Cake-Tin.

So, what blogs will I choose?

Let's start with Winter of '79, which offers games and pastiche set in a 1970s Britain that wasn't, but nearly was. I can't say I thought much of the seventies at the time, and this blog reminds me why.

I love the nostalgic title of Richard's The Land Of Counterpane, so that's next on my list. 

There are a number of blogs which document play-throughs of classic Fighting Fantasy game-books, but Turn To 400 was the first I came across, so it gets my next award.

My source of much in the way of local goings-on is iWollongong, formerly What's On In Wollongong and run by the lovely Eleise. See what goes on in the city I travelled 10,000 miles to live in.

Finally another wargaming blog - David Crook's Wargaming Odyssey. He does wonderful stuff with wooden blocks and his blog is a gateway drug to the addiction that is Bob Cordery's Wargaming Miscellany (which is ineleigible for an award by virtue of having more than 200 followers). I have pretty much read the entire archives of both blogs; they are responsible for a lot of lost time over the last six months ...

So there we go; that's my nominations done. If your blog was picked it would be great if you could pass on the love to five other sub-200 follower blogs.

Monday 26 November 2012

Cedar Run - New Terrain And A New(ish) Idea

Yesterday afternoon I found some suitable felt and bits of cork tile, and put together an 8x8 square grid suitable for fighting Portable Wargame ACW battles outside of New Mexico. This evening I christened it with another refight - the Battle of Cedar Run, fought on 9th August 1862.

Here's Wikipedia on the subject.

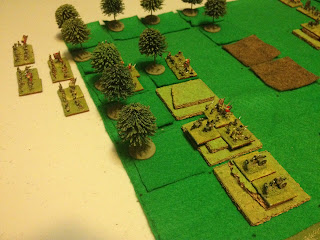
And here's my setup:


In the foreground are the Confederates, emerging from the woods. The union are in a line along the far ridge. Cedar Run crosses the board and there are some troops on Cedar Mountain to the right. The squares are 5cm, the terrain pieces slightly less than that. I don't think I've said, but the figures are mostly 6mm Heroics and Ros, with a few Irregular Miniatures thrown in (the artillery particularly).

Here's a close-up of the Union forces:


They had five units of infantry, a unit of artillery and a unit of cavalry. All were regular, aside from two of the infantry units which are poor. They are led by Nathaniel Banks.

And the here are the Confederates, led by Stonewall Jackson:


They have eight units of infantry and a unit of artillery, all of which are regular.

Across Cedar Run is Cedar Mountain, which is occupied by Confederates:


The infantry are for show - in the actual battle they didn't contribute until right at the very end. The single gun didn't count as a unit, but gave a +1 to any Confederate artillery fire it could support by having the target in range and arc.

And so the battle began ...

Right off I got to use a new(ish) rule I wanted to try out to increase unit survivability - demoralisation.

Basically when a unit is hit you roll a D6 as before, with a +1 if the unit is elite and a -1 if it's poor.

On a 2 or less the unit is destroyed.
On a 3 or 4 it is demoralised and retreats one space (mark it with a counter)
On a 5 or more it retreats one space.

Demoralisation has no effect on a unit, but if a demoralised unit is demoralised again then it is destroyed.

At the beginning of each player's turn, before they move troops, they roll a D6 for each demoralised unit. There is a +1 if a commander is adjacent and a -1 if the unit is in front of an enemy unit.

On a 4 or more the demoralisation marker is removed.

 Basically units are harder to kill outright, but easier to kill by a sustained attack. That's the theory anyway.

With that in mind, the first shot of the game, from the Confederate artillery, demoralised some poor Union infantry:


And so the battle went. Banks led a Union advance on their right, to take the woods before the Confederates did:


The Confederate troops begin to mass:


They lose their first unit to artillery fire ...


... but keep advancing:


The Union left starts to disintegrate under Confederate artillery fire:


Banks gets into position on the right as the first wave of Confederates swarms through the woods:


And the rest of their infantry strengthen the position on the ridge against a Confederate probe:


The probe was driven off by musketry, and the Union boys advance:


On their left the Confederates attack in strength:


Disaster! Banks is shot whilst trying to rally some retreating infantry! The Union are leaderless!


I should say at this point that the demoralisation rules don't apply to commanders - a commander who is hit is killed/captured on a 1-2, otherwise retreats one space.

The Confederates shift troops to their right in order to slow the Union attack there. Note the demoralised Confederates hiding at the back whilst they are rallied:


Bayard's Union cavalry is outflanked and routed before it can mount up and ride to safety:


With Banks gone there is nothing to hold the Union forces together, and they retire to the ridge, exhausted and demoralised.


The actual battle was fought in the late afternoon/early evening, so I decided to put a time-limit of six turns on my refight. The final picture is the position at the end of those six turns - the Union are down to three units, whilst the Confederates are still viable, having only suffered a loss of two units. The refight was a fairly decisive Confederate victory.

The new terrain played well and didn't hinder the game, whilst the alternative hit rule kept units in the fight longer, whilst adding the decision of what to do with demoralised units - withdraw them until they rally, or risk them being hit and destroyed. I shall try it out in some more games.

Portable Close Combat

I have said a couple of times that I'm not happy with the close combat rules in the Portable Wargame, and was trying to come up with an alternative.

Well, I think I have something I'm happy with, or at least which will provide a base to work from. It uses the same 'to hit' mechanisms as the rest of the game, so scores in the area of being easy to use, and I think it gives reasonable and fair results, within the overall limits imposed by the nature of the Portable Wargame itself. It does assume that, in the Portable Wargame, units in adjacent squares shoot at each other normally, and that close combat is an extra option initiated after firing takes place.

The only proviso I will make is that were written for use in my ACW games; they would almost certainly need a little modification for other eras and conflicts.

So ...

Portable Close Combat - Alternative Version

The phasing player (the Attacker) can initiate close combat with any unit which has an enemy (Defender)  unit to its front, except:

 - Artillery may not initiate close combat.
 - Infantry or dismounted cavalry may not initiate close combat with mounted cavalry.
 - Unaccompanied commanders cannot initiate close combat

A defending unit can have more than one close combat initiated against it. An attacking unit can only initiate close combat against one unit.

Resolve each combat in turn. The units involved roll to hit one opposing unit. A defending unit must roll to hit the unit to its front if there is one, otherwise it can roll to hit any attacking unit.

An unaccompanied commander is automatically hit if close combat is initiated against him.

The order in which units roll to hit is as follows:

 - A unit attacking the defender's flank or rear
 - Defending infantry, artillery or dismounted cavalry
 - Any attacking unit
 - Defending cavalry

If more than one unit is in a given level of priority then the owner decides which one rolls to hit first.

A hit is scored on a 5 or 6. Apply the following modifiers to the roll:

-1 to attacker's roll is defender is in cover or favourable terrain (uphill, behind works or in other cover)
+1 if commander is in square or adjacent.
+1 if attacking enemy flank or rear
-1 if enemy unit attacking own flank or rear.
+1 if cavalry in open terrain rolling to hit unit with no cover/favourable ground bonus.
+1 if artillery fighting to its front
+1 if opponent is artillery

If a hit is scored then resolve it immediately.

If the defending unit retreats or is destroyed then the attacker may choose to advance into the square they occupied. They do not initiate another close combat after this, though.

The aim is to give a frontally assaulted defender an edge (bearing in mind that the attacking units get to shoot after movement but before they initiate combat). Artillery is dangerous to attack frontally, but vulnerable if the attacker isn't driven back. Flanks are very vulnerable. Cavalry are good in open ground, especially against a flank, or against opposing cavalry.

The wording certainly needs simplifying (I'm certain that some of the statements are redundant), but I think there's a germ of an idea there.

Example 1

A regular Union infantry unit is facing a poor Confederate one. The Confederates are behind hasty works, and the Union have a commander behind them:


It is the Union's turn. They fire at the Confederates, needing a 5 or more to hit (they get +1 for the commander and -1 for the Confederates being in cover. They roll a '3' and miss.

The Union player now initiates close combat - the Union boys fix bayonets and charge!

The defending Confederate infantry rolls to hit first. They need a basic 5+ to hit. They roll a '4' and miss.

The attacking Union infantry now rolls. They need a basic 5+ to hit, but get +1 for the commander and -1 for the defender being in cover. They roll a '5' - a hit!


The Confederate player rolls the effect of the hit - being poor troops a -14 will see them routed, whilst a 5-6 is a retreat. They roll a '6', and fall back one square. The Union player advances into the works, and the combat ends.


Example 2

It is the Confederate player's turn. They have advanced three regular infantry units adjacent to a Union line. They have also hit the flank of the line with a unit of mounted cavalry, and one of the infantry units has a commander in the square behind it. The Union line, from left to right in the picture, consists of a mounted cavalry unit, an infantry unit, an artillery unit and finally some dismounted cavalry. They are all regular.


The Confederates fire, and miss. They now move onto close combats.

The Confederate cavalry initiate a close combat with the flank of the dismounted Union cavalry.

The left-most Confederate infantry cannot initiate close combat with the mounted cavalry to its front. The other two Confederate infantry units can initiate close combat with the Union infantry and artillery.

Each combat is resolved in turn.

Starting from the Confederate left, infantry face infantry. The defending Union roll to hit first, needing a 5 or 6 to hit; there are no modifiers. They roll a '5' and score a hit. The Confederates roll the effect - a '1' means their unit is routed. The attack fails.


Next in line a Confederate infantry unit faces Union artillery. The defending artillery fires first. The basic roll to hit is 5 or more, but defending artillery with an enemy to the front gets a +1, so a 4 or more will hit. They roll a '1' and fail to halt the Confederate advance. Now the Confederates roll. They need a basic 5+, but get +1 for the commander in their rear and also a +1 for rolling to hit artillery. A '4' is a hit. The artillery rolls to see what effect the hit has. A '6' means that they retreat. The Confederate infantry can choose to occupy their position, and do so.


Finally the Confederate cavalry attack on the flank of the dismounted Union cavalry is resolved. Units attacking a flank or rear roll to hit first. The Confederates need a basic 5+ to hit, but get +1 for attacking a flank and another +1 for being cavalry in the open - a 3+ will hit. They roll a '4' and the Union troops take a hit. They roll a '1' for the effect, take to their horses and flee the field. the Confederates move to occupy their square.


If, in the final combat, the Confederate cavalry had rolled a '1' or '2' their attack would have missed. The dismounted Union cavalry would have then made a roll to hit, needing a basic 5+, but with a -1 because they are being attacked in the flank or rear.

Example 3

This Union infantry is in trouble. It is being attacked frontally by a Confederate infantry unit with an attached commander, and in the flank by a dismounted cavalry unit. It is, however, in a wood.


Once again we will assume the Confederate firing has no effect.

The Confederates initiate close combat with both of their units. The order in which rolls to hit are made is: Confederate dismounted cavalry, the Union infantry, the Confederate infantry. the Union infantry must attempt to roll to hit the Confederates to its front.

So, first the Confederate cavalry rolls. They need a basic 5+, get +1 for attacking a flank, but a -1 because the Union troops are in cover. They roll a '2' and miss.


Now the Union troops fight. Their basic 5+ is modified with a -1 because an enemy is attacking their flank or rear; it's something of a distraction. But they come good and roll a '6'! Both the Confederate infantry and the commander must roll for the effect of the hit. I treat commanders as elite units. The infantry roll a '5' and retreat one square. The commander is less fortunate - he rolls a '1 and is killed or captured. The combat is over. On the Union player's turn the infantry will turn to face the cavalry to their flank, will shoot at it and can choose to initiate close combat against it.


I hope that these examples help. Comments and questions are, of course, welcome.

Related Posts Plugin for WordPress, Blogger...