Friday 31 January 2020

Dwarves vs Uruk Hai

Fired up by last night's game of Challengers Of The Great Beyond I got out my Battlesworn warands this evening so that I could try some of the ideas in the new game.

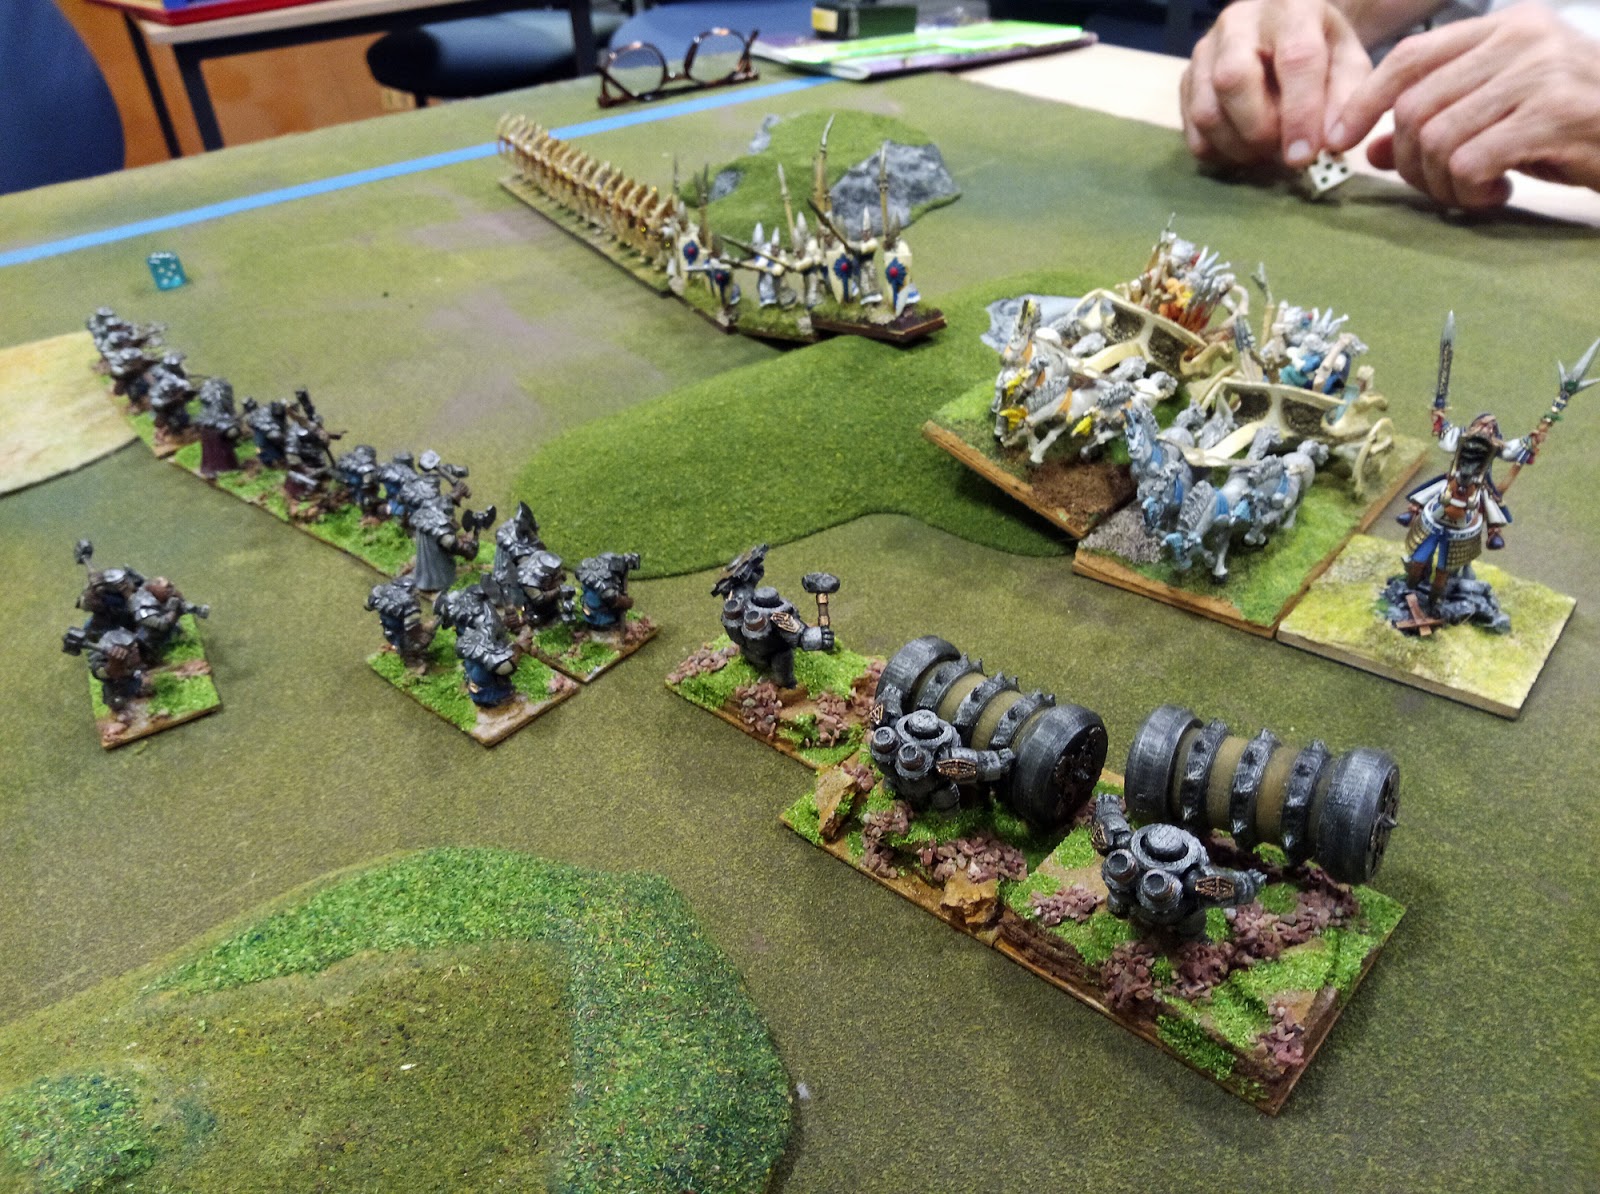
I set up Dwarves vs Uruk Hai; no spells or particularly unusual troop-types on either side.

I used the card-based initiative, with special events happening on a drawn initiative check lifted straight from COTGB. In addition after setting the terrain I rolled for a random scenario, lifting some of the 'plotlines' from COTGB as scenarios, as well as the two from the book plus a straight head-to-head fight. Inevitably I got the straight fight.

I used a method of dicing for figure setup I've used before; roll a D6 for each side and whichever side rolled the lowest had to set up that many figures in their half of the field. You keep rolling until one side has placed all their figures, at which point the other player places what they have left. The first player to position figures is counted as the defender.

The terrain was a ruined city, and the bulk of the forces faced off along a street. The Uruk Hai had some powerful crossbows (Arquebusiers) whilst the Dwarves had their troops covered by a rock-throwing machine (Sniper/Tank). All of the buildings an rubble offered cover, but only high buildings blocked line of sight beyond them.


An initial exchange of fire saw one of the crossbow users wounded, but a lucky shot seriously wounding the Dwarven leader. This was another change - Leaders no longer took a slot, and both sides automatically got one. They had the same ability to alter one combat roll each turn, but only the active player could use it. However if the leader was lost then the side had to randomly draw their initiative card. In fact this was what I was doing for the NPC side (the Uruk Hai) anyway.

As the crossbows were slowly reloaded the Uruk Hai charged - I used a simple Yes/No die roll to make general decisions for them, but tried to play them as sensibly as possible. Their fierce warriors (Brutes) charged the armoured Dwarves (Tanks).


Fighting was fierce and bloody. For combat resolution I used the system from Knight and Knaves - I chose my bid and then used the tables in the booklet to generate my opponent's bid.


The fighting was really bloody, and occupied most of the game. I was forced to bring up my ordinary warriors to support the armoured troops, who despite their strong defences were suffering badly from the sheer power of the Uruk Hai attacks. Sadly Dwarves were falling faster than Uruk Hai.


A lull in the fighting as the survivors eyed each other up. Both crossbows were primed and ready to fire, but they couldn't get a shot on the wounded Dwarf leader, who continued to inspire his troops as well as he could.


A final attack - the Uruk Hai berserker charged the Dwarven leader, but was intercepted by a brave warrior. The berserker simply beheaded him with one swing of his sword.


That was the last turn of the fight, however, and the last casualty was enough to break the Dwarven warband, putting it on more dead figures than alive.


I had two drawn initiative bids. One resulted in the Uruk Hai being able to reload their crossbows, whilst the other allowed the Dwarves to charge in some supports without reactions from their opponent. They are neat responses and a lot better than the options in the current Battlesworn books.

Anyway, the game back to me pretty well, and I hope to get a chance to try some more skirmishes over the weekend.

Challengers Of The Great Beyond

Victor came down to The Gong last night, and brought a new game he is currently developing, Challengers Of The Great Beyond (COTGB), which is a sci-fi version of the Battlesworn fantasy skirmish rules from Ganesha Games. It uses much the same core mechanisms in terms of bidding for initiative and resolution of combat, but has some fundamental differences as well. The biggest change is that as well as characters you can also purchase squads, which are basically multi-figure characters. Squads lose figures rather than move through the coloured wound statuses and there are a few other differences in the way they perform in combat.

All classes are either squads or characters, and each one comes with its own set of special rules. There is no 'basic type' like the Fighter in Battlesworn. Costs are more granular - rather than each type costing one 'slot', you get 16 slots to spend on your force, with squads and characters costing between 2 and 5 of those slots. You must spend at least half of your slots on squads. Squad types cover, but are not limited to, such things as Redshirts (numerous but very vulnerable in close-combat), Star Marines (basic competent combat infantry) and Starport Thugs (undisciplined but handy in a brawl). Characters can be such things as Space Rangers (think Flash Gordon or Dan Dare), Pirates (with a Han Solo variant called the Maverick that always gets to shoot first) and, of course, the obligatory Psi-Knights. Psychic powers are the equivalent of Battlesworn's spells, but are resolved slightly differently.

Anyway, we set up a straight fight, using 15mm figures selected from Victor's collection. He went for a force of competent Star Marines with four-figure squads, backed up by a heroic Space Ranger and a powerful Juggernaut. I opted for a force of Redhsirts (in six-figure squads), led by a Sergeant (which operates as a single-figure Star Marine in game terms) and supported by a hover-bike and a squad of Armoured Marines (upgraded Star Marines in quality armour and equipped with jetpacks).

The volcano in the centre was simply impassable terrain, but when we rolled for a battlefield complication (an optional rule) we got a random meteor shower, which we rationalised as the volcano actually erupting.


You can see playing-cards on the table; COTGB uses a hand of cards for determining initiative rather than players bidding using dice. Basically each player gets a hand of cards consisting of two each of A,2,3,4,5 and 6 (12 cards in total). They choose two of these cards to dispose face-down. Each turn the player chooses one card from their hand face-down as their bid. Obviously you have to plan how you're going to play your cards; use all your low value ones early in the game, and then towards the end you will tend to lose the initiative. The hand of cards limits the game to ten turn, although Victor reckons that most games end in about 5-7 turns anyway.


A squad in action, shooting at Victor's Juggernaut.


Squad vs Squad.


This squad of Armoured Marines only consists of three figures, but they are pretty dangerous.


Redshirts are pretty dire in close combat. so Victor quickly got stuck in with pistols and bayonets.


A lone Star Marine, the only survivor of his squad, fights my Sergeant.


Victor's troops tore through my Redshirts, and my force broke in four or five turns. Really I needed to have set them up in cover where I could shoot down his troops before he could close, and also have made more use of my Sergeant's ability to give units a free 'follow me' type action.

There's still plenty of work to be done on COTGB, but the core mechanisms and concepts seem sound, and it certainly improves on Battlesworn in terms of 'crunch' whilst retaining the key interesting features of the system. Thank you to Victor for bringing it along for us to play.

Monday 27 January 2020

More Trench Clearing

I reran the German attack on a British trench last night. This time it didn't go anywhere near as well for the Germans.

Their only approaches through the wire were on their left, and they had little cover on their baseline. As before the LMGs set up in shellholes and behind an undulation in order to lay down covering fire.


The main attack was through the wire on the left.


The Germans quickly approached the trench.


However the British sallied out of their bunker, destroying the Germans advancing through the shell-holes in front of them. The other German rifle squad got into the trenches, however, and drove them back.


At this point the British reinforcements arrived. The British rifle-grenadiers moved into the communication trench in order to support them. To the right of the picture can be seen an HMG, marking the point from which the off-table fire will originate.


On the far left the German grenadiers prepared to sweep round to assault the pillbox. They did this but were driven back. For a few turns both sides eyed each other warily and fired trying to suppress the other, whilst consolidating their own forces. The momentum was going out of the German attack.


The HMG pinned one of the German LMGs, and fire from the pillbox forced the German rifle group to shelter in a bunker.


Fire from the Lewis in the bunker destroyed the German grenadier group too. At that point I called the game. The Germans were never going to take the British positions.


So this time the Germans failed badly. The lack of cover made a difference, but some of it was simply the wild swings of fortune this game can offer.

Saturday 25 January 2020

Trench Clearing

This is another one of the 'training' scenarios from 'Stout Hearts and Iron Troopers', based around a German platoon clearing a trench of British defenders after an initial bombardment. I adapted it for Trench Hammer. It's played on a 2' x 2' board.

The Germans have two rifle squads, two LMG squads and a bomber squad, with one leader and a sergeant.

The British defenders have a standard platoon - rifle squad, LMG squad, rifle-grenade squad and bombers, with a leader. The bombers and the leader start off-table as reinforcements, the LMG in a concrete bunker in the centre and the other two squads sheltering in bunkers in the front-line trench.

The Germans are attacking as the barrage lifts.

The terrain consists of single trench line, with a communication trench heading off towards the British baseline. There are eight 3" wire sections across the front of the trench and about 4" from it. At the start of the game the Germans can dice for each one; it is removed on a 5-6.

I placed shell-holes and low rises placed at random.

The British units suffer effects of pre-game bombardment as per the rules.

Owing to their confused state, the British only roll 1D6 for command. They can move units or set aside command points for reinforcements. Before rolling command dice they can spend these banked command points, rolling a D6 against them. On a score equal to or less than the banked points the reinforcements appear, at one of the three points where the trenches leave the board.The original scenario has rules for off-table HMG fire, but I didn't work out how to resolve that. I think in future I'd have it appearing as some kind of auto-reinforcement with the LOS being measured from one of the three points where trenches leave the board (these also being the three possible entry points for the British reinforcements as well), firing as an HMG at long range but perhaps only scoring 1D3 damage - annoying rather than deadly.

Anyway, here's the game set up and ready to go. I put the British bases on for the look of it, but really they're hidden in the bunkers/pillbox.

The Germans had some craters on their baseline, so deployed the two LMG squads there, with orders to take the pillbox under fire and keep it suppressed, or provide supporting fire for the other squads. The other squads aimed for the British bunker on their left; the rifle squads were to deal with the trench, whilst the bombers, led by the sergeant, were to swing round, flank the pillbox and assault it.


The Germans moved rapidly, and their riflemen quickly entered the trench before the British emerged from their bunker. The bombers followed close behind. The other riflemen moved through a gap in the wire in front of the pillbox. Suppressive fire from the German LMGs wasn't enough to stop the British from spraying them with fire, and they fell back to regroup.


The British came out of their bunker and fighting broke out along the trench. The British retreated.


The Germans consolidated their position, and the bombers got themselves in a position to move in on the pillbox.


They attacked, but were driven back, but with light casualties only.


Alerted by the firing the British reinforcements arrived, rushing down the trench to assault the Germans. The fight was fierce and the Germans fell back, but the British suffered badly and lost their officer as well.


The Germans attacked the pillbox again, and destroyed the squad inside, taking the defences.


German and British troops face off along the trench.


The supporting fire from the LMG was starting to tell now, inflicting steady casualties on the British. The bombers were soon dispersed.


The British tried to consolidate their position, with a rifle squad grabbing the junction with their communication trench, and the rifle grenadiers finding the range of the supporting LMG. But the German platoon commander was directing the fire of his support weapons, and kept them in the fight.


The Germans attacked again, attempting to take the junction, but both assaults were thrown back.


However the Germans had the advantage of numbers, and kept up a relentless series of attacks, whilst allowing squads to recover. The British had no such luxury, and were soon defeated.


Their surviving squad - the rifle-grenades - retreated back down the trenches.


The Germans took hits, but didn't lose any squads, as they had the numbers and initiative to be able to pull units out of the fight to recover.

To be fair this was a closer fight than it looked; The Germans did take hits, and a couple more casualties could have seen units lost at key moments, maybe handing the initiative to the British. But on the whole a careful German plan should win this each time.


Friday 24 January 2020

HOTT 52 - Week 4 - Dwarves vs Elves

For this weeks HOTT 52 game I switched to 25mm, and played against Geoff. We had two games. I used my Dwarves in both, whilst he used Dark Elves in the first and High Elves in the second.

Geoff defended in the first game. Both our armies had a core of blades with some shooters. Geoff's were supported by warband and a hero, with a magician general. I had artillery and a hero.


Initial approaches.


On the flank I lost a a shooter, which opened up a gap in my line, exposing my artillery. Geoff charged the gun with his archers and destroyed it.


This allowed Geoff to roll up my line. My blades put up a great fight against their opposite numbers, but blade vs blade is always a hard slog, and I had no way of exploiting any advantages I gained.


Geoff polished off enough of my elements to get a win. He lost nothing.


In the second game Geoff switched to High Elves; lots of spears and shooters, some knight chariots and a hero. I swapped my artillery and an accompanying lurker, for a couple of knights (the dwarves with the spiked rollers)


Our respective heroes and the knights fought each other on my right, and I gained the upper hand, destroying both chariots.


Leaving the knights to keep the Elven hero amused I turned my hero on the flank of their spear line, and attacked with the blades.


The Dwarven crossbows were outnumbered two to one by Elven archers, but put up a great fight. mostly due to the Elves attacking in a rather scattered formation, preventing them from concentrating their fire. The Dwarves even scored a kill.


The spears were driven back, and one element was lost on the flank.


The Dwarven rollers squished the Elf hero to give the Dwarves a win.


One game each seemed a fair way to end the evening.

Tuesday 21 January 2020

Back To Trench Hammer

On Sunday I went to see '1917'. I don't plan to do a review, beyond saying that I thoroughly enjoyed it. I was on the edge of my seat for the whole time, and so invested in the story that I was in tears at the end.

There's little in the way of gameable actions in it (I think a variant of 'Four Against Darkness' would be the best option, strangely enough), but it inspired me to get Trench Hammer and my paper WW1 squads out again. I was pondering what to play, and fishing around on the 'net for scenarios, when in some of the early Trench Hammer reports I noted that the rules were tested using variants of scenarios from a Two Fat Lardies book, Stout Hearts and Iron Troopers. So I ought it. And what  great bok it is. It has 14 historical actions in it, all designed for their Mud and Blood rules, but easily translated to Trench Hammer. There are also six scenarios based on contemporary training exercises, four from Allied manuals and two from German. In fact the basic scenarios in Trench Hammer itself are based on these. Finally there is a short but excellent essay on small unit tactics on the Western Front, with the issues covered being explained in more detail as 'solutions' to the training scenarios.

Although I've identified a couple of scenarios I'd like to try, I thought I'd reacquaint myself with the game using the basic attack on a strongpoint scenario from Trench Hammer (which is also the first training scenario in the TFL book anyway).

I set up two German rifle squads plus an HMG in some trenches. The British were assaulting with a standard platoon: one each of a rifle squad, LMG squad, bomber squad and grenade launcher squad. Both sides had one leader. I randomised the terrain. A low rise covered the British approach on the right, and a few shell-holes offered cover near their baseline, but the Germans had chosen a good position with clear fields of fire otherwise.


I based my attack on the 'solution' in the book. The bombers would come in from behind the hill, and assault the trench, supported by the rifle grenadiers. The LMG squad would lay down covering fire from cover. And the rifle squad would work around the flank to make a final bayonet attack.

The LMG squad got into immediate trouble, losing the exchange of fire with the German HMG. With the dead and wounded mounting, the squad took cover in some shellholes and was quickly out of the fight.


The bomber squad rushed over the hill, and assaulted the HMG. In a fierce fight both sides took damage, but the HMG was forced to fall back and the British entered the trench between the two rifle squads.


A poor activation roll saw the Germans wrong-footed, and only a rifle-squad responded to the British infiltration of their position. Their platoon commander led them in a counter-attack, but was immediately cut down. Another fierce close-quarters battle ensued ...


... and the battered bombers were forced to retreat.


The British rifle squad shot down the survivors of the German HMG team as they struggled to bring their weapon back into the fight. The German rifle squad was also damaged, and the British squad took it under fire to try and capitalise on their misfortune. But the Germans were in good cover, and casualties were light.


Sheltering behind the crest of the hill the bombers tried to regroup, with the British platoon commander assisting. But sustained fire from the German trench saw them scattered.


The Germans got the measure of the British rifle squad, and forced that out of the fight as well.


This left the British with just their rifle grenadiers, firing from the cover of some shell-holes. They kept up a steady fire as the Germans fired back, encouraged by the platoon commander, and eliminated one enemy rifle squad. This left the Germans with one squad as well. But it had rallied and recovered, and the British didn't have a line of fire on it. I decided that they'd withdraw, having knocked out the HMG. With most of their platoon lost this was a very sensible option.


When I've played this before I've had the defenders in just shell craters, which makes them a less difficult target. Against trenches I think the attackers need at least one more squad.

In addition to playing the game, I started making some basic barbed wire sections, using thin brown card and a silver pen.


Related Posts Plugin for WordPress, Blogger...