Saturday 25 June 2016

Forgotten Heroes - Jenny Everywhere - Part 4

The painting of Jenny Everywhere is completed.


I confess to a small conceit; the outfit is based on one of mine, except I gave Jenny a sturdy jacket rather than the cardigan. And she has the scarf and goggles, of course:


Of course it now means that I can cosplay as one of my own figures.

I wasn't sure what to do about her right hand. She appears to be holding a small device of some kind, which didn't become apparent until she was mostly painted. I did consider converting it to something else - specifically a slice of toast, as a love of toast is one of the character's defining features apparently - but I discovered that the had is a little too fragile for even the small amount of cutting and filing such a change would entail at this stage. Yes, her arm fell off, and had to be glued back on.

In the end I just painted the small device in silver and left it at that. It can be whatever you want it to be.

I spray varnished her, and then chopped her off her base. As you can see the base is hollow; whilst you can opt to print a figure such that it is entirely solid, generally it's not worth the effort. In this case it was a double-edged sword, as the figure's being hollow is what made the arm difficult to modify, but it also meant that removing the base was a doddle.


And here she is glued to her perspex base.


Jenny Everywhere - Completed


So that's me done for Forgotten Heroes, since I can't seem myself doing another figure in the five days which remain of this month. Thank you to all those who have encouraged me and said nice things about my efforts. As I said at the outset, painting and modelling aren't my thing at all, and I prefer gaming to actually generating the toys and scenery. But I have enjoyed putting these two figures together, and will almost certainly give it another go next year, if only because there was a completely stupid idea I had for this year which I'd love to implement.

Forgotten Heroes 2016 - Captain UK and Jenny Everywhere


"The character of Jenny Everywhere is available for use by anyone, with only one condition: This paragraph must be included in any publication involving Jenny Everywhere, that others might use this property as they wish. All rights reversed."

Saga Team-Up

We got Saga out again on Thursday, but this time we played a scenario where two forces were allied against the other two for the whole game, rater than the chaotic alliances of the previous game.

We chose the alliances randomly, and so it was that I, playing the Welsh (again), found myself teamed up with the Normans, under John P. Meanwhile Caesar took Vikings and was teamed with Gary, playing the Jomsvikings.

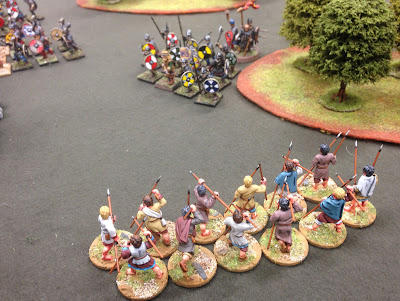
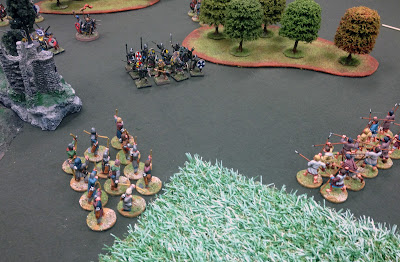
This was our setup. As the Welsh I was happy to sit in rough terrain with my javelins, tempting and taunting enemy units into range and then throwing things at them and running away. John mixed some of his Normans in with my troops, which led to a little bit of a traffic jam.


On the other side, the Viking Alliance were heavily weighted to their right flank, which was opposite very little of our forces.


With a lot of Vikings opposing them, John pulled his Norman horse over to our right. This set the pace of what we thought might be a short, and rather uninteresting game, as our side ran away (or 'redeployed') and the Vikings tried to catch us.


Here's a shot of the whole field, showing the Vikings towards the top, and the Norman/Welsh Union at the bottom.


However we hadn't really got how the Jomsvikings work. They can force us to either lose troops, or give them Wrath points. The latter can be spent to move our units in a way of the Jomsviking's choice. Not wanting to lose troops - even the expendable levy - we conceded those points, and found to our disadvantage just how useful they are. Our troops, in their carefully prepared positions, soon found themselves moving to meet the oncoming Vikings, including this unit of rather vulnerable looking levy.


And the Norman cavalry, who were stuck with no choice but to charge the oncoming Vikings with very little in the way of support. They didn't last long; an unlucky combat on one side saw one unit wiped out with virtually no loss to the enemy, whereas the other unit inflicted casualties but was then routed by Viking trickery. And that was pretty much it for the alliance's cavalry.


I started working the Welsh board as best I could, showering the advancing Vikings with javelins, then running away when they tried to advance to combat. This led to the Vikings edging forward into and arrow/javelin kill-zone.


Some sturdier Welsh warriors joined the fight. They were also armed with javelins.


The Vikings finally brought the Welsh to battle. However casualties from missile weapons meant that the Welsh could bring their Strength in Numbers ability to bear. They lost the fight, but it was close and casualties were heavy on both sides. But the Welsh were happy to trade levy for warriors.


This is the last photo of the game, as my phone ran out of juice afterwards. Some Welsh hearthguard were drawn out of cover and attacked by Vikings and ended up getting wiped out.


At the end of that combat the Vikings were ahead on pints, and had just enough to claim a victory. However some more accurate javelin-throwing saw more Viking casualties, which evened things up to them having a mere winning draw. A final charge by the Norman warlord against a group of isolated Jomsvikings could have tipped the result either way, but in fact whilst the Vikings were totally destroyed, the warlord succumbed to his wounds immediately afterwards, leading to no change in the relative scores.

So the Vikings could claim a winning draw in what finally proved, in the second half, to be a tense and interesting game. I'm still not a great fan of Saga, with the Jomsvikings' ability very much being an example of how the things you can do with your board don't seem to directly represent anything on the table; they just seem to be able to magically make enemy figures disappear, or mind-control them, and I can't equate that to any kind of 'real life' capability. That said I find most of the Welsh board fairly logical, with their abilities relating to use of terrain, numbers and missiles.

Thanks to Gary and Caesar for putting on the game, and for John as well for adding in his toys.

Ralph and Brian played Flames of War 40K, with burning tanks ...


... and helicopters with snakes on.


DakkaDakkaDakka!


Wednesday 22 June 2016

Forgotten Heroes - Jenny Everywhere - Part 3

Here's Jenny Everywhere with an undercoat. It very nicely brings together all of the plastic and putty into a whole; I'm pleased with the result.


Well, fairly pleased. Putting her next to some Heroclix figures I can see my choice of base figure was less inspired than I thought. Whilst she is about right in terms of height, the fact that she was scaled up from an 18mm figure has left her with a head that's bigger than those of a Heroclix. Maybe when she's painted it will be less obvious though.


If you look closely at the rear-view above you can see that the back of her skirt and one of her legs looks wet. That's some wood glue drying, since there were still a few rough patches needed smoothing out.

And so to the painting and the initial blocks of colour. Blue dress, yellow tights and a brown jacket matched with the shoes. 


She's looking good so far. More painting - indeed the rest of the painting - in the next part.

Tuesday 21 June 2016

Forgotten Heroes - Jenny Everywhere - Part 2

It's been a few days since I've had a chance to sit down with Jenny Everywhere and actually progress her. On Friday I painted the blue plastic with grey paint in order to see what I was working with better. At various spare moments this weekend I scraped and cut with a modelling knife to tidy the figure up. This is the result:


The print process does leave a very rough figure (my printer is cheap and nasty and doesn't do the ultra fine resolution of the ones that, say, Shapeways use), but I did my best. Some of the rough edges would be hidden by any clothing I model onto her, and, as I discovered with my Captain UK conversion, I can work wonders with partially dried wood glue.

The next stage was to decide on clothing. The figure is already modelled with what appear to be high-heel ankle-boots, so I was happy to work with those. The two items required by the character's description were the flying goggles on the head, and a pilot's scarf. Both of these were really the last items which to be added, 

There was a piece at the back of the figure which looked like a very, very short skirt, so I decided to build on that and give her a short skirt and a jacket, both things I thought would be within my modelling capabilities. It took about an hour of teasing putty into place, but I got there in the end, and there was just enough left over to do the scarf and goggles.


To be honest I'm not totally happy with how she looks now, but I'm hoping that once the putty hardens I can shave and file it a bit to tidy things up. And then there's always the wood glue. and if the worst come to the worst I can hide stuff with paint. The goggles came out OK though.

Monday 20 June 2016

Supanova and Clobberin' Time!

I was stupidly busy this weekend, with Supanova on Saturday and the Waterloo refight on the Sunday. But I did find time to pull together the various notes I'd been making regarding changes to the current draft edition of Clobberin' Time.

Some of the changes have been tested and, I'll freely admit, some of them haven't. But I have been excited to discover, in recent weeks, at least two other people playing these rules, and they have suggested ideas which I thought were worth introducing into rules and putting out there for further testing and discussion.

Draft 0.3 of Clobberin' Time is now available on my FREE STUFF page. In it you will find improved rules for lifting and throwing, new rules for knockback, optional rules for making use of the Jokers in activation and for engaging multiple targets and a number of new abilities - Boost, Regeneration, Tactics, Heavy and more. Get into that phone-booth, ditch your everyday identity and fight some villains. It's Clobberin' Time!

I mentioned Supanova above as well. Catherine and I had a grand day out there on Saturday, but I ended up taking no photos aside from our own cosplay.

Here's Catherine as Fireball XL5's Dr Venus:


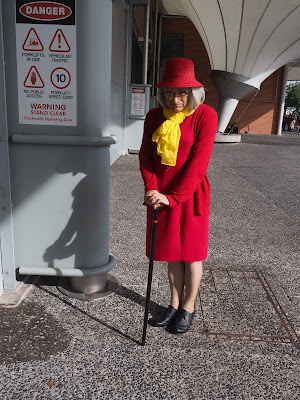
And here I am as Crack Comics' 1940, Madam Fatal - Maybe a sweet little old lady ...


Possibly a daring crimefighter ...


But definitely a dedicated transvestite!


Now we've got to start thinking about costumes for next year.

Sunday 19 June 2016

Blucher At Waterloo

Is there a better way to spend a wet and windy Sunday than refighting the Battle of Waterloo? Opinions on that might differ, but it's certainly worth trying. So that's what we did today.

The aim was to refight the whole battle using Blucher - I think we've done a portion of it before, but this was the megalomaniac's version.

The availability of our usual venue at the University was in doubt, owing to rooms being randomly locked during exam season even if previously booked, but fortunately Peter was able to arrange for us to use the function room at a local surf lifesaving club.


So it was that we gamed with this as the view from the window.


Waterloo obviously needs a decent-sized table. We played with one long table covering the ridge on which the Allied army was deployed, plus a separate smaller table for the area around Plancenoit. It was assumed that units wouldn't move between tables. The space between them represented the French rear area, and a lot of their Corps started here, moving onto the appropriate table as they were activated.

Here's a view of the tables from the west, with Hougoumont in the foreground.


The Allied commanders confer. Victory was about securing a number of objectives - Hougoumont, La Haye Sainte, Plancenoit and the two hamlets of Papelotte and La Haie to the east. Destroyed units would act as a tie-break. The Allies held all of the objectives at the start of the game, bar Plancenoit.


My command; Reille's Corps, with Hougoumont as its target. My orders were to seize the chateau with a bold, direct attack, then form up beyond it and pin the Allied in in that sector, whilst Kellerman's cavalry came up to turn the Allied right.


Caesar took D'Erlons Corps, with orders to capture Papelotte and La Haie.


The attack on Hougoumont. Gary was commanding the Allies in that sector, and decided that the position was untenable after the first attack went in. Rather than reinforce he chose to concede the objective to the French, and withdrew the defenders.


In the centre the Guard were deployed to assault La Haye Sainte


The British cavalry came off the ridge and threatened the flank of D'Erlon's Corps. The French reserve cavalry moved to counter it.


Caesar launched a brisk assault on the hamlets, and took them.


Allied light cavalry had come down off the ridge between La Haye Sainte and Hougoumont. The remaining French Reserve cavalry was deployed to that area in order to drive them off and then cover the flanks of both the Guard and Reille's Corps. Observant readers will see that this was a change from the original flank-move plan, brought about mostly because Reille  was suffering from inertia and wasn't moving from his position around Hougoumont.

In the centre the Guard took La Haye Sainte. All objectives were in the hands of the French now.


A view along the battlefield from the west.


Caesar's attack on Papelotte.


Meanwhile Lobau had been assigned the defence of Plancenoit.


And now things got exciting! It turned out that that cloud of dust to the east wasn't Grouchy's troops arriving to assist the French but was, in fact, a ton of Prussians under the very man after whom the rules were named. Much to Caesar's consternation it turned out that the Prussians weren't in fact allies of the French, and that we couldn't (as on of his pre-battle plans had required) use them to garrison Plancenoit.

Anyway, lots of Prussians appeared.


Lots.


Caesar formed a thin blue line in order to resist them


The British cavalry formed up behind the French line, ready to make a tasty D'Erlon sandwich.


The French cavalry under Kellerman formed up closer to La Haye Sainte in order to cover against an Allied recapture. With all objectives under French control, all we had to do was hold them until nightfall.


More Prussians! These attacked Plancenoit, but Lobau held them off for the whole of the rest of the game.


The focus of interest was this one small corner of the filed, as the Prussians moved towards La Haie.


But the view out of the window is worth seeing too.


John gives his Prussians a Hard Stare.


Napoleon himself steps in to organise the French right and prevent the recapture of the hamlets.


Another overview of the battlefield, showing Reille's troops still milling around Hougoumont.


In the centre the Allies had come off the ridge and were advancing towards the Guard around La Haye Sainte. Kellerman's cavalry was ordered to support the Guard by threatening the advancing infantry.


The British cavalry charged Caesar's cavalry.


A spectacular cavalry melee ensued ...


... in which the French came off worse.


Plancenoit. Still in French hands.


Kellerman's cavalry forced the advancing Allied infantry in the centre into square.


 Formation commanding from Wellington and his aides.


Reille. His progress past Hougoumont was glacial.


The end of the Allied line in the centre was made up of conscript troops, Even in square they were vulnerable, so The Guard cavalry was ordered to charge. The fight was inconclusive.


The French right was now a mess, with dispersed units battling Prussians on one side and British cavalry on the other.


La Haie fell to the Prussians.


However in the centre a stalemate saw La Haye Sainte still in French hands.


And at that point night fell. Most of the objectives were in French hands still, and whilst the Allies and Prussians now had the upper hand in the battle, current casualties were about even. The French had won a victory, although how long their hold on their gains would remain was a matter of some discussion.

This is a scenario we need to try again, as it was felt that there were a few flaws with how victory points were gained, and with the deployments. A slight change to the way initiative was rolled was deemed a success, however, giving each Corps a single dice which could be merged for multiple formations under one player. This sped up play greatly, as there was not MO allocation by committee to deal with.

Thanks to Ralph for organising the scenario and Peter for organising the venue. Many people provided figures. I just turned up and played.

Related Posts Plugin for WordPress, Blogger...