Friday 30 June 2017

Lion Rampant

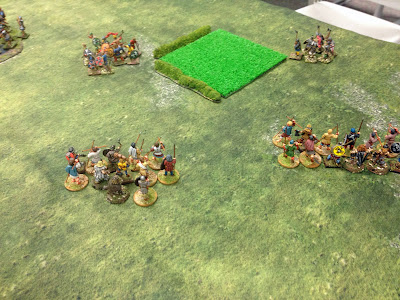
Last night we played a four-player game of Lion Rampant, two players a side. Each of us selected a 24 point retinue from the figures available, which were mostly from Saga warbands, and we played the basic pitched battle scenario. As fate would have it, Gary and Daniel both went for English knights, and faced each other, whilst Caesar and I went for wild Islemen and also ended up opposite each other.


Here's my retinue: a unit of archers, two lots of fierce warriors and two small groups of armoured Islemen.


My commander, with his wild axe-wielding bodyguard.


Because this was a straight, head-to-head fight, we also each made a boast, as this would affect how the game played and create useful tie-break points at the end. Daniel vowed to destroy more enemy units than he lost, Gary vowed to destroy Daniels elite knights, I psyched my warriors up with the boast that we would destroy two enemy units in one turn, and Caesar's commander decided that he would not draw his sword during the battle.


The boasts did affect how we played. I tried to position my warriors such that I could do a wild rush at two of his units in the same turn, hoping to break them both, especially after I had softened them up with archery from the cover of the woods on my flank. Caesar played a more cautious game, keeping his units positioned such that his leader was protected from being attacked.


My plan was hampered by my failing activation rolls to launch both of the attacks I needed to make. But eventually we got stuck into the fighting. One of Caesar's warrior units attacked my Islemen nobles, but despite their numbers they cam off worse and routed.


On the other flank the two English forces fought their own battle, with knights charging and counter-charging.


After a promising start, Daniel's force was badly mauled, and eventually Gary made good his boast, destroying Daniel's leader and his elite knights.


Back to the Islemen. Caesar kept avoiding combats, I kept trying to initiate them.


Two units of warriors met in the middle, and there was much slaughter.


Gary polished off the last of Daniel's units. Daniel was nowhere near to making good his boast, which was a point lost for our side.


I whittled down Caesar's units, but only managed one each turn; we were both too dispersed for me to make the concerted effort needed for a double kill. Eventually we ended up with Caesar's battle-shy leader sheltering behind the remains of Gary's retinue.


Meanwhile I had the scattered remnants of my nobles, flanked by archers on one side and some warriors on the other. My only option was to try and defeat Gary's bowmen with my own. It was a 50/50 fight, and I lost. Daniel and I conceded the game at that point.


The actual battle losses were about even, but neither Daniel or I had made good our commanders' boasts, so we both lost honour. Gary and Caesar, however, both achieved their goals, picking up five points, so despite the even losses, Gary and Caesar won a decisive victory.

The game itself was great fun, but the boasts really added an extra dimension to it, leading to all four of us planning our tactics around achieving the various goals. Whilst optional, they are well worth including in any game.

Thanks to Daniel for being organised, and Caesar, Gary and Daniel for providing the figures.

Monday 26 June 2017

Forgotten Heroes - Jessica Jones

In terms of the Forgotten Heroes project this is a little bit of a cheat, since I actually started this figure back in February. But it had sat at a very early stage of progress for months, and I decided to finish it as my second figure for the challenge. I think I'm allowed, since I've already done one original figure this month.

Jessica Jones (played by Krysten Ritter) is a cynical, hard-bitten New York private investigator, who also happens to have super-strength. As the series progresses we learn that she has a traumatic past, linked to a particularly powerful, deadly and amoral superbeing, Kilgrave, played by David Tennant.

I'm only familiar with the Jessica Jones from the TV series; here appearance in comics was well after my time. So this is the look I was basing it on:


A pretty straightforward look, really.

As a base figure I used the 3D-printed Alexandra Pryce figure I used for Jenny Everywhere last year, although I used the 28mm version this time.


I didn't get any pictures of the initial work I did on the figure, but it involved:

(i) Trimming off all of the sci-fi clothing detail.
(ii) Cutting off her bun.
(iii) Using milliput to make a jacket, boots and some new hair

All straightforward stuff.

The finished result was this:


The painting was easy. I chose not to remove the figure from its original base, and mount it on clear perspex, because of the work I'd had to do on her boots. I also trimmed back her hair to giver her a higher forehead.

Here's the finished Jessica.


I'm pretty happy with how she has turned out, although with hindsight I would have liked to have modelled her scarf as well, so the figure fitted my cosplay for Supanova. There's still scope for giving her a camera as well.

But that's me done with Forgotten Heroes for 2017. See you all next year.


Sunday 25 June 2017

Six By Six Machinas

Machinas is the one game on my Six By Six Challenge list that I've yet to play, So I decided to fit in a game before the end of June, so I would reach the halfway mark with at least one game of each of my selections played.

Since it was part of the challenge I decided to run a Six By Six race - six vehicles running for six laps.

Here they are:

Bulls On Parade (Yellow/Brown) - An excavator bolted to the back of a utility truck. Not something you want to get into close contact with, but a bit slow.
Pigs On The Wing (Red) - A meaty engine and a rear-firing gun.
Dreamline (Brown) - A ram-car.
Stay On These Roads (Green) - Another powerful engine, crammed into a nippy rat-rod.
The Fountain of Lamneth (Yellow) - A huge rocket pod mounted on a car.
A Farewell To Kings (White) - A decent gun in an otherwise unremarkable car.


I decided to run A Farewell To Kings, with the others being played by the NPC rules. Here they are on the starting-line.


And they're off! Fountain of Lamenth raced into the lead, the two cars with decent engines dropped in behind, and the rest of us brought up the rear. I opted for my usual strategy; sit back, build up dice and try to deal with one opposing car each lap.


NPCs have no patience, and Pigs On The Wing and Stay On These Roads raced ahead.


The mighty digger-toting ute also forged ahead, and had a go at the tiny Stay On These Roads. But it evaded the attack.


Fountain Of Lamneth was now back in fourth place. I moved up to pass, but decided to try out my gun. The yellow car was heavily damaged.


There was a lot of jostling for position at the front. This was the position at the end of the first lap.


Bulls On Parade had a go at Pigs On The Wing, but was damaged by the rear gun.


I closed up on the damaged ute, and fires another burst from my machine-gun ...


... and destroyed it. Fountain Of Lamneth had to swerve to avoid the wreck.


With no gun it's danger had been somewhat neutralised, but the driver boldly tried to bash me off the track, to no avail.


I closed up on the rat-rod, which was holding a fairly safe lead.


Meanwhile Fountain Of Lamneth fell foul of Dreamline ...


... and was smashed out of the race.


I was now jostling for the lead on the final bend of the second lap.


Into the third lap, I was in second place. The idea of being stuck between the red car's tail gun and the brown car's ram didn't appeal.


Into the first bend of the third lap, and I was able to take the lead; the powerful engines of the green and red cars were less use to them on the turns, where driver skill counted for more.


Pigs On The Wing tried to run Stay On These Roads off the road.


Dreamline now worked up on the outside


The driver of Stay On These Roads was having real trouble with his brakes; twice his vehicle lost ground as they locked up, including this incident where he locked bumpers with Pigs On The Wing.


However he found his mojo again, and raced back into the lead.


Into the fourth lap, and I'd been relegated to third place, in that position I didn't want to be in.


I made another run for the lead. My car had a couple of traits which allowed me to pick up extra bonus dice, even when I wasn't drafting another car, so I reasoned that if I could get in front at this later stage I might be able to hold the position. But to be safe, whilst I passed Pigs On The Wing, I decided to shoot at Stay On These Roads. My shots were on target, and the vehicle was badly damaged.


This move put me into second place, but I lost the position soon afterwards And Dreamline was quick to exploit my discomfort, smashing me out of the race.


At the end of the fourth lap, Stay On These Roads fell foul of the red car's rear gun. The green car flipped, and its wreck landed on Dreamline, who smashed through it with little difficulty.


And so as the race entered its fifth lap, there were only two cars left running. Pigs On The Wing was out in front, and unbeatable on a straight.


But on the first bend, Dreamline saw its chance, and moved in fast with its massive ram-plate ...


CRASH!


The winner. With a lap still left to go.


It was an exciting race, even if it didn't go to the finish. The only real problem is the the NPC cars don't really play a long game, something 'live' players would do in a race of this length. This is really a race where you build up your bonus dice resources as much as possible. I may have to make some adjustments to the AI in order to cover this, although it does mean extra die-rolling and slowing the game down. Having cars of different sizes racing each other didn't seem to be an issue, and cars were eliminated both by bashing and by gunfire, which was good.

My next job is to collate all of the notes on the extensive changes I've made to the game over the last couple of years.

6x6 - Game 4.1

Saturday 24 June 2017

Battle Cry - Glorieta

Fired up by my ACW game on Thursday, I found a Battle Cry scenario I'd downloaded years ago on my hard-drive and decided to give it a try this afternoon. It's for Glorieta, one of the actions fought during the New Mexico campaign of 1862, and therefore within my favoured Trans-Mississippi theatre.

Here it is:


I ran it solo, using a Battle Cry variant of the rules I tried out HERE. The rules for each player turn were:

Draw one card.

Roll D6 equal to Command Cards - 1
+1 Dice if you played a Scout card last turn
-1 Dice for each Fight Back card you currently hold.

Each 5 or 6 gives you an extra card draw. Choose one card to play. Discard the rest.

If you choose Fight Back as your card, keep it to one side, then play the top card from the deck (regardless of what it is, but discarding it and drawing again if it is another Fight Back). When a side has at least one Fight Back card, and it is possible for them to play it, you decide if they will or not. However roll a combat die. If the die is a Star, then your decision is reversed. So if you choose not to play it, but roll a Star, then it is actually played. If you choose to play it and roll a Star, then it isn't played. So long as a side has a Fight Back card, they roll one less dice per card when determining how many cards they draw (see above).

The rules worked pretty smoothly, and gave a couple of good games. The first was something of a walkover for the Confederates; they got good rolls for cards, rolled some excellent combat dice and beat the Union by six flags to two. Their artillery in the centre proved especially effective.

In the second game the Union put up a better fight, and the Confederate advance was less organised. The Confederates managed to push up to the ranch, and almost took it, but a counter move by the Union saw them driven off. towards the end both sides were rolling sets of combats that could have won them the game, but the Confederates just managed to pull off a victory, five medals to three.

I took photos during both games, but not really with a view to writing a report, so they're posted here just to give an idea of how the games looked. Here's the scenario set up.


I used my 6mm figures. I have enough bases to substitute for the original plastic figures one-to-one, but I wanted to see how the game would look with a lower density of bases


I used two bases for each unit, and small stones to mark hits.


This meant that units didn't completely fill the hex, so there's room for terrain pieces as well, if I decide to go down that route at a later date.


I don't think that the look of the game suffered with the lower figured density, and the markers were unobtrusive and no problem to use.


I did consider two guns for each artillery unit, but decided that they looked nicer with a gun and limber.


I'll try some of the larger scenarios with this setup, and see how they look.


Related Posts Plugin for WordPress, Blogger...