Monday 28 September 2015

Machinas For MOAB

As well as the regular gladiator games we've run for the last couple of years, Victor and I are hoping to run some Machinas at MOAB this year. Previously we've run Charioteer, but really neither of us have any visually impressive chariots yet, so we abandoned it for this year. It was Victor who suggested Machinas as an alternative.

I am thinking of running a simple road-chase setup, rather than a race, as thanks to Mad Max this is a familiar scenario to most. This evening I tried out a few combinations of vehicles to get a feel for what might and might not work,  So here's a few pictures.

The games saw the debut of my bikes. They really are a bit small compared to most of the cars, but they'll do.


This game saw my hobo roadster hold off a bike and car until they both gave up the chase. There was plenty of ineffective gunfire, however.


A second game saw my school bus hold off a succession of vehicles. The first two aren't pictured - a buggy and the flamethrower-toting Plymouth Fury. The latter got in a couple of good shots on the bus, scoring no actual damage because of the vehicle's heavy armour, but wearing down its bonus dice. Both vehicles quit the chase, but luck wasn't with the bus, as other vehicles joined in. Including the mighty armoured excavator.


I reasoned that dropping back was the best option for the bus - being behind the excavator was safer than being in front of it. But I didn't pull off the maneuver, and the big digger swung across for the kill. With no bonus dice left I didn't stand a chance. The two massive vehicles smashed together ...


... the bus flipped ...


... and it was game over. I didn't even get the satisfaction of landing on the bike (a one in three chance).


Mind you, I like to think that motorcyclist had to pull over in order to change his underwear afterwards.

My plan is to let interested players play the pursued vehicle, with the game's AI (or my version of it) running the pursuers. But the AI still has a few wrinkles in it, which I need to work out over the next couple of days. However I have a basic setup ready, and that's what's important.

Sunday 27 September 2015

Titan

The other day I turned up yet another gladiator figure in one of my boxes of bits - a dwarf retiarius. So I painted him. He's called Titan.

Here he is facing the mighty Mongo.


And here he's fighting the previously nameless scissor gladiator, who is now called Mordax.


Telamonius was a tricky opponent, with lots of armour and a nasty arbelas.


Finally Titan defends a pons against Artemisia and Marpesia.


Saturday 26 September 2015

Maurice: French Revolutionary and Early Napoleonic Wars

These notes were put together by Caesar Anderson

Aim: To play Napoleonics using the Maurice rules with minimum meddling to the core rules or resorting to house rules. Therefore, the proposed tweaks only restrict army composition and introduce a combination of existing advanced rules to achieve a more fluid battle and balance of arms, true to Napoleonic warfare.

To represent the greater mobility and dependence on dense formations for assault and counter-cavalry manoeuvres, all nationalities have the National Advantages of Cadence and En Masse. Specific nations have additional National Advantages as follows:

Austrian - Cavaliers
British – Lethal Volleys, Steady (only nation allowed over 30pts of National Advantages)
French – A la Baionnette, Skirmishers
Prussian – Lethal Volleys, Professional Train (horse artillery)
Russian – Artillery Academy, Rally

To reflect the greater shock impact of cavalry on the battlefield, infantry and cavalry quality is re-jigged such that there is no elite infantry and a maximum of two trained infantry per army (representing grenadiers or guards in this period). The attacking side is entitled to another trained infantry unit for free (see p.22 “Mercenaries” or in this case a battalion of grenadiers hastily brought up from reserve). All other infantry is conscript or irregular. There is no restriction on the quality of regular cavalry (the average is trained). All armies must contain more infantry than cavalry and the principle arm rule applies (infantry cannot exceed cavalry by more than 3 to 1).

A couple of advanced rules are adopted to provide armies with the more dynamic command and artillery appropriate to this era:

DYO Cards – Shuffle the three DYO cards into the deck. Each DYO card is played as a “Coordinated” event card, allowing two forces within 12BW of the CinC to march or rally in a single round.

Light Artillery – Artillery units may be included in an infantry force to march (including for the purpose of removing smoke from previous bombardments) or rally.

SAMPLE FRENCH ARMY
2 Trained Regular Infantry (Consular Guard) @ 12 pts
4 Conscript Regular Infantry (Line) @ 16 pts
3 Irregular Infantry (Legere) @ 9 pts
1 Elite Regular Cavalry (Cuirassiers) @ 8 pts
2 Trained Regular Cavalry (Dragoons) @ 12 pts
1 Irregular Cavalry (Chasseurs รก Cheval) @ 3 pts
4 Artillery @ 10 pts
National Advantages: 30 pts
Total: 100 points     Army Morale: 13

SAMPLE AUSTRIAN ARMY
2 Trained Regular Infantry (Consolidated Grenadiers) @ 12 pts
4 Conscript Regular Infantry (Line) @ 16 pts
2 Irregular Infantry (Grenzer) @ 6 pts
2 Elite Regular Cavalry (Cuirassiers) @ 17 pts
2 Trained Regular Cavalry (Dragoons) @ 12 pts
2 Irregular Cavalry (Hussars) @ 6 pts
4 Artillery @ 10 pts
National Advantages: 21 pts
Total: 100 points     Army Morale: 14
  
SAMPLE BRITISH ARMY
2 Trained Regular Infantry (Foot Guard) @ 12 pts
5 Conscript Regular Infantry (Line) @ 20 pts
1 Irregular Infantry (Light Infantry) @ 3 pts
1 Elite Regular Cavalry (Horse Guard) @ 8 pts
2 Trained Regular Cavalry (Dragoons) @ 12 pts
2 Irregular Cavalry (Light Dragoons/Spanish Guerrillas) @ 6 pts
3 Artillery @ 6 pts
National Advantages: 33 pts

Total: 100 points     Army Morale: 13

Maurice Marengo

General Blofeld
"Spectre does not tolerate failure!"
Last night we tried a bit of an experiment - playing a straight early Napoleonic battle using Maurice. We tried this a couple of years ago, when we refought Boxtel with these rules, but for that we used them unmodified. This time we played with some minor - very minor - adjustments to the rules and the way the game was set up.

Caesar and Ralph put the whole thing together, using their gorgeous collection of 25mm figures. Caesar selected Marengo as a battle to try. Uncharacteristically Ralph chose to play the Austrians, which led to a lot of confusion as to which side the rest of us are on; normally if Ralph is opposing you in a battle you're fighting the French.

I think I will post Caesar's rules adjustments in a separate post and just get on with the battle report in this one. Update: The rule changes/adjustments can be found HERE.

This was the briefing:

The scenario for this week finds us fighting the War of the Second Coalition on the morning of 14th June 1800, in the opening stages of the Battle of Marengo. The Austrian commander Melas has aggressively pushed an advanced guard across the Bormida River from the northern Italian city of Allessandria and caught Napoleon unawares. Fortunately for the French, Victor’s command hastily responds to form a rear guard along the Fontanone River, to give the strung out French army time to consolidate against the threat.

Here's the table. It's quite small, given the number of units we had and that fact that a Base Width (the unit of measurement in Maurice) was 2". It meant we got stuck into the action pretty quickly though.

The French would be on the right, defending the building/town, and the Austrian would approach from the left. The trees are garnish.


The French.


The Austrians.


We played two players a side, but with one hand of cards. These were my troops; the French light infantry, supported by some light cavalry. In Maurice terms these were irregulars.


Caesar had the bulk of our troops; the infantry and cavalry. Opposing them was Dave, with the Austrian cavalry.


Ralph had the Austrian infantry.


Ralph also had the Austrian light troops, who opened the battle with an attack on their French counterparts. The French got the worse of the initial firefight, despite their superior range, but when the Austrians charged home The French held firm and saw them off with considerable loss.


Unfortunately the Austrian lights were followed by the main Austrian force. Most of the French light troops melted before them, but when the Austrian advance halted one unit kept up a steady, and sometimes effective, fire on them.


The Austrians did look rather splendid, though.


On the other flank the Austrian cavalry prepared to attack.


It charged the French. In this battle the Austrians have an edge in terms of both quality and quantity of cavalry.


Caesar used the cavalry action as cover to withdraw our infantry, moving it from the left over to the right where it could face the Austrian foot. But the action ended more quickly than we thought, with the French cavalry defeated, and left the rear of the retiring French exposed.


Some of the infantry was turned to cover the movement of the others


The Austrians charged, but the French held. In this game the massed formation represents squares to some extent.


At that point, with both sides really only a couple of units from breaking, we had to call time. It was still a close game, so could be considered a draw.

Whilst purists could probably point to a whole raft of things that aren't correct for a game set in this period, we felt that it ran pretty well and gave the right feel. It certainly looked spectacular and actually rattled along at a good pace as well. It's certainly something we'll try again.


Friday 25 September 2015

The A-Z of Me

I picked this meme up from HeroPress and, because of the effects of the question for 'D' it seemed like a great idea. I shall regret this tomorrow,

So here I go...

A - Age: 51

B - Biggest Fear: Dogs

C - Current Time: 9pm AEST

D - Drink You Last Had: A rather nice Merlot. Lots of it.

E - Easiest Person To Talk To: Myself

F - Favorite Song: Oh, come on. Who has one favourite song? Or keeps the same one for more than a week or so?

But this was what first sprang to mind. Stick it out to the end. It's worth it.


Without wanting to sound morbid, I want this song played at my funeral.

G - Ghosts, Are They Real?: No.

H - Hometown: Birmingham

I - In Love With: Catherine. And Honeysuckle Weeks, Nigella Lawson and The Scarlet Witch.

J - Jealous Of: Crossdressers thirty years younger than me, who live in a society tolerant enough that they can be themselves and look bloody amazing..

K - Killed Someone? Not that I know of.

L - Last Time You Cried? At a recent service commemorating victims of suicide.

M - Middle Name... : Not any more.

N - Number Of Siblings: Two.

O - One Wish... : More wishes?

P - Person Who You Last Called: I can't remember. I make very few phone calls. I texted my wife today though.

Q - Question You're Always Asked: Why?

R - Reason To Smile: Cats

S - Song Last Sang: I don't sing. But I do dad-dance.

T - Time You Woke Up: 6am

U - Underwear Colour: Today? White.

V - Vacation Destination: Mad Max country - Broken Hill!

W - Worst Habit: That I'm willing to admit to on a public forum? Nail-biting.

X - X-Rays: Not too many. Most recent were my wisdom teeth, and my ankle when I hurt it falling off a skateboard about six years ago.

Y - Your Favorite Food: Meat pie.

Z - Zodiac Sign: Taurus/Dragon. Apparently.

And here's some more Sigur Ros:


Wednesday 23 September 2015

Gladiator Showcase - 1

Whilst I had all my gladiators out of their boxes I started taking pictures of small groups of them. And kept going. These pictures represent about half of my collection. I'll do the other half another day.

I'm slowly working through the figures making the shields look a little more colourful by painting abstract designs on them.

The figures are a mix from Gladiator (as was), Copplestone, Foundry, Shadowforge, Castaway and West Wind.

Longer-term readers of this blog will know that, a couple of years ago, I went through an exercise in which I named all of my gladiators. Each one has a little label on the underside of their base. The names are a mix of real gladiator names, some conjectural and a few flights of fancy.

Silvana, Melanippe, Toxaris

Spiculus, Cupido, Pugnax

Sartornilus, Culex, Murranus

Rufina, Vita, Andromache

Telamonius, Cygnus, Velintinus

Medusa, Marpesia, Artemisia

Priscus, Bregans, Syphax

Mongo, Severus, Crixus

Mordax, Ombos, Hero

Hilarus, Lucius, Aurius

Amazon, Lenia, Fabia

Alumnus, Scylax, Sabrata

Herminia, Helena, Hippolyte

Monday 21 September 2015

Preparing For MOAB

MOAB is happening in less than two weeks. As well as playing in the HOTT competition on the Monday (for which I still have some elements to prepare), Victor and I are running some gladiator games on the Saturday. These will focus mostly on 'Munera Sine Missione', so I thought that I'd better give it a whirl this evening in order to remind myself how to play it. In addition we have thrown a few rules changes around in the last year, and I hadn't tried some of them out yet, so this was an opportunity. Don't worry; they're not major changes; they are mostly adjustments to the way some weapons are defined and used.

First two figures out of the box ended up in the arena; the Gaul Bregans, with his big shield and big sword faced the diminuitive Murmillo, Pugnax. Bregans' sword can be used two-handed if he discards his shield, otherwise it is an unwieldy weapon. However it is capable of shattering his opponent's shield.

And that's what happened. The two gladiators exchanged blows, and Bregans got in a good hit and smashed Pugnax's shield. Unfortunately Pugnax then tripped Bregans up, put a sword to his throat and forced him to appeal to the crowd. The crowd loved him, though, and he was spared.


I wasn't trying out skills, so Pugnax just got to fight again as he was, this time against the net-wielding Medusa. She gave him a hard time, entangling him once even, but he grabbed her net and pulled her over twice, wounded her more than once and soon had her down and appealing for mercy. She got it as well.


Finally Pugnax faced Margareites, a simple sword-wielding fellow like himself, but with a smaller shield. They danced around each other for a while, before Pugnax got into his stride and, over the course of a few turns, stripped Margareites of his sword (broken), his shield (kicked out of the way) and his helmet. Margareites had to resort to fists and harsh language ...


... until a fit of agility saw him blind-side Pugnax, retrieve his shield and use it to smash his opponent to the ground to win the fight. What a comeback!


Oh, and the crowd were merciful again.

Playing 'Munera Sine Missione' is like riding a bike; you never really forget.

A few more games over the next couple of days should see me back to where I can run it without thinking too hard. Then I have to sort out some Machinas! to take as well, as we're offering that this year instead of the chariot-racing.

Sunday 20 September 2015

One Hour Wargames - Scenario 15 - Fortified Defence

The next scenario in One Hour Wargames is an unusual one with some major special rules - the fortified defence. One side starts in strong defensive positions; the other must take them. Both sides get the same number of units, and the defenders get bonus weaponry on their defensive positions to make them extra nasty. However the attackers get the option, once per game, of eliminating all of their on-table units and then getting a second wave of units with which to continue the attack. The scenario boils down to the attacking deciding where to commit their first wave, which is pretty much doomed whichever way you look at it, before going for the refit and starting the second attack. Pull the first wave out too early and the second wave will have too tough a job. Leave it in the field too long and the second wave may not have time to take the objectives.

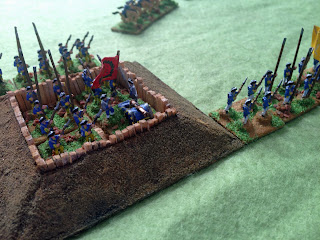
For this scenario I got my Great Northern War troops out again. The original scenario specifies the objectives as town, but readers of this blog will know that I've recently made a couple of redoubts which were, it has to be said, put together with this scenario in mind.

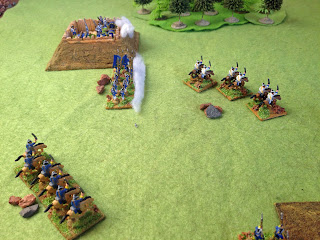
I rolled the forces and the Swedes ended up defending, with four infantry regiments, one cavalry regiment and a battery of artillery. They set up as shown below; infantry in the forward redoubt, and artillery in the further one, each with a unit of infantry in direct support. A regiment of infantry was placed behind the forward redoubt as reinforcements, whilst cavalry covered the gap between them.


The artillery redoubt. The attackers had a lot of ground to cover to reach this one, so the longer range of the artillery would be useful. In addition, if it was ignored it could provide covering fire to the forward redoubt.


The infantry redoubt. The artillery piece in it represents the additional weaponry the scenario specifies. This pretty much fires the same as an infantry unit, making each redoubt a deadly opponent.


The Russians attacked with four regiments of infantry, one of cavalry and one of dragoons. The second wave is the same force; it occurred to me afterwards that it could be interesting to roll for the second wave as a different force, or roll two forces at the beginning of the game and decide which to commit in each wave.

The Russians had a plan - always a good idea. This was to overwhelm the forward redoubt with a massed infantry assault, whilst using the dragoons and cavalry to screen the flanks and try to inflict as much damage on the troops between the redoubts as possible. If a redoubt falls the extra weaponry is lost, so even if it is reinforced it becomes less dangerous. The aim of the plan was to eliminate the garrison of the first redoubt and with it the extra weaponry. This would then give the second wave a chance to take on the reinforcements that were waiting to reoccupy it whilst also attacking the second redoubt.


The Russians charged forward into a hail of musketry and cannon fire.


Their horse moved quickly, heading for the units covering the gap between the redoubts.


The first Russian assault went in ..


... and was repulsed. There is no infantry close combat in these rules; the assault was pushed in close so that the second line of Russian troops would already be in close range if the first line was lost.


The opposing cavalry clashed in the centre, but the Russian dragoons were driven off by heavy fire from the artillery redoubt and its supporting infantry.


The Russian cavalry fell back, and was also driven off by fire from the artillery redoubt. However the Swedish cavalry was far from fresh.


The defenders of the infantry redoubt poured volley after volley into the attacking Russians, driving off another unit. Their supporting infantry also held firm, preventing the Russians from bringing more fire to bear on the defences.


The Russian first wave was faltering now and was down to one active unit.


A final volley saw that off as well.


It was now halfway through the game, and the Russians could throw in their second wave because the first no longer existed. The first wave had failed in its objective, however; the lead redoubt was still occupied by its original defenders, albeit that they were only a couple of hits away from defeat. Their supporting infantry was also wavering. However the reserve unit was still waiting to occupy the redoubt; the Russians had to clear it, then deal with the reserves. In addition they had to take the second redoubt - things were not looking good for them.


Two infantry regiments were assigned to finish the assault on the forward redoubt. Their first volley drove off the supporting infantry, but the defenders of the redoubt itself refused to yield. Meanwhile the Russian horse moved rapidly across the field towards the artillery redoubt.


The Russians had to keep their infantry as intact as they could during the long march to the artillery redoubt. So the cavalry and dragoons were assigned the task of acting as a shield to cover them. Whilst the dragoons headed for the redoubt itself, the cavalry charged the supporting infantry.


The Swedish cavalry counterattacked.


The Russians recoiled, rallied and charged the infantry again, whilst the dragoons attacked the redoubt itself.


Again the Swedish cavalry went in, but the sacrifice of the Russian horse had allowed the Russian infantry to come up intact.


The Russian cavalry fled.


Meanwhile the Swedish garrison in the lead redoubt refused to yield, as the Russians attacked again and again.


Both redoubts were now under attack, but time was running out for the Russians.


The attack on the artillery redoubt was limited by the presence of the supporting infantry and the Swedish cavalry. The latter was eventually driven off.


One of the Russian units attacking the lead redoubt fled ...


... but so did the infantry supporting the artillery redoubt.


The defenders of the lead redoubt finally gave in. But the reserves were ready to replace them. and the Russians didn't have the time to eliminate them as well. Victory had pretty much slipped from their grasp.


The redoubt reoccupied - not as strong as before, but enough to hold off the final attacks of the day.


The demoralised Russians fled at the first volley the defenders fired.


In the last turn of the game, though, the artillery redoubt fell.


The Russians had cleared one of the two redoubts, but had lost the battle.

The Swedes settled into their remaining defences.


This is an epic scenario, with the attackers set to take huge losses trying to take the objectives. Ten of the twelve attacking units were lost, whilst the Swedes lost five of their six defending units. The Swedish victory was due to a stubborn defence of the first redoubt, which lasted far longer than hoped for. The supporting infantry tied up the attacking Russians for longer than expected, and the garrison refused to quit. This was coupled with some good combat rolls early in the game, which saw the initial Russian wave decimated before it could inflict much damage. The second wave of attackers had a tough job on their hands, with their resources stretched too thin to be able to be truly decisive anywhere. The Swedish cavalry was, as ever, very useful, threatening units in the centre and forcing them to turn their attention to driving off charges instead of attacking the defences.

That said, the version of the rules I am using, which has saving rolls for cover rather than a straight halving of casualties, could have seen the defenders losing very badly; a couple of turns of poor saves could have seen them defeated fairly quickly and the Russians in a far stronger position when their second attack went in.

To some extent the Russian's force wasn't the best for the mission they had. The dragoons could have been dismounted, but their firepower isn't as good as that of the infantry. A battery of artillery would have been more useful, allowing the first wave to pick off and weaken defending units from long range. The Swedes, however, really got just the force they needed to mount an effective defence. That's the fun of these scenarios in some respect; the troops you roll each time you play it can have a major influence on how the action plays out and what your options are.

This now sees me halfway through the scenarios in the book.

Follow the rest of the scenario refights HERE
Related Posts Plugin for WordPress, Blogger...