Over on the Portable Wargame Facebook Group, Martin Smith has been posting occasional reports of games using my ECW rules. Yesterday he posted a refight of the Battle of Alton, and I was taken with it enough to give it a go myself this afternoon.
I took his scenario, but made a few minor changes (described below). We both derived our scenarios from the one described on the Solitary Wargamer page, originally written for 'For King & Parliament', so I went back to that, and created a mashup of the two setups.
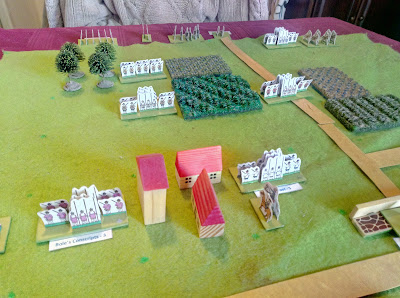
Here's the table laid out, ready to play:
And my scenario notes:
I used the following OOB
Parliament
William Waller - Commander (SP 2)
Haselrig's Lobsters - Trained Horse (SP 3)
Waller's Horse - Trained Horse (SP 3)
Other Horse - Raw Horse (SP 2)
2 x London Trained Bands - Trained Pike & Shot Regiments (SP 4)
Kentish Foot - Veteran Pike & Shot Regiment (SP 5)
Commanded Shot - Trained Shot-only Regiment (SP 4)
Artillery (SP 2)
Total Units = 8 (IV 4)
Total SP = 29 (Breakpoint 15)
Royalists
Colonel Boles - Commander (SP 2)
Crawford's Horse - Veteran Horse (SP 4)
Other Horse - Raw Horse (SP 2)
Bole's Foot - Veteran Pike & Shot Regiment (SP 5)
Bole's Conscripts - Raw Pike & Shot Foot (SP 3)
Oxford Conscripts - Raw Pike & Shot Foot (SP 3)
Artillery (SP 2)
Total Units = 6 (IV 3)
Total SP = 21 (Breakpoint 11)
I followed both of the other scenarios by retaining the Royalist horse, which historically ran off at the first sight of Parliament's approach. Martin gave them three units; I dropped this to two. This was partially because he played his game on a 10 x 10 grid, whilst I used my standard 8 x 8. Both scenarios also give the Royalists some artillery, which doesn't seem to be mentioned in any of the (admittedly few) accounts I've read. I kept it simply because it makes for a better game.
One thing I added were the Royalist defences. Accounts give them some small earthworks, so I allowed the artillery cover along single edge of its square. If I played the scenario again then I'd simply allow one Royalist unit to get this advantage; the foot before the town could make use of it instead.
I changed the rules as written to make the breakpoint based on SP lost rather than full units. Total up the SP, counting the commander as 2SP. Once a side reaches this breakpoint then do the normal test for them breaking.
Here's the setup for Parliament. Some of their units start off-table behind the on-table units. This was also a function of me using an 8 x 8 grid.
The two squares representing Alton proper were an objective. If a side was the last to hold both of them then they get +1 on their break tests. They start the game under the control of the Royalists.
Catherine played the Parliamentarians. Still not used to the rules, she advanced cautiously.
She spread her units into a line, just outside of the Royalist firing range. Colonel Boles moved his conscripts to the cover of some buildings.
The Royalist artillery got in a couple of hits on one of the London Trained Bands, which soon sought shelter in some enclosures.
Some Parliamentarian horse attacked the Oxford Conscripts, who were also sheltering in some enclosures.
The Trained Bands also advanced, and the raw Oxford troops found themselves under increasing pressure.
Fortunately I'd seen this attack developing early on, and had ridden some of Crawford's Horse around the back of Alton. It charged into the rear of the Parliamentarian horse, routing it.
At this point my wife was joined by her sub-commander, Colonel Aloy.
On the other flank Crawford's veteran horse charged Waller's horse.
The main Parliamentarian force continued to be cautious.
On the Royalist right Haselrig's Lobsters had moved from their reserve position, and routed Crawford's Horse.
They then swung to their right, and charged the Oxford Conscripts in the flank, causing them to run as well. This was the end of the Royalist right flank.
On the other flank, Crawford's main force of horse was paying the price for pushing forward unsupported, and was coming under attack from Parliament's commanded shot, as well as Waller's Horse.
Colonel Boles led his conscripts in a counter-attack which drove off the shot, allowing Crawford's Horse to resume its attack on Waller's Horse.
Boles led his troops forward in a bold attack.
Boles Foot abandoned the centre, falling back to garrison Alton Church. This pretty much abandoned their artillery.
The London Trained Bands assaulted the guns, which held them for a round, inflicting a hit, before finally succumbing.
The Trained Bands assaulted the church, but couldn't drive out the Royalists.
Boles' Conscripts had also fallen back into Alton proper, pursued by other troops from the Trained Bands.
They fought bravely, but the Kentish Foot rushed in from the west of the town (courtesy of a special event), and routed them.
Colonel Boles escaped to the church, but Haselrig's Lobsters had cut off their only line of retreat. Under attack from three sides, the beleaguered Royalists called for quarter, and laid down their arms.
Even with the retention of their cavalry, the advantage of cover and some artillery they may not have had on the day, this is a tough one for the Royalists, but it was a great way to spend a Sunday afternoon. My thanks to Martin and The Solitary Wargamer for a great little scenario.


No comments:
Post a Comment