Sunday, 24 May 2020

Hunting the Kaisar Gurita

Local traders in the East Indies had fed the Dutch and Portuguese stories of the Kaisar Gurita, a giant many-tentacled creature that destroyed ships and whose capacious belly contained the remains of the treasure-laden cargoes the ships had been carrying.


Both nations sent a squadron of ships to investigate and kill this creature for the fabulous wealth its carcass would offer them

(Almost certainly the traders were telling them about the treasure on the hope the annoying foreigners would  go after the monster and get destroyed. But that's irrelevant.)

The Dutch sailed in three cromsters, the Java, Reijger and Eendracht.


And the Portuguese were in three carracks, the Santa Amaro, Misericordia and Madre De Deus.


As the ships approached the area in which the Kaisar Gurita lurked, they had to work upwind.


The monster lurked under the surface, avoiding contact with the European ships.


The Dutch turned into the wind and waited for the Kaisar Gurita to surface. Meanwhile the Portuguese struggled to round the island; a small shift in the wind meant that only their lead ship, Santa Amaro, had sea-room to get past. The other two ships had to perform a slow tacking manuever.


The Java fired at the Santa Amaro as it headed between the island and the rocks.


The Santa Amaro headed towards the Dutch, who, despairing of seeing the giant octopus they were hunting, turned to engage.


Behind them the Kaisar Gurita emerged from the water, looking for easy pickings.


The Santa Amaro's course took it between the Reijger and the Eendracht, and it fired a broadside at both, inflicting some damage. Indeed the Eendracht caught fire ...


... and exploded.


With all of the other ships heading away from the Santa Amaro, the Kaisar Gurita saw an easy opportunity, and latched onto the Portuguese vessel.


The crew fought the monster, and inflicted some damage, but took casualties in return.


Meanwhile the Java was discovering that the area they were in wasn't just the domain of the Kaisar Gurita; there was a mighty whirlpool out on the fringes. And in trying to round some rocks in order to bring the fight to the Portuguese the Dutch ship had fallen into its pull.


The Santa Amaro cut free of the Kaisar Gurita, and ran out its guns.


A broadside did no damage, but it did seem to stun the monster, which remained inactive for a while.


The Kaisar Gurita submerged, seemingly unwilling to attack the Portuguese ship again, despite it being badly damaged.

In fact the Santa Amaro managed to get away, and spent the rest of the game repairing, never returning to the action.


The Dutch continued to work towards the two remaining Portuguese ships, which were still floundering downwind from the action.


But the Java was now in trouble. It had been on the edge of the whirpool's influence, but now couldn't turn fast enough ...


... and was sucked in, to be lost with all hands.


The Dutch now just had the Reijger left, and as it shaved past the island it took fire from the Misericordia, losing some rigging.


It returned fire, dismounting the Misericoria's foremast.


Another broadside from the Misericordia damaged the Dutch ship, which struck its colours.


The fighting attracted the Kaisar Gurita, which saw the stricken Dutch ship as a possible kill.


But the Misericordia was also a tempting target, and soon the Portuguese vessel found tentacles wrapping around its hull and remaining rigging.


A desperate struggle ensued, with the monster savaging the Misericordia's crew, whilst they poured fire into its buk, wounding it again and again. The Madre de Deus saw the mighty octopus was striken, and set a course to ram it, but neither ship nor monster took any significant damage.


But now the Kaisar Gurita was fighting two enemy ships. Sensing its weakness it concentrated its attacks on the Misericordia, whose crew soon had enough, and took to the boats. 


But the monster was weak now. It put up a ferocious fight, and soon the Madre de Deus was damaged as well. But eventually the volume of fire, added to swords and axes cutting at its tentacles, was enough to finish the monster.


For the Dutch and Portuguese victory was determined by killing the monster, with some points for destroying or capturing enemy ships. Meanwhile the monster scored some points for destroying enemy ships but also got points simply for surviving a turn. This latter score I found problematic; the Kaisar Gurita could simply submerge every turn for one action, and remain immune to attack. It could then simply pick up points and the Dutch and Portugueses could do nothing. I changed it such that the monster only scored points if it was on the surface at the end of its turn, where it is potentially exposed to attack.

Anyway, on that basis, the Kaisar Gurita scored 9VP, but also picked up 1VP for forcing the Misericordia to strike. This latter was also an issue; the scenario says that the monster only scored points for destroying enemy ships, but the octopus fights by boarding and can't destroy them. I assumed that forcing one to surrender was sufficient. But see below.

The Dutch scored nothing.

The Portuguese got 3VP for destroying or capturing two Dutch ships and, in addition, 10VP for killing the monster (they'd have also got that for driving it off, a possibility via critical hits). So they won the scenario.

The scenario was 'Thar She Blows!' from the original rules. The setup seems very much to favour the monster, who can set the terrain, set up anywhere and then choose the wind direction and starting corners of the opposing forces. As the monster I simply set both flotillas in corners where they were heading into the wind in order to reach the monster's position, safe in the knowledge of being able to pick up points simply whilst watching them have to tack to where it was. In future I'd randomise the monster's position, maybe, and allow the ships choice of wind direction and position in the way most other scenarios do it. I did randomise the terrain setup, which is how the maelstrom worked its way onto the board. I think this is the first time I've lost a ship to one.

I adjusted the ships slightly from the previous scenario in order to even up the forces a little and match points with the monster. The carracks lost the sluggish train, which increased their points value, whilst I dropped yare and master gunner from the Dutch ships, replacing the latter with carronades.

I added two small changes. Firstly I used the 'Jury Rig' rule I mentioned in an earlier post, which allows a ship to spend one action per activation to nullify the effects of one rigging critical. This actually allowed the Misericordia to work upwind to the monster towards the end. I'd need to rename the rule, as 'Jury-Rig' is already a trait in the game. Secondly when pondering how the monster could destroy a ship, I added an 'destroy' option to boarding. A ship or creature that is grappled to an opposing ship which has surrendered via the All At Sea table, or via excess boarding damage or criticals can spend one action to scuttle it. This cuts the grapples for free, and the enemy ship then sinks. To be honest by the end of the scenario I'd decided that forcing the crew of a ship to surrender was enough for the monster.

Saturday, 23 May 2020

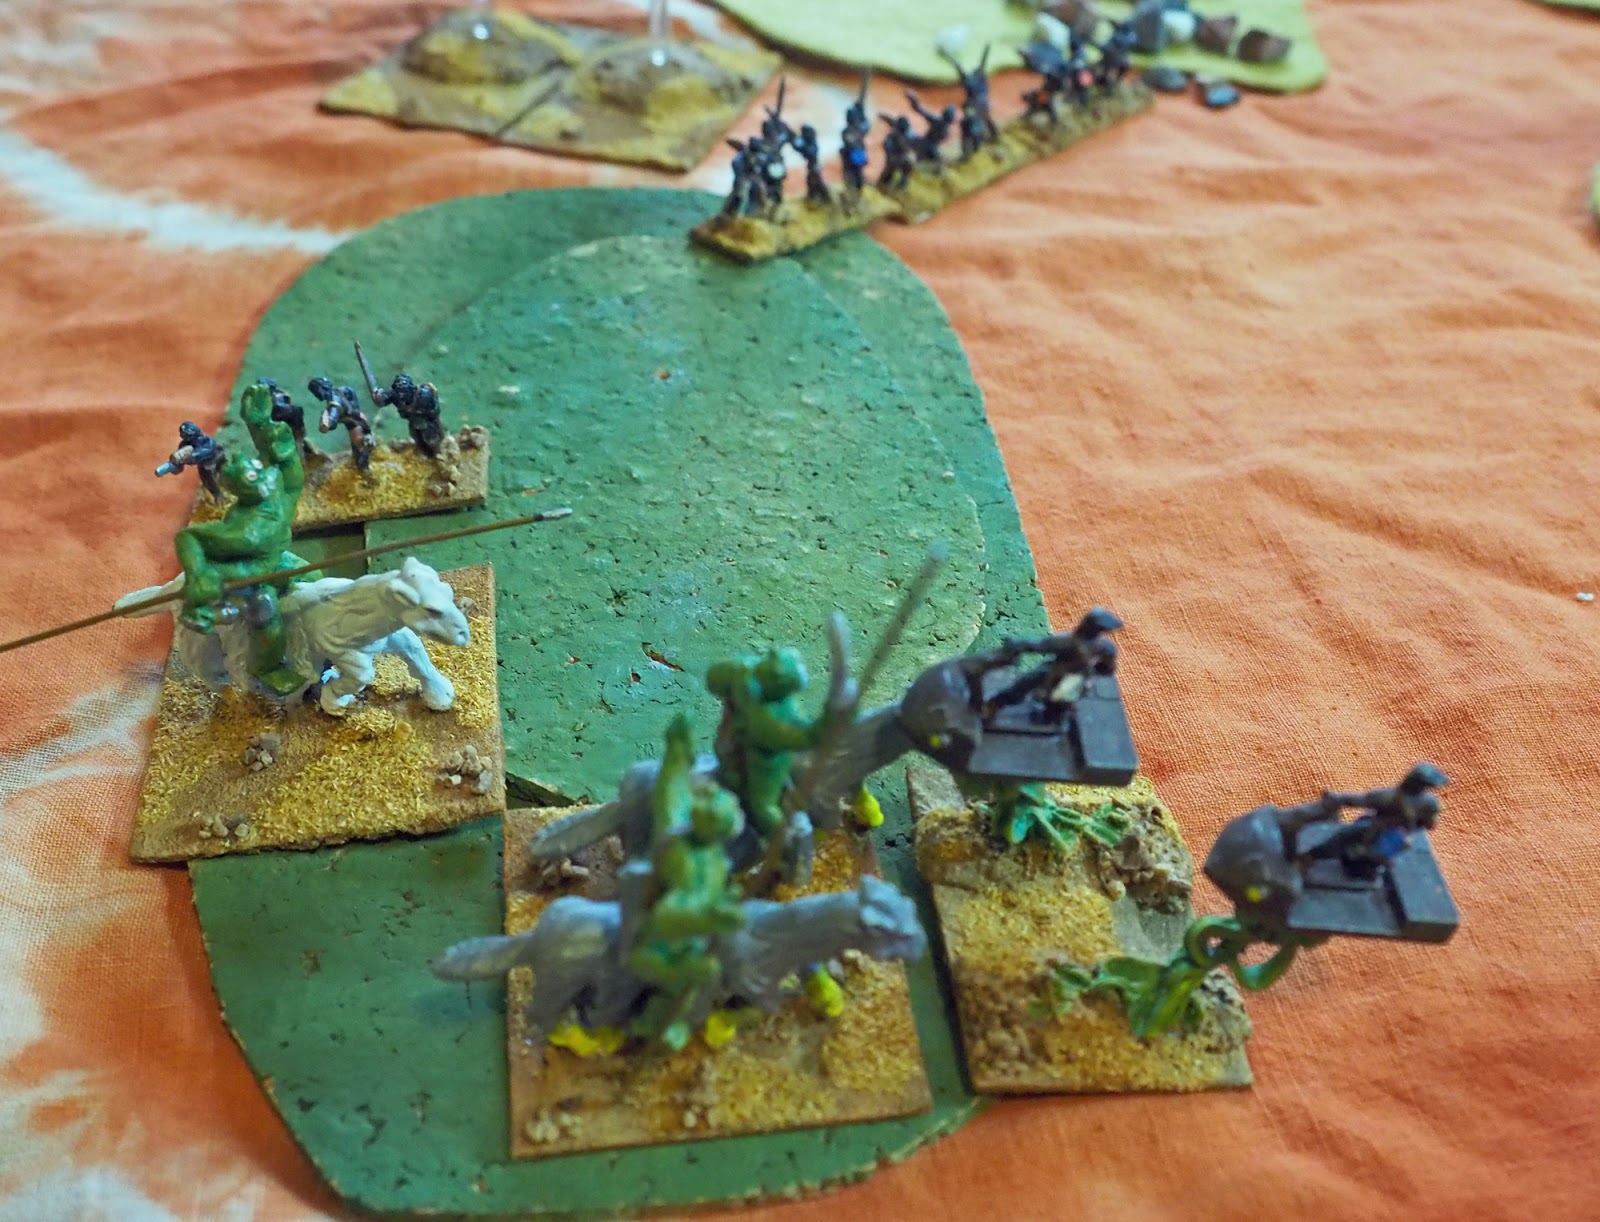
HOTT 52 - Week 21 - Thark vs The Black Pirates

I enjoyed last week's Barsoomian HOTT game enough that I thought it would be fun to try a another one this week. I only have three of my Barsoom armies in my gaming room, so I brought out the one that hadn't seen action last week - the Black Pirates - and, rather than go for the old cliche of pitting them against John Carter and the forces of Helium, I used the Green Martians. This time, though, I used the version in the rules with a hero general - the horde of Thark, led by John Carter's best buddy, Tars Tarkas.

The armies are:

Green Martians - Hero General (Tars Tarkas), 6 x Knights, 4 x Shooters
Black Pirates - 4 x Airboats (including the general), 2 x Flyers, 4 x Blades

The Black Pirates ended up as the defenders. With lots of aerials and facing loads of knights, placing a pile of bad going was always going to be on the cards. And they got lucky with the placement, being able to spread it around the centre of the board. Their aerials could ignore it, whilst the green men of Thark would have to wend their way around it.

The Tharks selected an edge that would have them deploy and move past the bulk of the bad going, and fight the Pirates in the more open terrain beyond. They deployed in two groups. The one on their left was a blocking force, designed to pin down the Pirates on that flank by threatening the stronghold. The second, led by Tars Tarkas himself, was to run down the other flank, where there were fewer aerials, and attack. Being a hero, Tars Tarkas could contact aerial elements, and leave opening for the rest of his army. Both forces were assigned a pair of shooters to cover their flanks.


The Black Pirates had the bulk of their aerials on their right, reasoning that they could swing across the centre as required. Their stronghold was covered by their foot troops.


The Tharks' plan was OK, up to a point. In fact Tars Tarkas was positioned such that there was too large a gap between him and his left flank force, which meant that it would cost extra PIPs to move them. True, they were simply a delaying force, but it would have been useful to have them able to move swiftly if required.


The opening turns saw the Pirates get off to a slow start, whilst the Tharks got a couple of good PIP rolls and were able to advance their whole army. The Pirates swung the bulk of their airboats across the centre to attack the Thark wing containing their general.


As the airboats crossed the board, Green Martian shooters took them under fire, but with no effect.


The shooters covering the Thark right came under direct aerial attack, and took the first casualties of the game - an element was destroyed in the first combat.


But Tars Tarkas and his thoat-riders had now reached the Black Pirates opposing them, and he led the attack, taking on their flyers. They held his first attack, and only recoiled from the second.


Meanwhile the Black Pirates were continuing their attack on the Green Martian foot, who held them off initially ...


... but were soon surrounded and cut down.

Meanwhile the Black Pirate foot closed up on the advancing Tharks.


Even with support Tars Tarkas continued to make heavy weather of the Black Pirate flyers, but eventually destroyed them.


The Black Pirates charged the Tharks ...


... and cut some of them down.


With their forces concentrated on their left the Black Pirate right was inactive, so Tars Tarkas used what command he could to order his troops on that flank to advance, hoping to threaten the stronghold.


Tars Tarkas attacked a Pirate airboat ...


... but was repulsed and, beyond him, more Tharks were destroyed by the Black Pirate foot.


On the Thark left the Pirates had sent in their one airboat, which attacked the flank of the advancing warriors. One group pursued into bad going by the retreating airboat, where they were easily dispatched.


On the other flank flyers and foot reinforced the lone airboat ...


... as Tars Tarkas and his single remaining companion element attacked again.


Held to a draw the mighty green warrior was soon surrounded ...


... but "Leave to a Thark his head and one hand and he may yet conquer. Tars Tarkas destroyed his foe, and survived. Meanwhile his companions drove back the Black Pirate flyers, which fled ...


... leaving the Thark warriors almost at the very gates of the Black Pirate stronghold.


On the other flank the Pirates continued their attack.


But this time the Tharks prevailed, and another airboat fell.


As the remaining Black Pirate airboats closed on the Tars Tarkas, his warriors assaulted the Black Pirate citadel.


They were hold to a draw ...


... and their attack was defeated when the Black Pirate flyers returned to the fray.


Alone against the Pirates, Tars Tarkas shouted defiantly. But his army was broken.


The final positions. The Tharks had another advance on the stronghold developing, but had simply run out of troops.

The Tharks lost 12AP (two shooters and four knights). The Black Pirates lost 8AP (A flyer and two airboats).


This was a fairly close game, with the Pirates seeming advantage in aerials and terrain offset by the fact that the Green Martian troops are still quite difficult to take down with airboats. The Green Martians knights have the advantage that airboats have a relatively low factor against mounted and that, if the airboats recoil, the knights pursue and maintain contact. And Tars Tarkas should have been useful against aerials, although some poor combat results meant that he was less effective than anticipated. I really loved how this game looked, though, with the big airboats and hefty Green Martian figures.

Thursday, 21 May 2020

An Evening in the Spice Islands

1610. The East Indies. It's a Thursday. And here's an enterprising flotilla of Portuguese carracks.


And here's another flotilla, this one of interloping Dutch merchant venturers in cromsters.


And here are three islands, each with a port offering fabulous wealth for those willing to risk the possibility of an unfriendly potentate or some nasty tropical diseases.


Catherine and I played Galleys and Galleons again, running a variant of the Treasure Island scenario from the rules.  In the scenario as written a ship can only send a landing party to an island if it is within short, but that also puts it in the shallows. So either every ship needs to have a shallow draft, or you have to risk running aground in order to achieve the scenario objectives. I this version the port acts as a jetty in Fair Winds and Foul Tides, allowing ships of all drafts to approach. Instead of having to be within short of the island to test for what you get, you must be within medium of the port.

The islands were randomly positioned, and then the ports on each island. We also randomly positioned some rocks and a patch of ship-slowing seaweed.

The ships were lifted straight from the rules - carracks for the Portuguese and cromsters for the Dutch. The Portuguese had more ships, and they are tough, but also slow and not easy to maneuver. The Dutch only had three ships, but they are nippy and can sail close to land.

Basically ships had to approach a port and spend actions to send in a delegation. On a 1-2 something bad happens to it (and the ship). On a 3-4 they achieve nothing. On a 5-6 they acquire treasure. Each side only gets to roll for each port once.

The Santa Amaro sailed up to a port and got a pile of spices - first treasure to the Portuguese.


The Reliquias approached a second port, but weren't able to secure anything except a nasty disease which severely hampered the crew (reducing its quality for the rest of the game).

Once a side gets a treasure the game is played to a six-turn limit, with sides scoring big points for holding on to, or capturing, treasures and a few points for sinking or capturing opposing ships.


The Dutch Reijger gained nothing from the port, but took a few shots at the Santa Amaro as it sailed past.


Things got busy in the centre of the board, as the Portuguese sent two carracks to the final port they needed to visit. The Dutch raced to get there as well.


The Madre De Deus fired at the little Eendracht, damaging her.


The Java picked up a first treasure for the Dutch, evening the scores.


The Reijger suffered damage from the Santo Amaro as it sped past.


Disaster in the centre! The Madres de Deus collided with the Eendracht. The sturdy carrack took no damage, but the Dutch ship was crippled.


The Misericordia did the third and final port visit for the Portuguese, but secured no wealth.


However the Portuguese edged ahead on points when the Madre de Deus sank the Eendracht. Purely for business reasons.


With only two turns left, however, the Dutch arrived at their third port - and acquired a second treasure! And owing to shifts in the wind, all of the Portuguese ships were badly positioned to deal with this sudden change of fortune, being unable to rapidly work upwind to the Dutch ships carrying loot. All bar the Reliquias and its crew of dubious quality. They fired on the Reijger, but with no effect.


All the Dutch had to do now was survive, and they used their agility and shallow drafts to go where the Portuguese couldn't easily follow.


With one turn to go we called the game, since the Portuguese couldn't even get in a long-range shot in order to sink a Dutch ship.

Catherine won 10-6 - she got two treasures whilst I had one and had sunk an enemy ship.

This is a bit of a random scenario with two, very much dependent on the rolls at each island. But there's always a chance - with planning - to take a treasure from another player. In this scenario the Portuguese stand a good chance of holding on to their treasure; the Dutch can't easily damage their ships. But the Dutch have the advantage of maneuver, and were able to put it to good use. Portuguese activation rolls were pretty lucky as well, though. I'm going to try this setup again sometime.

The Underwater Menace

Galleys & Galleons has rules for craft and creatures which can submerge, Not only can they move underwater in their own turn, but they can also stay submerged between turns as well. I thought that it would be nice to have some way of marking this, whilst allowing other models to move over the submerged model's position.

So this was a lunchtime project today - a little bit of photoshop created a submerged version of my 3D-printed giant octopus:


 Astute observers will see that it's a coloured version of the octopus in the levels diagram in 'Fair Winds and Foul Tides', and I merged it with the sea texture I use for bases. I still need to colour the edge.


 Attack!


 Anyway, as a solution it looks OK, so I will look at making some for other things I have that can submerge.


Related Posts Plugin for WordPress, Blogger...