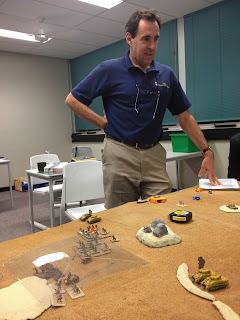
We played a game of Blitzkrieg Commander last night, using 15mm figures and a scenario based on, I think, part of El Alamein. Dug-in Italians, supported by German armour faced an attack from Australians. There was flat desert and tanks aplenty.
My tanks attempt to move into position, but failed command rolls meant that this took some time.
The Commonwealth forces get themselves organisied. Their command rolls were worse than mine, including a number of early blunders.
Australian infantry advances.
My tanks form up behind the cover of a railway line.
One of our more unusual vehicles - an amphibious ... thing.
The British armour pushes towards our lines.
The Germans still attempting to get into position. This tank company had lost a couple of elements to artillery fire.
Some Shermans strayed too close the the active Italian anti-tank guns.
The Italian positions. They suffered a couple of heavy artillery barrages, but just ended up suppressed. They also fought off several air attacks.
At last - the Germans get a proper defence line together. Just as the Commonwealth forces pull back from that particular axis of advance.
Geoff's face says it all; the Australian infantry is wiped out by an artillery barrage. From their own artillery.
At that point, with most of their infantry gone, and the Germans and Italians still in strong positions, the Commonwealth players conceded. Our defence lines were strong, and some good artillery barrages would have been required early on to weaken us. As it was poor command rolls on the part of the Australians kept us safe. The battle was won by the side that made the fewer poor command rolls, in fact.
Thanks to Ralph for putting together the scenario, and to various people for providing figures and terrain.
By the way, we discovered that if you order the print copy of BKCII from Lulu, what you get is a copy of BKCI. At least that's what had happened to two players.


Thanks Alan. I'm sorry if I seem overly defensive about numerous comments about the flatness of the desert, but:
ReplyDelete1. It was generally fairly flat, compared to,say, the Himalayas or Northern Italy,
2. Actually there were 2 official hills in this scenario, Point 29 and Barrell hill, both represented, as well as numerous low sand bluffs.
Whilst of course players get frustrated in being asked to play 'unwinnable' scenarios, thats what you get if you play a historical scenario, and if nothing else, it should leave one with a sense of what those Commonwealth troops achieved!
Actually it wasn't the Commonwealth I was concerned about in terms of the extensive, unblocked lines of sight; it was us :) I think we were lucky not to get the troops we didn't have dug in hammered by artillery for most of the game; we were saved by the poor Commonwealth command rolls.
DeleteMind you, having us hit hard by artillery would have meant us defending with fewer assets, and possibly evened things up for the Commonwealth attack. So maybe it did all pan out OK in the end.
Another thought on the scenario design - if both sides think it's unwinnable from their point of view, you've probably got the design right. The trick is then encouraging them to try and win anyway :)
DeleteFor the record, the scenario was very loosely based around the operations by the 9th(Australian) Division to secure the coast road and railway at the tail end of Operation LIGHTFOOT in late October 1942, as a preliminary to SUPERCHARGE. These actions were characterised by the greatest single concentration of artillery fire in support of a single Brigade so far seen in modern warfare. However historically it was used on the Barrell Hill position, rather than on the troops it was meant to support...
ReplyDeleteJust one question: unless you are planning to cross the Nile, what in the name of all that is holy is that "amphibious thingy" doing in the middle of the Sahara? The whole world wonders....
ReplyDeleteJerry
A/K/A The Celtic Curmudgeon
We were reliably informed by Lt-Col Bryan 'Bushy' Sallans, late 41st Foot and Mouth, who kindly supplied most of the models, that amphibious thingys were considered very 'a la mode' amongst DAK artillery forward observers...
DeleteMind you the good Colonel had a few pink gins under his belt by then...
It's a prototype Jawa Sand-Crawler. With a lifebelt.
DeleteWhile you in the East were playing this game of Blitzkrieg Commander in the Western Desert, over in the West we were playing an Eastern Front game.
ReplyDeleteOnly halfway through our game, but some telling command blunders and failures along with some devastating artillery barrages.
http://onesidedminiaturewargamingdiscourse.blogspot.com.au/2013/10/kursk-style-game-using-blitzkrieg.html
Hola
ReplyDeleteAmigos
Libros y Revistas Usados, despachos
Visítenos en :
https://listado.mercadolibre.cl/pagina/lapicadellibro/
Saludos
lapicadelibro@yahoo.com