Monday, 27 April 2020

HOTT 52 - Week 17 - The Knights of the Round Table vs The Knights of Simba

We had a busy day yesterday, with a fair bit of online socialising, plus a walk and some burlesque rehearsal, but at the end of the evening Catherine and I fitted in a quick game of HOTT so I could fulfil my HOTT52 challenge for this week.

I grabbed a couple boxes of armies from the games room, and found that I had Arthur's knights in one of them, and the curious lion-centaurs of The Knights of Simba in another. It seemed too good a pairing to waste.

Catherine chose Simba, so I ended up defending with the Knights of the Round Table. For this game I dropped Merlin and went with Galahad as a paladin, to give me 2 x Heroes (including the general), 1 x Paladin, 4 x Knights and 2 x Blades.


The Knights of Simba are one of my most straightforward army compositions - 6 x Knights (including the general) and 6 x Warband.


Catherine matched her knights against mine, and massed her warband on the flank opposite my blades, which didn't bode well.


I refused my right flank (the blades) and charged with the rest of the army. Catherine brought the Knights of Simba forward at full speed too, and we quickly collided in the centre.


The results were mixed, and we shoved each other back and forth.


Simba's allied ape-men (the warband) seemed curiously reluctant to charge Arthur's foot-soldiers, despite their numerical advantage. I bolstered them with Galahad, hoping to bluff her into inactivity.


The fight between the knights was always going to be influenced by the first casualty. I stood a good chance there, with two heroes in my line, but it was Catherine who inflicted it, riding down the knights that were covering Arthur's right.


The Knights of Simba exploited the gap, and more of Arthur's knights fell.


Arthur himself was now threatened, so I moved Galahad in from the right flank to assist him. The Knights of Simba simply killed Galahad.


Arthur came under attack. If he fell his army would be defeated. Now the performance of heroes in this game so far had been disappointing to say the least, but Arthur did manage to pull his finger out, not die, and see off his attackers. More than once.


With Galahad gone, Catherine sent in the ape-men against Camelot's finest foot-soldiers, half of whom fled.


Interlude: We are now at the point where it is impossible to play a game in the dining room without at least one cat joining us. This time it was Miller.


The scores currently stood at 10AP to ... 0AP. Catherine only needed to kill one more element to achieve a total whitewash. But I finally got my dice together, and killed her general. Obviously with the disparity of losses this was simply a command and control issue for her; in order for the loss of her general to affect her army I had to basically destroy it anyway, but it was a start.


Inevitably Catherine's attacks slowed as the extra PIP cost for having no general hit home. Sadly Arthur seemed complacent as well, and for a couple of turns both armies started at each other, throwing in the occasional half-hearted charge for form's sake.
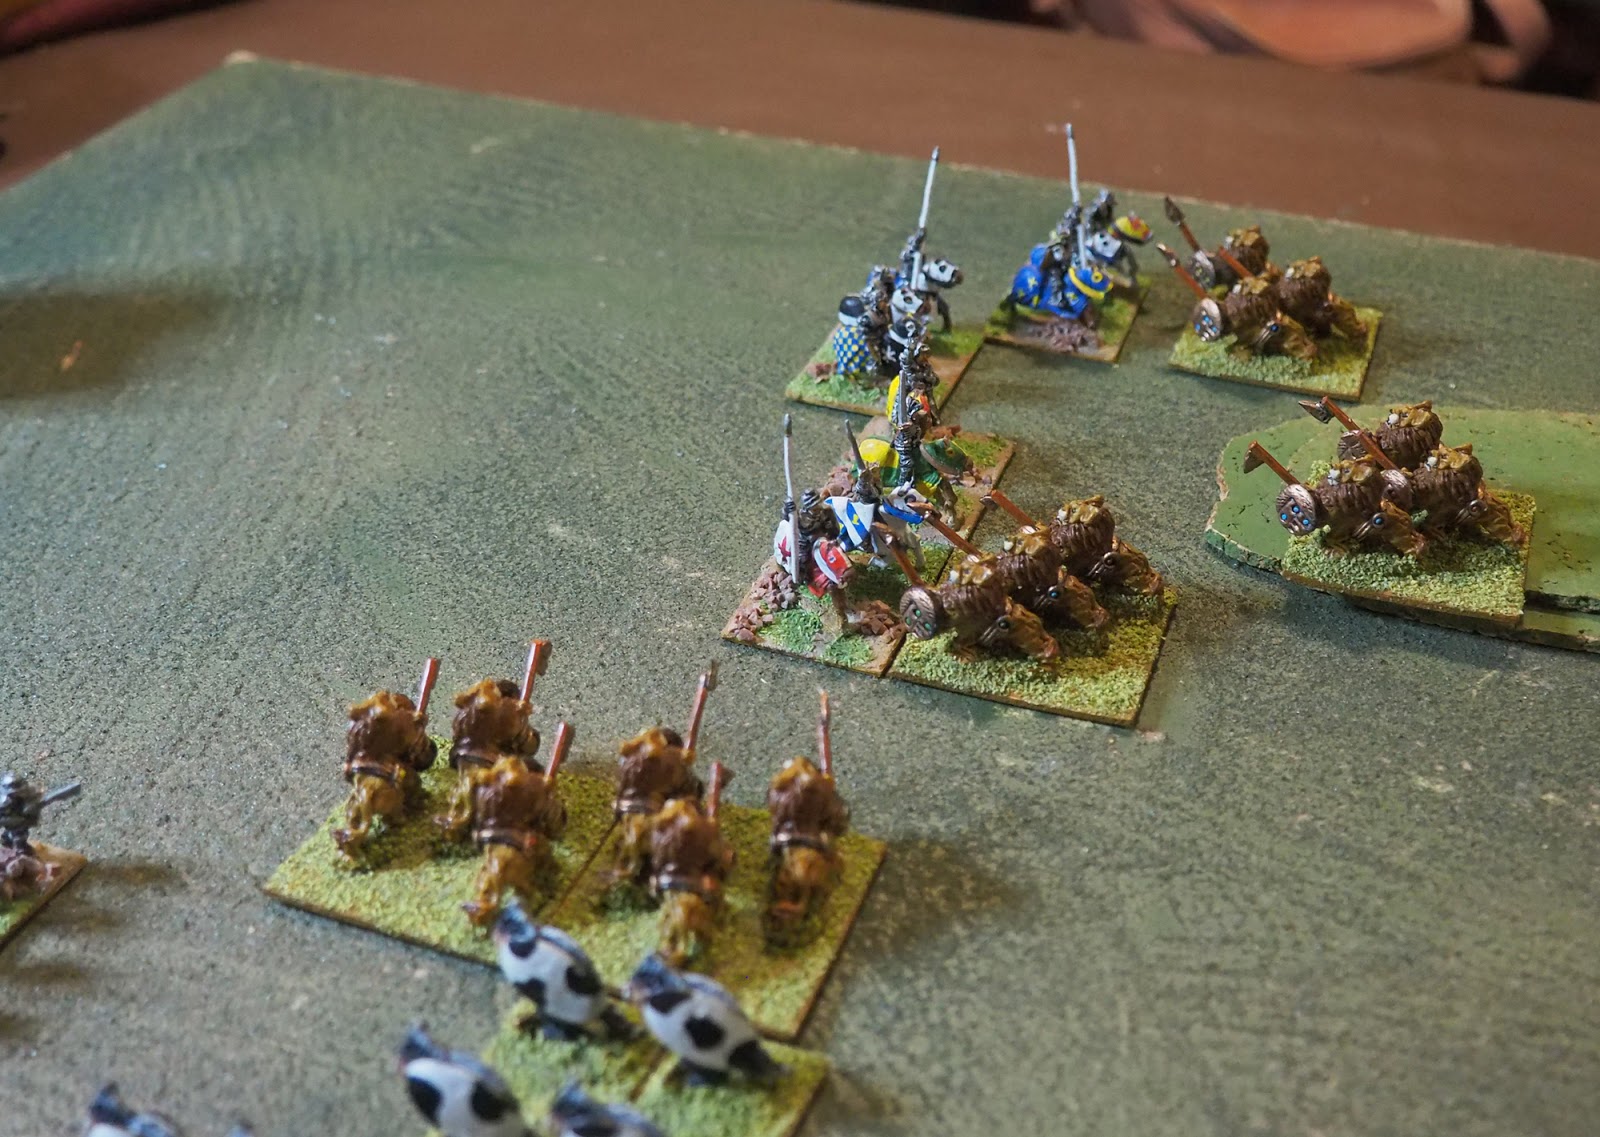

Finally Arthur showed that being king wasn't simply a matter of not having shit on him, but also one of leadership, and showed his surviving knights how to kill an enemy element.


But it wasn't enough. The surviving foot-soldiers had put up a stubborn fight on the right flank, but eventually succumbed to the ape-man hordes. And that broke my army.


Catherine won 12AP to 4AP, although I did get her general.


This was good fun to play, and was more interesting than it first appeared, as both sides tried to exploit their overlaps to maximise the odds of a kill. The differing based depths of the opposing knight elements also made a difference, with the Knights of Simba recoiling out of contact if they lost, forcing me to spend PIPs to maintain a fight, but also allowing Arthur's knights to fall back if they pursued too far ahead. Swings and roundabouts. I was outnumbered, and would have lost much quicker had Catherine not hesitated with the warband. I failed to get the die rolls to exploit my one advantage - the double hero and paladin combination.

Saturday, 25 April 2020

Control The River ... Twice

Today I ran through one of the OHW scenarios a couple of times using my ECW Portable Wargame variant. I chose Control The River, in which both sides enter the board and fight for control of two crossings along an otherwise impassable river. On an 8x8 grid you can either run the river along the halfway line, or do what I did and have it fill an entire grid square, running along four squares to the centre, then cutting across the diagonal to run along the other four. In this way each side has half of the river three squares from the starting edge, and the other half four squares.

This was the terrain. One crossing is a ford, the other a bridge. Both have the same movement effects, but units on the bridge cannot be interpenetrated. Most of the terrain is garnish - aside from the river, only the one-square wood and the two square hill are significant.


I gave both sides six units - two foot regiments and two horse, plus two more randomly determined - 1-2 - Foot, 3-4 - Horse, 5 - Dragoons, 6 - Artillery. One Royalist foot unit was automatically all-pike. One Parliament foot unit was commanded shot. Finally I randomly selected one unit on each side to be upgraded from Trained to Veteran (with the proviso that it couldn't be Artillery or Dragoons) and another unit to be downgraded to Raw (again, with the proviso that it couldn't be an Artillery unit).

These are the forces for the first game:

Royalists - Commander, 1 x Trained Pike, 1 x Trained Pike & Shot, 1 x Veteran Horse, 1 x Trained Horse, 1 x Raw Dragoons, 1 x Trained Artillery (21 SP - Breakpoint 11)

Parliament - Commander, 2 x Trained Pike & Shot, 1 x Trained Commanded Shot, 1 x Veteran Horse, 1 x Trained Horse, 1 x Raw Horse (25 SP - Breakpoint 13)


I set the breakpoints at 50% of the force's SP lost, with a side dicing to see if it breaks once that point is reached. They got a positive modifier to the roll for each crossing they currently controlled, so whilst breaking the other side was an obvious way to win, it would be harder to break a side if it controlled the crossings. If neither side had broken at the end of 12 turns then the side which controlled both crossings would win. Usually this scenario ends in a draw.

Parliament entered from the right, and sent their horse to contest the ford. The Royalists moved up their dragoons to hold the ford until other units could be brought up.


Parliament moved a foot regiment accompanied by their commander towards the bridge ...


... but the Royalist artillery had set up on the hill opposite the bridge, and a lucky long-range shot saw a cannonball take off the hapless Parliamentarian colonel's head.


This was not a great start for the Parliamentarians.

Their horse galloped across the ford and engaged the Royalist dragoons.


The dragoons fell back, but the Royalist's veteran horse took their place.


An extended melee took place, which saw the Royalist commander riding over to lend his support.


A charge saw the Parliamentarians pushed back from the ford.


Meanwhile at the bridge the two force's foot were engaging each other. Parliament charged across the bridge ...


... and the Royalist foot defending it fell back.


 More Parliamentarian foot came up and crossed the bridge.


The Royalists formed up their two units of foot, whilst their artillery fired from the hill in support, if to little effect.


The Royalist's veteran horse had fallen back from the ford, having taken rather too many hits to continue in the attack. This allowed Parliament to push across the river again.


But a Royalist counter-attack saw them cross the ford again. This pretty much concluded the fight on that flank, with the Royalists very much in control of the ford.


Parliament's position at the bridge was still strong, however. The Royalists sent in their pike unit to drive Parliament back. The Royalist commander moved over to support his foot.


Both sides had lost plenty of SP by this stage, but a charge by the pike saw Parliament pushed past their breakpoint. Their unit on the bridge held on with grim determination for a couple of turns, but eventually the pressure was too much, and the Parliamentarian's morale broke.


The battle lasted ten turns, and was closer than it looked. Parliament lost a couple of units, plus their commander, but most of the Royalist units had taken casualties, and their force was close to its breakpoint as well.


I enjoyed the game so much, I set it up again. I used the same terrain, and both sides also advanced from the same edges as before. But I rerolled the force compositions. The forces for this second game were:

Royalists - Commander, 1 x Elite Pike, 1 x Trained Pike & Shot, 1 x Raw Pike & Shot, 2 x Trained Horse, 1 x Artillery (22 SP, Breakpoint 11)

Parliament - Commander, 1 x Veteran Pike & Shot, 1 x Trained Commanded Shot, 3 x Trained Horse, 1 x Raw Dragoons (SP 20, Breakpoint 10)

Parliament sent their horse towards the bridge in this game, with dragoons moving to cover the ford. In both games I forgot that the woods in my PW variant aren't impassable to foot units (they are in the OHW rules); the dragoons should have set up in the woods rather than skirting them.


It was the Royalists got off to a bad start. Attempting to inspire one of his foot units, their commander was caught up in a cavalry melee and captured.


The Royalists charged across the ford and engaged the enemy dragoons.


The dragoons put up a fight, but were soon routed ...


... leaving the Royalist horse to pursue them and charge straight into Parliament's commanded shot unit.

They were driven back, then charged in the rear by enemy horse that had moved over from the bridge.


The Royalist horse was scattered, but a foot regiment was now contesting the ford, leaving the Parliamentarian horse trapped with a wood to its rear. 


Meanwhile the Royalist's veteran pike unit had driven forward and pushed some of  Parliament's horse back over their bridge, leaving one regiment - and their commander - isolated.


Parliament's commander was quickly captured, although the horse unit would continue fighting almost until the end of the battle.


Parliament counter-attacked across the bridge with their veteran foot unit, and a bloody melee commenced. The Royalist pike unit broke ...


Both sides reached their breakpoint on the same turn. It was just a matter of time before one side broke.


The Royalist's raw foot unit was inspired and fiercely charged the bridge ...


... but it wasn't enough. The Royalist morale broke first.


These were two close games, and a lot of fun to play. In the second one I abandoned my Low on Ammunition rule, as I am starting to feel it doesn't add enough to the game to be worth keeping. I will have to see what effect this has on the balance (and choice) between shooting and engaging in melee. It was originally added to make shooting less attractive at some point during the game, and force a push of pikes, but play has shown that close combat is often an attractive option anyway, so it make not be needed. I do still like the OHW of doing things, where units go out of ammo but can't melee until they do, but I'm not keen on tracking this on a unit by unit basis, even with only 10-12 units per game.
Related Posts Plugin for WordPress, Blogger...