Monday, 16 March 2020

MiGs vs Meteors

Whilst there are plenty of scenarios available for Instant Thunder, I was poking around the 'net the other day, and came across various PDFs of scenarios written for older SPI air games such as Foxbat & Phantom and Air War. One of them caught my eye because it featured Australians, so I bodged a quick Instant Thunder version of it yesterday and gave it a go.

Set in 1951 it features a small group of RAAF Meteors fighting superior numbers of MiG 15s, which were nominally North Korean but may have actually been Russian. It's very unbalanced, but the victory conditions make it interesting - the RAAF wins if they can finish the game with at least one plane still flying and have also inflicted as many kills as they have lost planes. For the North Koreans to win they must either shoot down one Meteor whilst losing no aircraft themselves or shoot down all four Meteors.

The RAAF have four Meteors. The North Koreans have eight MiG 15s. All pilots are average. There are three clouds. On the first turn all aircraft can deploy in two-aircraft formations. After that they deploy individually. The game lasts eight turns. Aircraft leaving the board do so temporarily only.

First turn deployments saw the Meteors fairly safe from attack aside from a couple of MiGs on the row above them.


And they got lucky - one Meteor managed to climb to that row and get a shot at a Mig. And destroyed it!


So now the game was on. The RAAF could win by avoiding no more than one casualty, whilst the North Koreans had to shoot down all four Meteors for a win.

On the next turn the MiG at the top right got a clear shot at the Meteor on the left end of the row below. And downed it. Both sides had now lost a plane each.

(Note the MiG and Meteor sharing a square - neither than shoot at the other or be shot at, and there's no collision, so flying close like this is a good strategy for the Meters when trying to avoid being shot down)


I think this is the third turn, but I forgot to advance the marker until it was finished. There was lots of flying around, but no hits were scored. A few time in the game the Meteors actually lined up shots and scored hits, but then got no damage.


And so it went - Meteors dodging and MiGs trying to score kills ...


Actually the Meteors didn't dodge much. Their flight numbers, which affect jinking, are quite low, so I started playing the odds. If a plane jinks it can't attack, so if a Mig had the initiative on a shot I was sometimes better off taking the risk of not dodging so I could maybe get a return shot.

That worked OK until the fifth turn, when another Meteor went down. The North Koreans kept drawing Aces for damage, and I was using the optional Critical Hit rules which reward Aces. Needless to say the RAAF kept drawing low cards that weren't Aces.


Turn six saw the surviving Meteors mobbed by the MiGs (those that had ammo left, since the MiG's cannons only get three shots). Another Meteor was lost.


Two turns left and only one Meteor was flying. A win for the RAAF was unlikely; it would have to shoot down two MiGs for that. But they could play for a draw by surviving the next two turns. And that was helped when deployment saw the Meteor placed in a cloud. Aircraft in clouds can't be targetted, so there was no point continuing with the rest of the turn; the Meteor would be safe regardless of the North Koreans' actions.


Last turn. MiGs facing down have no ammo, so can be discounted. They were just targets. A couple had a chance of catching the Meteor though.


One lined up a disadvantaged shot, but the Meteor got a good draw on its movement and was able to flee to the safety of some cloud-cover.


So the action ended in a draw. the North Koreans shot down three Meteors (two by scoring critical hits), whilst the RAAF accounted for one MiG shot down and one damaged. They actually scored several hits, but couldn't convert them to real damage, so were a little unlucky there.

Low performance planes such as the Meteors are quite frustrating to use - they have about a 25% chance of being able to act each turn - but it made for an interesting game. One scenario in the rules (Israeli Meteors vs Egyptian Vampires) actually has a solution for this when using small numbers of aircraft, where the scale of the game is effectively halved, but it wasn't viable for this game as the adjustments would make the MiGs into super-weapons. However this was a time when the role of Meteors as real fighter-aircraft was on its way out, and the scenario helps you see why; even with even numbers they'd seriously struggle*.

*Although they carry a lot of ammo for their cannons - over twice that carried by the MiGs. I'm not sure if there's a misprint - either too much ammo or that their 'cannon' are actually MGs in game-terms.

Saturday, 14 March 2020

HOTT 52 - Week 11 - Fishmen vs Dwarves

For this week's HOTT game I gave two of my non-human armies an outing - Dwarves (with their steam-powered marvels) and the Fishmen.

Dwarves - 5 x Blades (inc General), 1 x Shooter, 1 x Sneaker, 1 x Behemoth, 1 x Flyer, 1 x Artillery

Fishmen - 4 x Spears (inc General), 2 x Shooters, 1 x Lurker, 1 x Artillery, 1 x God, 2 x Warband

The Fishmen defended.


With their flank secure against some rocks, the Fishmen sat tight, waiting on their god to turn up.


The Dwarves advanced as rapidly as they could.


Their gyrocopter got into position behind the Fishman line, whilst their artillery opened up on the warband covering that flank.


The Fishman artillery fired on the Dwarven steam-tank, and forced it to flee.


The Dwarves charged, gambling that their blades could cut through the Fishman spears. Their sneaker tunneling-machine covered the flank.


Both sides had successes, pushing back opposing elements.


The Fishman lurker appeared, and the Dwarves lost an element of blades.


Their sneaker was forced to flee by artillery fire.


However the Fishman general's retreat was blocked by an element of shooters which was moving across the rear in order to engaged the gyrocopter, but whose progress had been stalled by a lack of PIPs. The Dwarves took a gamble and charged deep into the Fishmen's position, hoping to rout the opposing general.


They failed. And the exposed Dwarven general was overlapped and destroyed to give the Fishmen a win, 4AP to 0AP.


Final positions.


The heroes of the hour - the Fishman artillery drove off both elements deployed to support the Dwarven general, and allowing him to be flanked and destroyed. Putting their behemoth steam-tank in the line of fire of the guns was something of a risk, and it didn't pay off. Exposing the sneaker to fire was a bit of a lapse of reason, though; it was deployed behind the general so that it could push through the Fishman line after combat was initiated; using it as flank cover was doomed to failure.


Friday, 13 March 2020

Instant Thunder - Board and Counters

In a comment on my previous Instant Thunder post someone asked for the file containg the counters I made. I have uploaded it to my Google Drive so anyone can download it and have a look. It's a Word document, but I'm sure people can cope with that.

Instant Thunder - Counters

It only contains a few counters. I tend to maintain it as a working document rather than an archive.


Above is an image of the board I use. I have a link to the file containg the board as well. Again, it's a Word document, and prints out to give an A4 playing area.

Instant Thunder - Board

Lasalle

Our club is one of the playtest groups for the new version of Sam Mustafa's 'Lasalle', and we played a couple of games last night. I say 'we' - I just sat and watched and asked obvious questions, whilst other played. Mostly because I forgot my glasses and couldn't read anything.

I'm not going to write a detailed report, not am I going to talk much about the detail of mechanisms, because as with all things of this nature, a lot of it is subject to change. However two decent-sized games were pretty much played to a conclusion in the evening, despite questions and relative inexperience. The mechanisms seem simple; firing and melee are similar to Maurice, with the former being a number of dice rolling to hit and then a 'save' based on the quality of the unit, and the latter being an opposed D6 roll plus and minus various factors. Melee is brutal; if you attack with a decent margin then you stand a good chance of sweeping your opponent away.

The initiative system is excellent and seemed to work very smoothly. It uses a PIP system, but the initiative of a turn swaps back and forth between the players as one side can react to an action by the other. This continues until one player runs out of PIPs, at which point the other one spends what they have left. Skirmishers are abstracted; each turn starts with a die roll representing the skirmish battle, with the winner being allowed to select an advantage for the rest of the turn.

I took a few picture. In the foreground Dave and Gary were using French (with an oriental flavour) and Prussians respectively. In the background Caesar used Austrians against Peter's British.


Turkish/Persian artillery. This stood in for regular heavy guns, but still looks nice.


Gary and Dave played a cautious game, with plenty of artillery bombardment and some cavalry actions on the flanks. They didn't quite finish but would have seen a result on the next turn.


Caesar and Peter played a more brutal game. Caesar deployed his Austrians in massed columns in the centre and barrelled straight at the British line.


Closer up he deployed into line and a firefight developed.


A British edge in shooting (of course) was offset by Caesar rolling really well in response, and both sides saw units shattered.


Caesar used his cavalry to sweep away the British gun-line. The battle would be won by the first side to destroy six enemy units, and this pushed the British closer to their break-point.


A turn began with both side one unit away from breaking, and predictably both sides lost a unit during the turn. As DBA/HOTT players, we assumed that victory was assessed at the end of the turn, so that it was either a draw or the armies would keep fighting until one had lost more than the other. But in fact a quick reread of the rules showed that an army broke the instant it lost the sixth unit, and Caesar was the first player to lose six, giving Peter a Pyrrhic victory in a very close game indeed.


I enjoyed spectating these games, and look forward to actually having a go at playing some time in the near future. The rules seem simple, intuitive and have some subtle chrome built into them for the button-counters and national characteristic fetishists.

Thursday, 12 March 2020

Tiwintza

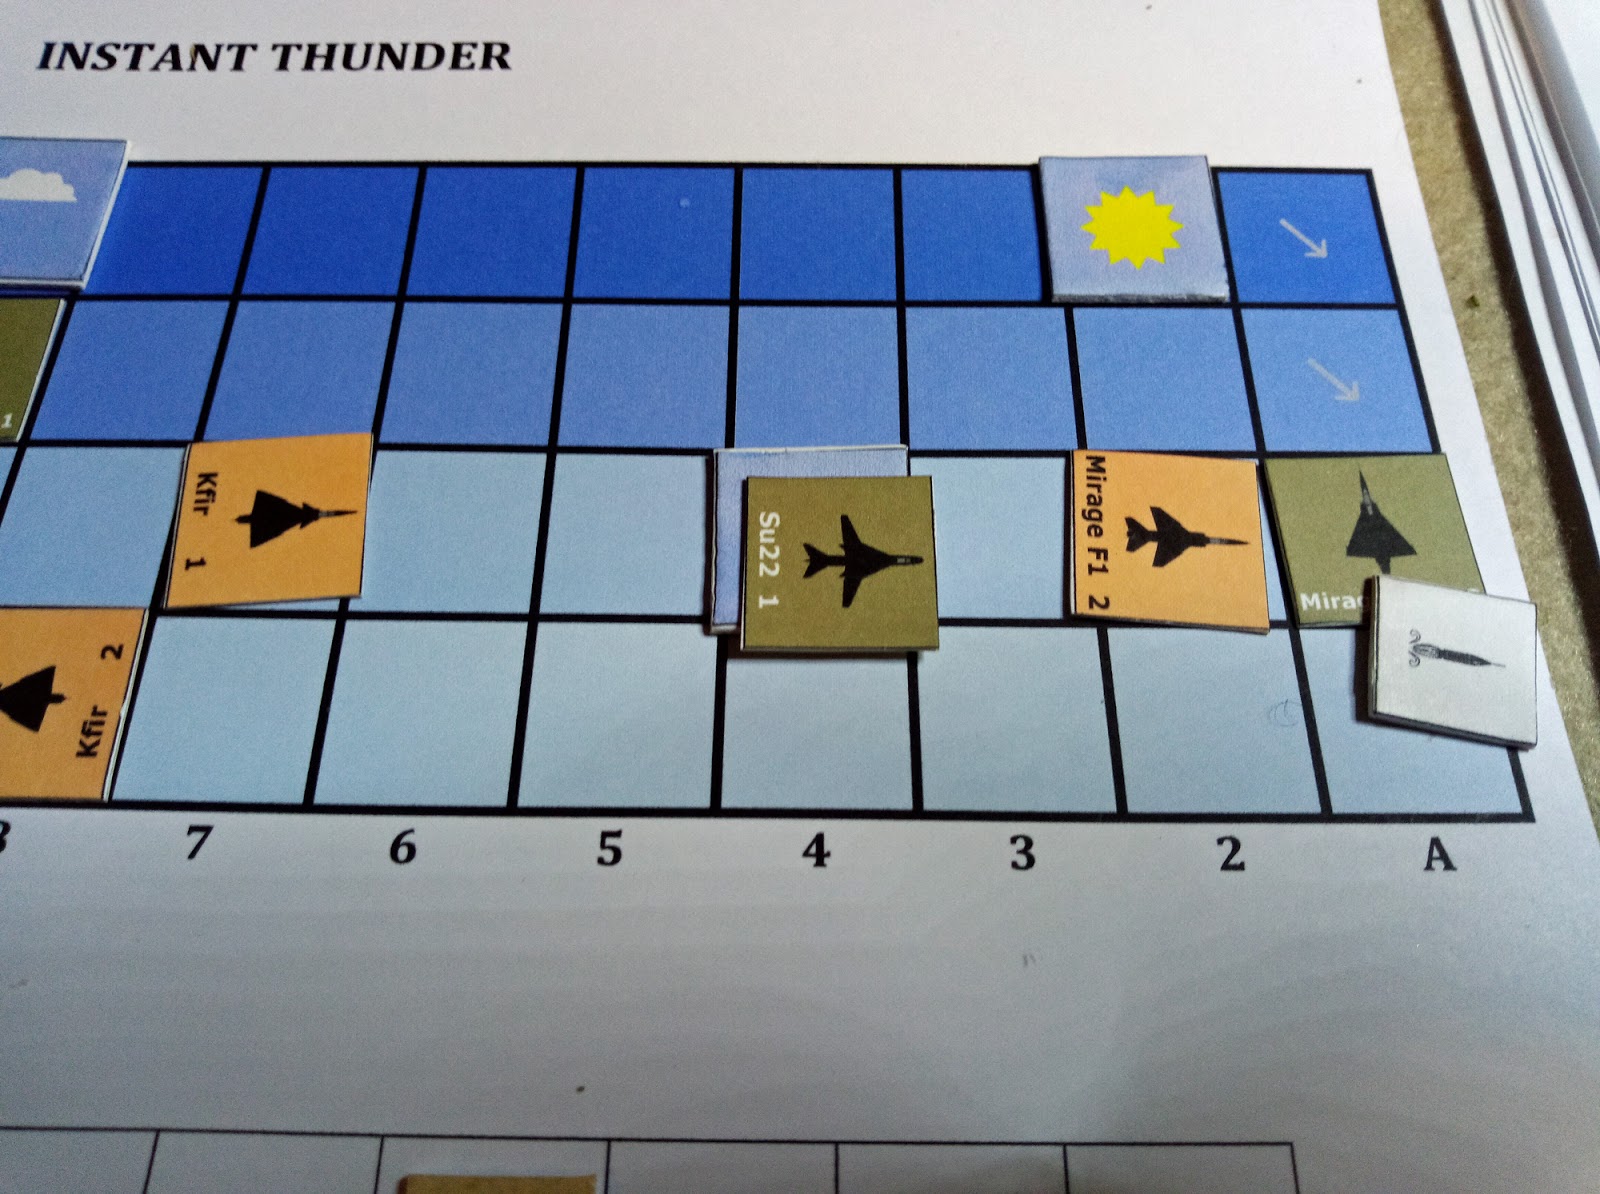
In my previous Instant Thunder post I promised some missile action. I was going to play the 1958 Taiwan scenario, featuring the first combat use of such missiles, but instead decided to lay the 'Tiwintza' scenario instead. This is set during the short Cenepa War of 1995 between Ecuador and Peru, part of an extremely long-running border dispute between the two nations. The basic version of the scenario is historical - on 9th February 1995, two Ecuadorian Mirage F1s intercepted a couple of Peruvian Su-22s on a bombing mission and shot them down. And expanded 'what-if' scenario includes other aircraft that were in the area - two Ecuadorian Kfirs and two Peruvian Mirage 2000s.

The game starts with the Su-22s and F1s in play. The Su-22s are loaded for their bombing mission, so have a massively diminished performance. However all they have to do in order for the Peruvians to score points is survive and (if they can) exit the board. The Ecuadorians have the advantage in combat, but must score kills with pretty much no loss in order to get a win.


On the first turn both Su-22s managed to position themselves such that they were covered by the sun. All missiles in this game are heat-seeking, so they were very hard to target.


On the second turn the reinforcements appeared - the Peruvians got two Mirage 2000s and the Ecuadorians a brace of Kfirs.


The Su-22s made it to the top row again, but couldn't 'hide' in the sun, and everything scrambled to get missile-locks. The Mirage at the top left got a lock, but decided not to fire. Missiles in this game have a flight-time which is a number of card-draws, with the distance the missile travels being the difference between two card draws. The Mirage F1 got the lock, but the initial card draw was a middling value that didn't offer the potential of enough flight distance for the missile to reach the target. A plane can decide not to fire on the basis of the initial draw.


The Kfirs were armed with Shafrir II missiles which have a longer flight-time, so could engage from much further away. One got a lock on an Su-22 on the top row, and launched.


The missile had legs, and scored a hit, destroying an Su-22.


So a good start for the Ecuadorians, which got better when they started the next turn deployed on the tail of the surviving Su-22.


A position they held after manuever. But the two Peruvian Mirage 2000s dropped down to provide cover from the third row. Both sides failed their missile locks, whilst the Kfir tailing the Su-22 failed to score any damage with its cannon.


And the Ecuadorians bad luck continued; on the next turn a Mirage F1 failed to score a missile hit at the closest possible range ...


... and the Mirage 2000 it was targetting spun about and fired a missile in return, downing its pursuer.


So both sides were now down one plane, which given the Ecuadorians' tight victory conditions wasn't good for them. And it got worse - their surviving Mirage F1 started a turn with a nice shot at the remaining Su-22, only to find the tables turned after the manuver phase as the fighter-bomber got the drop on it. A burst of cannon-fire saw the Mirage F1 badly damaged, giving the Peruvians more victory points.


Here you can see how the continuous line of squares works - the Peruvian Mirage 2000  top-right has a five-square shot off the edge of the board and down onto the next row against the damaged Ecuadorian Mirage F1.


Once again the missile didn't have the reach, and the Mirage F1 survived.


Into the penultimate turn. The Su-22 managed to hide in a cloud, making it impossible to target, but a Mirage 2000 found itself in real trouble, with a both Kfirs and the Mirage F1 able to get shots at it.


It evaded a missile from the first Kfir, saw the damaged Mirage F1 fail to get a clear cannon shot at it, and evaded a lock from the second Kfir to survive into the last turn.


Set-up for the final turn. The Kfir at the bottom had a potentially clear cannon shot at the Su-22, but a Mirage 2000 was flying close support and forced the Kfir to climb out of danger and position for a missile launch instead.


However the other Mirage 2000 dropped in on the Kfir, leaving it with the choice of evading the cannon attack and losing its chance to fire a missile, or going for the lock and hoping the Mirage 2000's guns missed. It went for the latter option, and ended up badly damaged, which threw off its chances of gaining a lock. The Su-22 survived to the end.


And so the action ended in a very clear Peruvian victory. They got points for the loaded Su-22 surviving the game, but also got points for shooting down a Mirage F1, damaging the other and damaging a Kfir (8VP total). The Ecuadorians just had the Su-22 kill on their side of the scoreboard (2VP).

This was a lot of fun, and a different game to the 1958 scenarios because of the higher reliance on missiles and the superior performance capabilities of the more modern aircraft and the options that opened up. The Peruvians are disadvantaged, in that two of their planes are hindered by not only being loaded, but being less suited to a dogfight even when unloaded. But the scoring system offsets this; the Ecuadorians have to score kills without taking any hits back, so need to be fairly cautious. More so than I was in this game, I reckon, as the results showed.
Related Posts Plugin for WordPress, Blogger...