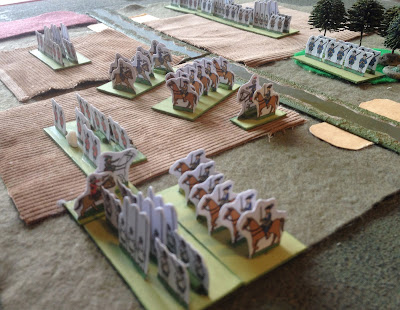
My ECW Campaign for Causton has now moved into Phase 2 - Skirmishes. After their defeat at Misomer barrow, the Royalist forces in Midsomer retired to the Oxfordshire border to regroup, whilst the Parliamentarians established themselves around Causton. Prince Rupert, recognising the importance of Royalist control of Midsomer in securing Oxford, sent supplies to assist Lord Standing. The fastest route for these to reach the Royalist forces required a crossing of the Waterman, a small river to the north of Causton. Lord Standing sent a small force under Sir James Halford to secure two important fords over the Waterman. Sir Thomas Barnaby received news of the Royalist movements, and led a small fore of troops to intercept the Royalists. They met at Ford Florey, on the river itself.
The second game of the campaign is the 'Control The River' scenario, where both sides are fighting to control two fords on a stretch of river which sits between them. As before, I diced to see what forces each side got, then applied a single quality downgrade to one Royalist unit to reflect the fact that they lost the previous battle.
The Royalists, under Sir James Halford got:
1 x Pike & Shot (Pike-Heavy, Elite)
1 x Pike & Shot (Raw)
1 x Pike & Shot (Shot-Heavy)
1 x Dragoons (Raw)
1 x Horse (Dashing, Elite)
1 x Horse (Dashing)
Sir Thomas Barnaby's troops consisted of:
1 x Pike & Shot (Shot-Heavy, Elite)
1 x Pike & Shot (Shot-Heavy)
1 x Pike & Shot
1 x Dragoons (Raw)
1 x Horse (Disciplined, Raw)
1 x Artillery (Raw)
Despite the single downgrade, the Royalists had an edge in quality in this battle.
Sir James approached from the north, whilst Sir Thomas came from the south, matching his dispositions to that of the enemy.
At the east ford, the Royalist horse rode straight across to the Parliamentarian side of the river, where they ran into a determined line of foot, supported by dragoons. The Royalist dragoons took up positions in the copse to the north of the river.
Sir Thomas ordered his cavalry to contest the crossing of the ford as well.
With their overconfidence having put them in danger, the Royalists did what any cavalry would do in such a situation - they attacked. Since the Parliamentarian horse had taken hits from the dragoons in the woods, they became the main target.
At the western ford the Royalists advanced a strong line of infantry up to the river. The Parliamentarian infantry were outnumbered, but supported by artillery.
Initial musketry from the Royalists was very accurate, and the Parliamentarians suffered a number of hits.
The Royalist horse charged home.
Emboldened by their success, the Royalists pushed across the ford.
The Parliamentarian horse broke.
Sir Thomas ordered his foot forward into a push of pikes in order to offset the greater Royalist firepower and to prevent the Royalists from expanding their bridgehead.
Meanwhile the Royalist horse had pursued into a position where they now threatened the Parliamentarian artillery on the hill.
They attacked, but it was a half-hearted attack and the artillery held.
A view of the whole battle.
The opposing dragoons now faced each other across the river.
The Parliamentarian foot broke, but had halted the Royalist advance.
On the other flank the Royalist horse broke after a series of bold but futile attacks on the elite Parliamentarian foot stationed there.
The Royalists pushed another unit across the river. There shooting seemed less effective now, though.
The Parliamentarian foot now moved to take the eastern ford.
Whilst their artillery saw off the disordered Royalist horse. Yes, that doesn't sound likely, and I need to rethink how I want artillery to work in these rules.
The fight at the western ford became another push of pikes, with the Royalist quality being offset by their greater number of pikes.
Sir Thomas's men crossed the river to the east, under fire from the dragoons in the wood.
To the west, Sir James Halford fell wounded trying to rally his men.
But the Royalists now had two units across the river.
Until one of them broke. Their second unit charged into combat.
With a firefight against the dragoons in the wood proving futile, Sir Thomas ordered his foot into the attack there as well.
To the west the Parliamentarian foot finally gave up the fight, but the artillery scattered the victorious Royalists.
The Royalist dragoons were not to be dislodged from the wood, and broke the Parliamentarian foot attacking them. They resumed skirmishing with the opposing dragoons south of the river.
And that was the end of the battle. I deemed it a draw, since the eastern ford was still contested by the dragoons of both sides. To the west the Parliamentarian artillery controlled the ford.
In the next battle neither side will start with any of their troops downgraded. But the Royalist supplies will now be delayed, since they will have to travel via a longer route.
I'm not sure what the best plan should have been here. I think the Royalist infantry were working on the right lines, since they had the strength to push across their ford. On the other flank it may have been better to have let Parliament cross before hitting them with the horse, but then Parliament could have held back and just fired at the dragoons in the wood. I'm not sure what the best plan was there.
I need to rethink how artillery works in close combat. At the moment I have it always counting as outflanked, and I don't want to go down the route of having it automatically eliminated, since that rather undervalues something which is still 1/6th of the total army. I have some thoughts, and will try something in the next game.
6x6 - Game 2.4


No comments:
Post a Comment