Saturday 26 May 2018

Whip It!

In an early post about our changes to Munera Sine Missione I said that we had added special rules for whips, rather than simply treating them as a lasso. I have been testing them with a lasso figure up until now, but I decided to convert one of my existing figures to wield a whip instead.

Here she is.


She's called Alba. I can't remember if she's featured on this blog before. I got her a while ago, and she's been painted for years - she's a Shadowforge Viking Berserker. In her original incarnation she had an axe in her right hand, and was raising her shield over her head. This is probably a great pose for a berserker, but looked odd in a gladiator, so I tended to leave her on the sidelines. Now she has a new lease of life, with a whip replacing the axe and a sword replacing the shield. The axe will see a use elsewhere.

She's had a few fights, with mixed results, but I can say for certain that the whip is a fun weapon to use.


Now I just need to find a suitable male figure to arm with one.

Update: Here he is. Rodan is from Castaway Arts, and was originally a retiarius, with a trident in his raised arm and nothing (I guess you were supposed to provide your own net) in his left. The whip was made from wire, whilst the sword is from a batch I 3D-printed last year.


Friday 25 May 2018

New Saga

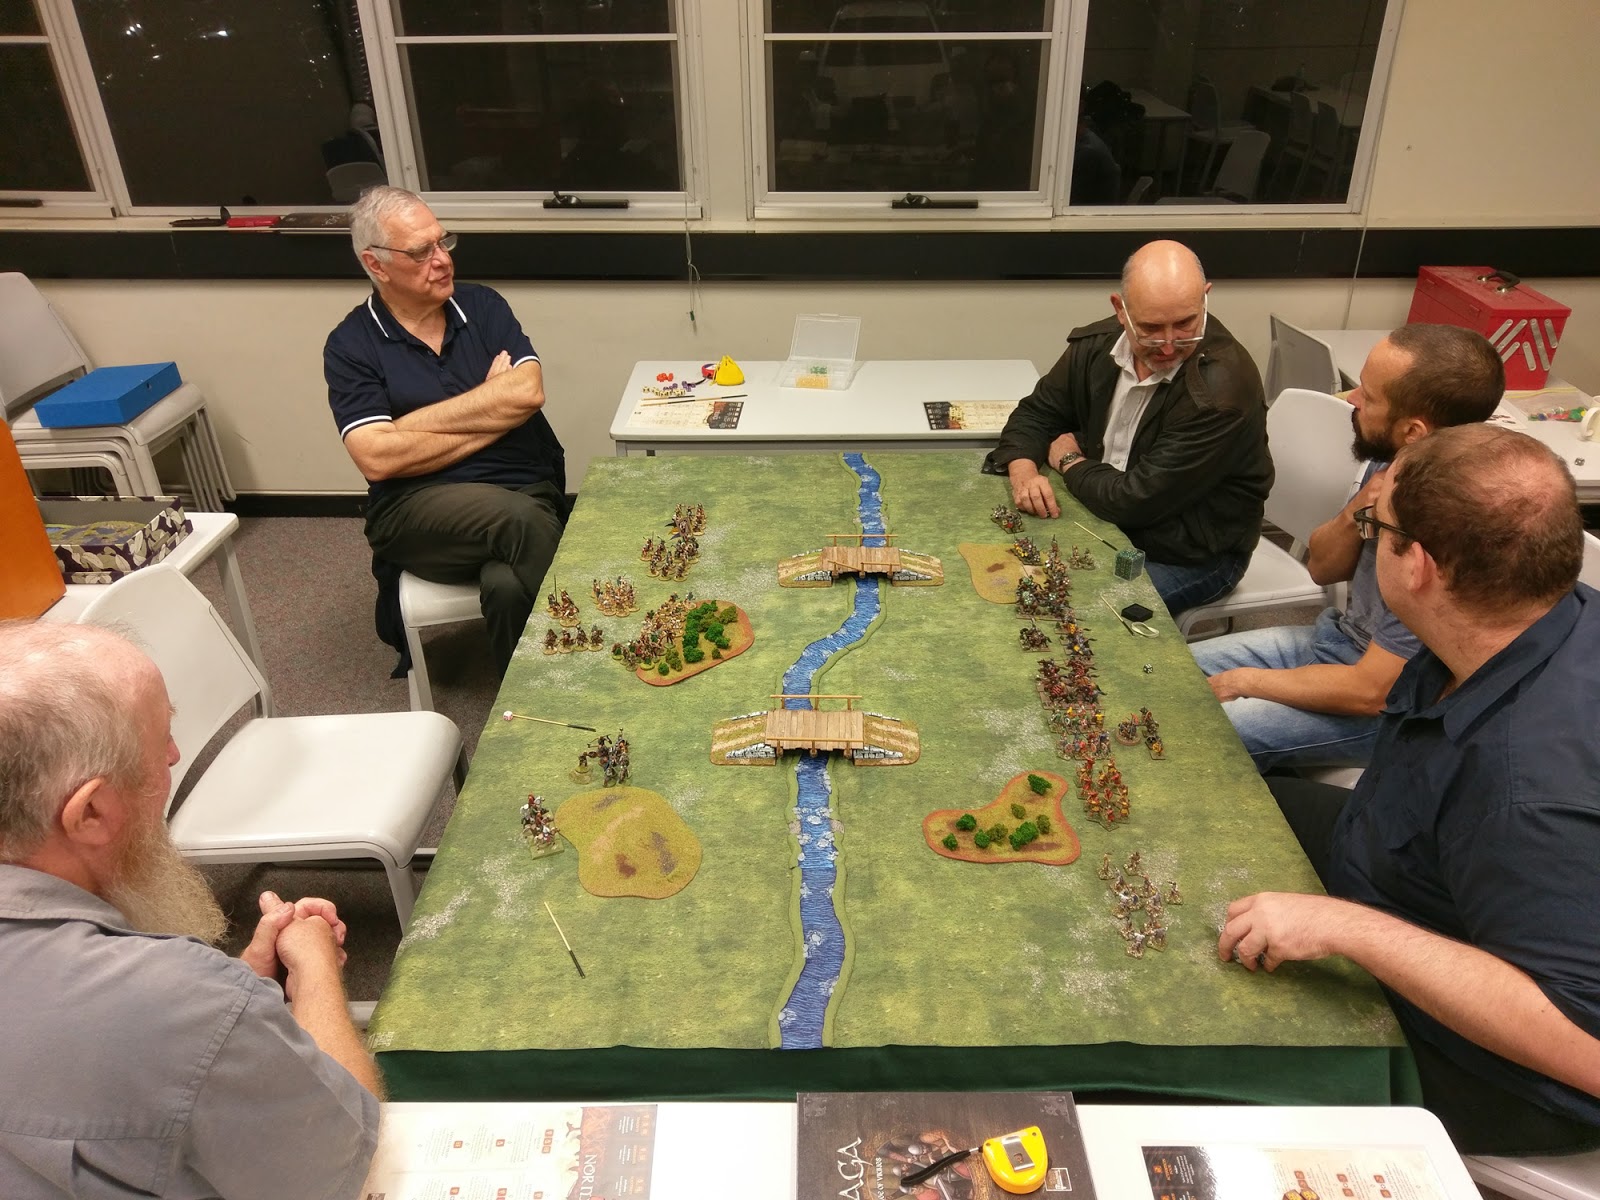
Last night we gave 2nd Edition Saga a go. Obviously the best way to try out a new version of a game is a leisurely on-to-one, with time to look things up. So that's exactly what we didn't do. We played a six-player game, three factions on each side, and did it with some pleyers who hadn't played any Saga at all. Easy.

On the left, Gary, Bryan and myself ran Vikings, Normans and Welsh respectively, whilst on the other side Dave, Caesar and John ran Vikings, Normans and Scots. We played the bridges scenario; at the end of seven turns the winning side would be the one with the most points of troops on the enemy side of the stream, which can only be crossed by the bridges.


Caesar went wild and galloped cavalry across both of the bridges. This went as well as you'd expect.


With the Norman cavalry mostly wiped out by archery, the infantry of both sides advanced towards the bridges. At the bridge in the foreground Bryan's Norman's eyed up John's Scots, neither wanting to push forward into the other group. At the further bridge, Dave and Gary's Vikings both made a rush for the middle, and bloodshed ensued. Caesar's depleted Normans annoyed the enemy with archery, whilst my Welsh acted as a reserve in the centre, again using archery with great effect.


Indeed they pushed up to support Gary's Vikings on the bridge, and killed the opposing Viking warlord.


The two Viking forces pretty much slaughtered each other, and we reached the lat turn of the game with no side having got troops onto the enemy side of the river. Our force made one last push. The Welsh archers peppered the Norman warlord with arrows, forcing his bodyguard to protect him. But the loss of the bodyguard opened up a gap in the Viking/Norman defence line, and a small group of Welsh levy slipped through to establish themselves on the enemy side of the table.


Gary followed up with his warlord ...


... but the Norman warlord cut him down in an epic duel.


At the other bridge, Bryan's Norman foot had hurled themselves into the Scots on the other side of the stream, and also created a gap. Bryan threw his warlord into the fight, throwing back the Scots again, which allowed him to also establish himself on the opposite bank.


And that was it. The Norman/Welsh/Viking alliance had won a narrow victory.

We had to do a lot of looking up of rules, but overall the new edition of Saga ran fairly smoothly, with a lot of the rules now streamlined, and some interesting changes and additions to the various battle-boards.

Meanwhile Peter ran a game of Maurice, introducing three new players to the game, who will become new factions in our ongoing campaign. 


At some stage in the next few weeks they will take to the field with their own campaign armies, along with John and I, who have yet to fight in this round.;

Tuesday 22 May 2018

Munera Sine Missione - Final Testing

The update to Munera Sine Missione hasn't been forgotten. Both Victor and I have been busy this past week or so, and we haven't has as much chance to discuss things as we'd like. However the main rules are finalised, bar renaming one of the terms in the game, and the solitaire campaign rules are done. All that's left is some final tweaking to the multi-player campaign system and some confirmation of how one or two of the more exotic weapons will work.

The exotic weapons are ones which will dismay purists, but which are included because of their presence in some popular figure ranges. First up is the cape, which we used to run as a poor-man's net, but which now acts to distract an attacker and improve a lighter gladiator's chance of survival.


The second weapon is the whip, which we used to treat as a lasso (and which is depicted here as one, since I don't have suitable figure) however it's now a weapon in its own right which has little chance of scoring real damage, but can annoy by inflicting critical hits, knocking away weapons or tripping an opponent.


I played some games using both weapons earlier this evening, and they seemed to work OK; not too powerful, but not so weak as to be useless.

Sunday 20 May 2018

Deep Space Serenity

Deep Space D-6 is a game that lends itself to tinkering, and one area where this has been done is in he nature of the ship you get to command. Last week I downloaded a 'Serenity' variant board, and gave it a run-through this evening. It's a tricky board; the Firefly-class ship is unarmed, so the Tactical option has been effectively removed. Threats are eliminated by out-flying them or tricking them, and this requires combos involving Command dice. Although hard to set up, tactical dice are wild-cards, so you get a few choices. 'Serenity' also has fewer shields and hull than the basis USS Crypsis board, although the hull is easier to repair.

Here's the start of the first game, with just some Raiders to deal with.


It was soon joined by an Assault Cruiser.


And quickly by other ships. I just didn't get any decent crew rolls in this game, and the 'Serenity' was swiftly destroyed.


In the second game I was confronted by an Interceptor at the  start.


A series of nasty ships came out of the deck early on.


Things were soon looking very bad indeed.


And that Threat Roll of '2' was the end, as it activated enough cards to eliminate all of my remaining hull.


I shall return to the 'Serenity' another day. I decided to give the USS Crypsis another try. My initial threats were fairly dangerous, but I got plenty of good tactical rolls, and the ship's weapons fought them off.


Two thirds of the way through the deck and I was still going strong. I'd navigated the Nebula, whilst not meeting any enemy ships, survived the Meteoroid by blowing it up when I had full hull and shields, and even passed through the Solar Winds.


That Time Warp proved a little tricky to deal with; I had a few turns where I had crew trapped in the Threats boxes and in the infirmary, and had to ignore threats in order to release them. The little damage I did regenerated via the Time Warp. By this stage I had my crew back in full fighting fettle, though.


I had used up the deck by this stage; all I had to do was eliminate the on-board threats.


And I did. Another win for Spacefleet!


That's two wins in a row using the basic board, so I think removing some of the Nothing Happens cards is in order so the difficulty is increased. One option I think might be interesting is to keep the deck in play the same (36 cards) but add in some new ones - say about 8. At the start of the game the deck is shuffled, and then 8 cards are removed and kept face-down. That way you have no idea exactly what cards you're going to encounter.

Saturday 19 May 2018

Comic Gong 2018

This is an entire post free of specific games stuff so if that's your only reason to read this blog, then it's probably best to move on.

Still here? Good.

Today was Comic Gong, which is Wollongong's free festival of pop-culture and nerdery, organised by the council through the public library service. As ever there was plenty of stalls, displays and events for all the family. There were even two miniatures companies selling their wares (although I didn't buy any). And, of course, there was cosplay. And, as you know, Catherine and I are partial to a little cosplay. 

In fact our costumes were the only ones I took pictures of. The photographic muse has deserted me recently for anything but blatant self-promotion, so that's all this post is; pictures of our cosplay.

But what a cosplay it was. Unlike previous years, when we have attempted specific characters, this year we decided to go for a theme. And the theme we went for was Star Trek. With a steampunk vibe. Yes, not original at all, but, surprisingly, something we could put together with very little effort using stuff we either owned or could borrow from our daughter. 

We put together our look, developing names for our character in the car on the way there.

Here's Catherine, as the logical Vulcan Sub-Commander Spanik.


She seems very stern and forbidding ...


... but is capable of a very unVulcan smile when prompted.

And do you like her Starfleet badge? I made us one each from layered card and small cogwheels from the steampunk accessories section of our local sewing and craft shop.


I took on the role of adorable red-shirt, Ensign Persano, whose name is derived from a very convoluted reference to something in the Sherlock Holmes canon. My cameo choker is also made from bits from the same craft and sewing shop.


The ray-gun was part of Catherine's Doctor Venus costume from a couple of years ago.


The belt was the only major item I bought specifically for the costume. It's the first cosplay I've done where I can actually carry my personal effects as part of the costume.


Even officers of the Steamship Enterprise need sustenance.


 More tea, Ensign?


The biggest thing to come out of it was that we met one of the senior photographers for our local paper, since she was obviously covering the event. She took our photos for the paper, of course, but whilst she took them we chatted and she wants to try and put together a story or photo-essay on Catherine and myself with regard to my crossdressing and how it's part of our life. We're quite excited by this; it's something about which people make a lot of assumptions and which is very misunderstood, and it's nice to be given an opportunity to maybe change the way people think, and do some good.

Update: Bonus picture of the two of us together.


Thursday 17 May 2018

Tankers In Normandy

Four of us played a game of 'What A Tanker' this evening. After our previous games we went for a denser terrain; more walls and thick hedges, more impassable woods and more buildings. Gary and Ralph took a Panther and  Tiger I respectively. Caesar and I each had a Sherman; mine was accompanied by a Firefly, whilst his was accompanied by an M10 Achilles.

Our Shermans took up positions along the road, using the walls and buildings as cover.


The Germans advanced to wards the village square.


Caesar was working the Achilles around the German flank. He got a clear shot at the Panther's side armour, but failed to damage it. Gary returned fire and destroyed the tank-destroyer.


He then used the cover of a building to line up a shot on my Sherman, but didn't get the rolls to take it. Still, this was a tricky position to be in. Meanwhile, off camera, Ralph ambled slowly down the road, knocking out Caesar's Sherman as he came.


A Sherman in trouble; in the sights of the Panther and with a Tiger heading down the road towards it.


I got the roll I needed; enough movement dice to dart out from behind the house, acquire the Tiger, aim and shoot. I hit it, but the shot bounced off the armour. I was then able to move back behind the house, out of sight of the Tiger and also closer in, such that I was no longer covered by the Panther, who lost both its acquisition and aim.


Gary worked the Panther around the Allied flank, but this gave time for the Firefly to move up. It achieved nothing before the Tiger (I think) took it out.


This left one Sherman alone against a Panther and a Tiger. Not good odds. the fact that I lasted three or four turns was the stuff legends are made of. I took three hits from the Panther, and survived a few misses, and managed to get three hits on it in reply. True they did no damage, but it was still an achievement. Eventually I simply ran out of command dice, and the crew skulked off into the woods.


The last few turns were the high drama that makes this game so much fun. Even at low odds there was a chance the Sherman could cause an upset on one of the German tanks, and the odds worked the other way as well; the Germans spent ages failing to finish off their opponent. All in all the game was tremendous fun, and a very welcome pick-me-up. I think we're getting the hang of the tactical possibilities now as well. I still want to try an early war game; I suspect the smaller strike and armour values of games involving Panzer IIs and IIIs could be frustrating but fun.

Monday 14 May 2018

Maurice Campaign - Round 2

Apologies for not posting for a week. Life has thrown us one of those ... life things, and my attention has been elsewhere. But we have a way forward now and should be returning to a semblance of normality for the foreseeable future. Even that wouldn't have prevented me posting a report of our games on Thursday night, had I not been so distracted that I left my phone at work on Friday; the one with all of the photos on it.

Anyway, on Thursday we started the second round of our Maurice campaign. John couldn't make it, and I was in doubt (I turned up to watch), so we sat it out, and will play each other again at a later date. In the meantime Gary (Ottomans) defended against an attack by Ralph's Prussians, whilst Caesar's French defended against Peter's Austrians.

Here's the Prussians attacking the Ottomans. Ralph stacked most of his army against the extreme Ottoman right trying to avoid the massed guns of the Turks. Even so he lost a few units to cannon during the approach.


Once he got in close, though, the Prussian musketry dealt with the Ottomans rather effectively.


However Gary swung his irregular cavalry across the battlefield to hit the Prussians in the flank. The battle was close, and could have gone either way, but the Prussians clinched a victory in what was an exceptionally bloody fight.


Cavalry featured heavily in the early stages of Peter and Caesar's Austrian vs French clash as well.


Whilst the cavalry pushed each other back and forth on the flank, the infantry eyed each other up.


At that point I had to go. Peter took the following pictures, but I'm not sure if they're in the correct order.


Peter also provided a summary of the game, including the bits after I left.

The Brief Summary

1. Austria attacked French Cav 5 vs 4 unit

2. French beat off Austrian attack

3. Cav battle grinds on for a long time, we get down to 2 cav each

4. I bring up my infantry to start volley firing at French Cav

5. I gun down the french cav

6. French infantry advance,

7. one crazy french battalion attacks the Austrian line and is eliminated (Heat of battle card)

8. the french infantry attack stalls and are then attacked form the rear / side by my Cav.

French are defeated.

This was a victory for each side in the alliance. Both games were fairly bloody, so there will be a lot of conscripts in play next time. John and I still have to play our game.
Related Posts Plugin for WordPress, Blogger...