Saturday 30 June 2018

What's New Pussycat?

I actually got some paint and brushes out today for the first time in weeks, and finished something! I started this car for Machinas last year, but it's sat in the 'to do' pile since then.

Big shiny bonus points if you can spot the inspiration for the colour-scheme and (to a lesser extent) the design.


Friday 29 June 2018

More What A Tanker

We played a couple of games of 'What a Tanker' last night, but I forgot my phone and didn't get any pictures. So here's some 'Girls und Panzer' fan-art from Excogitatoris-Logica from this site.


We did actually use T34-85s. I ran two of them (although Theo took one over in the second game), Colin ran a Stug and Ralph ran a Panther. The terrain was a mix of impassable woods, lines of trees and low rises. The terrain actually worked very well, with all of us manuevering to make the most of it and make the enemy's shots more difficult.

One report covers both games. Ralph brought his Panther down the middle, got it into a nice position and was then destroyed. Colin then spent the rest of the game heroically fending off two Russian tanks with his Stug, getting in several hits before eventually succumbing. The Stug is a tricky customer. Whilst it's limited by not having a turret, its low profile makes it harder to acquire, and the Tank Destroyer trait essentially gives it an automatic aim. The T34s both survived both games.

Meanwhile there was also a game of Saga. I think Caesar took some pictures of that, but I haven't seen them yet.


Saturday 23 June 2018

Newark In A Bathtub

Enthused by my refights of Whalley last week I decided to play another Portable Wargame this afternoon. After a few minutes with Google I came across this scenario for the 1644 Relief of Newark, and set about adapting it. Since I only have an 8x8 grid I decided to ruthlessly bathtub it, running each brigade as a single unit.

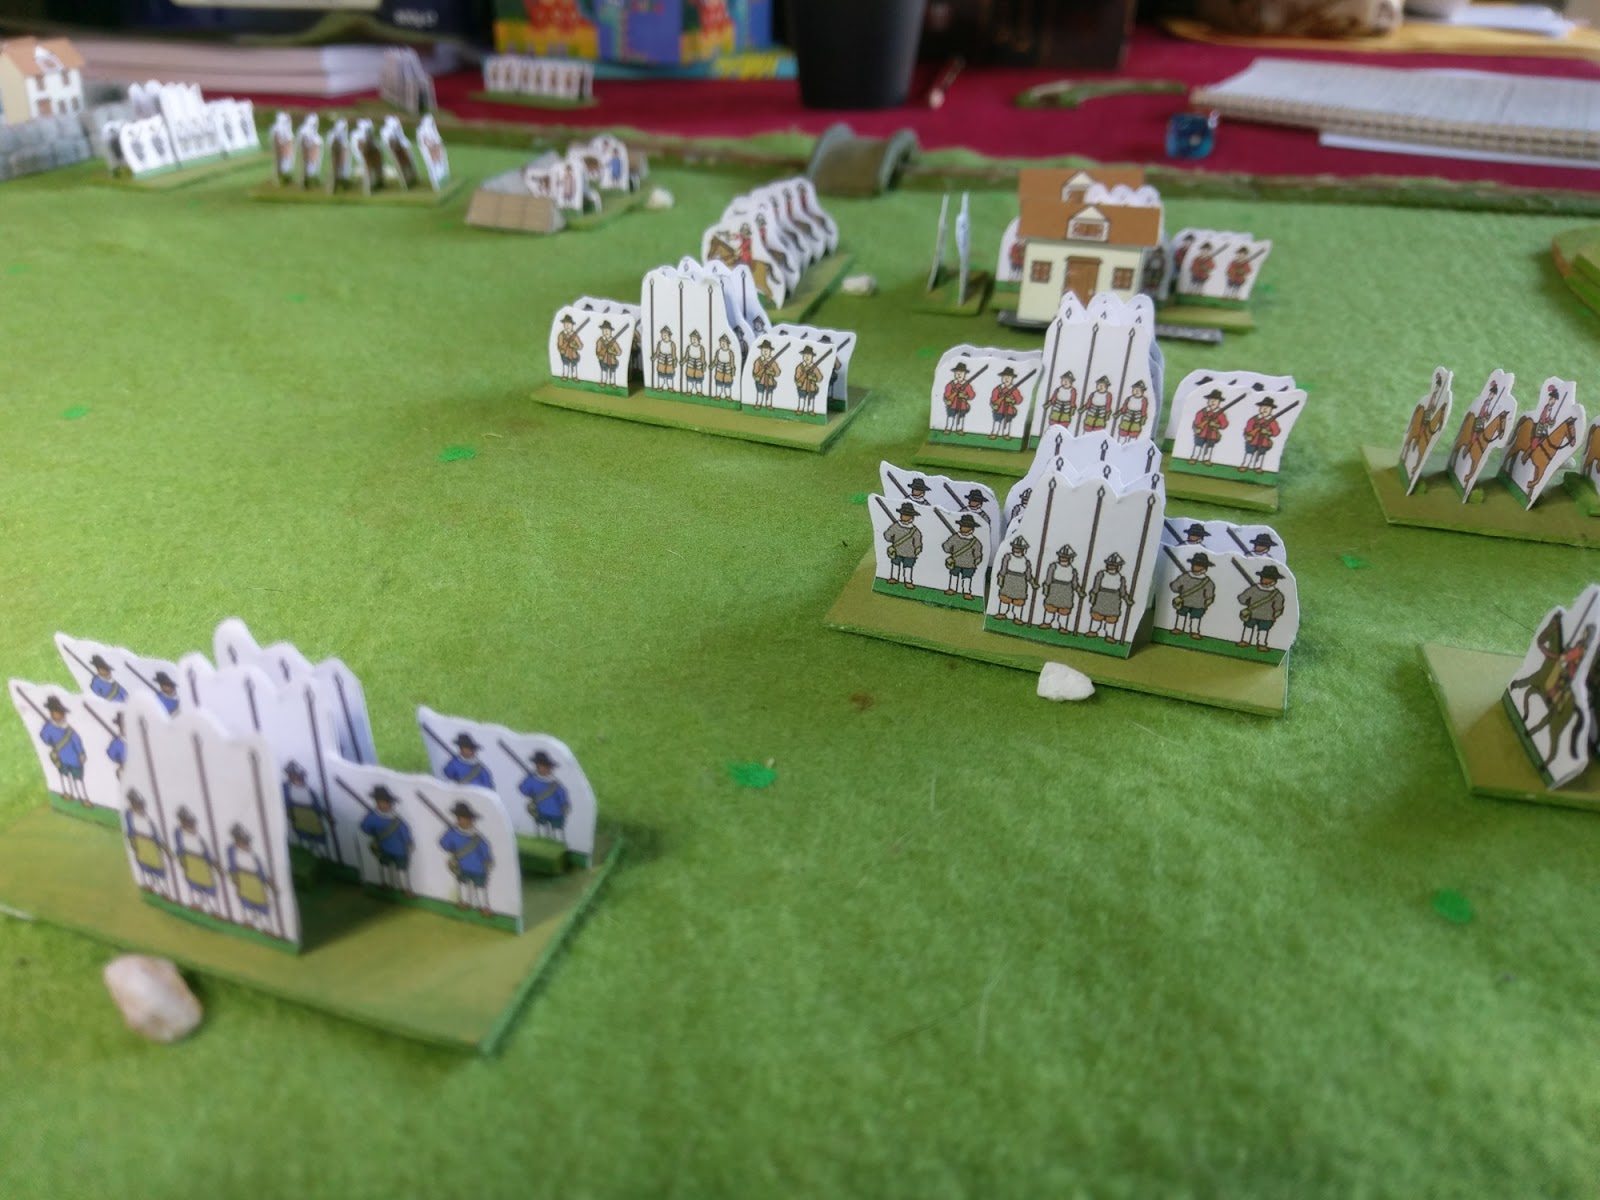
Here's the Parliamentarian besiegers: two bases of Trained Gallopers flanking two units of Pike & Shot, one Poor (in the cover of the Spittal) and one Trained (in the open, although the scenario did have parts of it in earthworks). In the distance you can see the siege artillery.


The Royalists started with two units on table, both Galloper units, one Elite (and led by Prince Rupert) and the other Trained.


The siege artillery face the Newark garrison, a unit of Poor Pike and Shot. They could sally forth on or after the turn on which the Royalist reinforcements arrived. I made their defences impregnable for game purposes.


The Royalists also had two units of Pike and Shot at the start, who arrived on the first turn, one Elite and the other Poor.


The battle stated with horse engaging on the Royalist right, Loughborough's Royalists against Lassiter's Parliamentarians. They would shove each other back and forth for most of the rest of the battle.


The Royalist foot advanced in the centre, and whilst the Norfolk Brigade stayed in the cover of The Spittal, King's Brigade moved forward to engage them.

Undocumented by the woodcut artist, Rupert's horse had driven forward against Thornhaugh's brigade of horse, and pushed them back almost to the walls of Newark.


Parliament rushed reinforcements to the battle, crossing the Trent via a bridge that was made of boats in the actual battle, but which wasn't in this refight.

Both sides had two units of reinforcements. Parliament had some Trained Trotters and Poor Pike and Shot, whist the Royalists had some Poor Gallopers and Poor Pike and Shot. At the start of each turn I rolled two D6 for each side and took the highest score. If it was equal to or less than the current turn, then that side's reinforcements would arrive.


The Royalists, now outnumbered but on the offensive, regrouped.


An overview of the battle. In the distance Rupert was still making heavy weather of the Parliamentarian horse.


Rupert fell back and led his troops in an attack on the Parliamentarian siege battery, destroying some of the guns.


He was drive off by the reinforcing horse, however, and quickly found himself outnumbered and surrounded when the other brigade of Parliamentarian horse joined in.


The newly arrived Parliamentarian foot also swung things in their side's favour, turning the Royalist left, undefended whilst Rupert was off elsewhere.


Rupert's horse were scattered, but the sight of Royalist reinforcements arriving emboldened the Newark garrison, who sallied forth and engaged Thornhaugh's brigade.


The arrival of the Royalist reinforcements allowed them to stabilise their position and push forward against the Parliamentarian centre.


The Newark garrison found itself beset by more horse, and seemed unequal to the task of inflicting any actual damage on either of its opponents.


The reinforcing Royalist horse, Porter's Brigade, came to the rescue but Parliament held. Another charge scattered the Newark garrison, the survivors fleeing back into the town.


Parliaments horse gained the upper hand on the other flank as well, routing Loughborough's horse. This halted the Royalist attack


A final Royalist volley saw off Parnham's Brigade, but the Royalists had failed to raise the siege and, with the garrison badly mauled, it would not be long before Parliament took Newark.


This was a more interesting game than I initially thought it would be, although on the open battlefield the rather free and easy flanking rules that the Portable Wargame has, combined with the low unit density, made flank attacks easier than perhaps they should be. Once again I used the quality system where poor units took one fewer hit and elite one more, whilst all units could convert a hit to a retreat if they rolled a 4+ and had an escape. The game really swung on the arrival of reinforcements; Parliaments' turned up two turns before those of the Royalists, allowing them to halt the Royalist attack before it had properly developed. By the time the Royalist reinforcements turned up, Parliament's position was relatively stable, and their low losses (a unit of horse and one of foot) reflected this.

Once again, though, the Portable Wargame delivered a fun game with minimal effort.

Friday 22 June 2018

More HOTT

On a cold winter's night there's nothing better than a couple of games of HOTT. So it's a good job I had a couple last night. I played Geoff, and he used my boring  bog-standard High Elves. I used The Spawn of Tiamat.

Here's the first game. I defended and did a weighted attack on Geoff's left.


It was a fairly quick game. Geoff's line of shooters and spears was a tough nut to crack, but a couple of lucky combats destroyed his archers, and then a second charge by the various elements I had classified as knights destroyed his spear general to win the game.


Geoff defended in the second game, and chose to run his mounted as riders rather than knights. I attacked his left again, and despite their position on the hill got an advantage over the Elven cavalry.


Meanwhile my chaotic beasts worked their way around his other flank, hiding in the woods to avoid the accurate Elven archery.


Unfortunately from that point onwards it all fell apart. Geoff had his Elf Prince hero in reserve, and took out my hero (Tiamat's consort, Qingu), before destroying my right flank.


His spear-line pushed forward, engaging Tiamat herself.


My beasts put up a valiant fight on my left, and Tiamat managed to ensorcell the enemy hero as well. Both armies were hovering on the verge of breaking, when Geoff lined up a fantastic set of combats and destroyed 7AP of my army in one turn, including Tiamat herself. With an undeployed dragon in my army, the 18AP I lost meant I had a single beast on the board. I think this is possibly the largest defeat I've eve had in a game of HOTT, although the 18-10 scoreline testified to a bloody game.


So, one game each. Not a bad evening.

Meanwhile others were playing Black Powder in 15mm, in preparation for a Waterloo game on Sunday.


And Gary and Caesar played Maurice -- Austrians and Ottomans.


Gary was trying out an experimental activation mechanism, using sub-commanders, which allowed multiple groups to activate during a turn. It looks like it was mostly successful, although the size of the game meant that they didn't finish the battle by the end of the evening.


Monday 18 June 2018

Whalley Again

This evening I played through a refight of the Battle of Whalley using the Portable Wargame. I used the same troop classifications as the previous game,  but with a few changes to the setup and the rules.

Firstly I shifted the map up one row so that the Parliamentarian right flank wasn't so exposed. Secondly I started the two Royalist units facing the wall with a hit each. Finally I made two changes to the actual rules. The first one was that I used the Average line on the hit results for all troop; 1-3 the unit takes the hit, 4-6 they can retreat or take the hit. I'll discuss this below. Secondly I reflected quality by varying the number of hits a unit could take; Poor units took one less and Elite one more. This was factored into the Exhaustion Levels as well. Finally I added a small change to the initiative roll; if the score is a double, then the side which eventually gains initiative was allowed to recover one hit on a unit of their choice. I rather liked the idea of a double having an effect. Again I'll discuss this below.

So this was the setup. The fields were just for show; the key terrain consists of the villages, hills river, bridge, ford and wall.

The Royalists got a rally on the first turn, removing the initial hit from their rather poor dragoons. After a brief exchange of fire at the wall, the Royalist troops fell back across the stream to await reinforcements.


On the other flank the horse of both sides met at the stream.


The Royalists pushed forward boldly, since their troops had the edge in terms of quality.


They were forced back, though. Both sides lost a unit, but the Parliamentarian horse was better supported. Parliament pushed forward against the retreating Royalist foot and horse.


The Royalists best foot unit was badly mauled in the attack, and sought shelter in a village on their side of the stream. But the rest of the Royalist army stabilised their position, and with the pressure mounting, the Parliamentarians fell back to the safety of the walls. The Royalists followed up.


The clubmen attacked an elite Parliamentarian foot regiment in the flank. This was a bold move that rapidly came unstuck, as the regiment simply turned and shot the hapless peasants down. next time they'll learn to attack with support.


Despite their lack of quality, the Parliamentarian horse drove forward with panache, and eventually routed the other unit of Royalist horse. This pushed the Royalists over the Exhaustion Point, stopping their attack.


The Royalists started to fall back to their side of the stream, but Parliament pressed them hard.


The Royalist dragoons were routed at the ford (far distance in this picture) and at that point I decided that the day belonged to Parliament.


This was a fun game, with a real to and fro to the action; the Royalists were pushed back at first, rallied and went on the offensive, but were then driven back again. Their best foot unit was savagely mauled early on, and they never got a chance to recover it, whilst their horse were totally outfought.

But let's discuss the changes to the rules. Firstly the change to the way units take hits. The current method does work. Poor units are more likely to take hits whilst better units have the option to avoid them by falling back. But  I found that this method didn't really feel right when one side was defending a position. In this case a retreat really isn't an option, so the effect of quality is almost irrelevant. One option was to add results which forced a retreat, making it more likely for Poor units to receive it. But I couldn't quite work out how to build it into the table in a way that made sense. But the rules themselves include an option for changing the number of hits a unit could take. Combined with the retreat rules this makes Elite units rather too good; an extra hit and less chance of taking hits in the first place. But with all units getting stand and take a hit or retreat equally, then the extra hit a unit was allowed makes a difference. It didn't seem to adversely affect this game, and I'll try it again in some more I think.

The second change simply makes use of doubles for the initiative roll. I should say that I don't like wasted rolls, where you simply roll again until you get a result.. One option was to automatically give the initiative to whichever side didn't have it in the previous round. But I opted for the rallying off of a single hit instead, as it seems more dramatic. One downside is that it doesn't connect too well with the Exhaustion Point rules, as a side opposing one which has reached its Exhaustion Point, and which can't take offensive action, could simply pull back and recover all hits before going in again. Maybe playing games to a turn limit would mitigate this. I think I'll try that in future games. A final thought on the rallying is to go back to the original system where a side reaches its Exhaustion Point based simply on hits taken, rather than units lost. With rallying this allows a side to possibly recover from exhaustion, but there's still the danger that a good run of combats along a line of battle could break a side very early on in a game. This was, in fact, the reason I shifted to basing things on lost units.

Anyway, plenty of ideas to explore, which means more games I guess.

Saturday 16 June 2018

The Battle of Whalley

With one thing and another it's been a while since I set up a miniatures game at home, so I thought I'd make an effort this weekend. I felt the urge to have a go at a Portable Wargame, so I got out my paper ECW armies again, and played through a scenario based on this scenario for the 1643 Battle of Whalley.

I used an 8x8 grid, with forces as follows:

Parliament

1 x Commander (Colonel Shuttleworth)
1 x Elite Pike & Shot (Shuttleworth's Foot)
1 x Average Pike & Shot (Brereton's Foot)
1 x Average Dragoons
2 x Poor Gallopers

Royalists

1 x Commander (Earl of Derby)
1 x Average Pike & Shot (Molyneux's Foot)
1 x Elite Pike & Shot (Tyldesley's Foot)
1 x Raw Pike & Shot (Fylde's Clubmen) - This unit cannot fire and starts with a Strength of 3
1 x Average Trotters (Derby's Horse)
1 x Average Gallopers (Houghton's Horse)

This is an encounter and the scenario starts with both sides partially inactive and the Royalists especially at a disadvantage, surprised by the sudden appearance of Parliamentarian foot from behind  a stone wall to their front. I started with this setup; Royalist foot and dragoons facing Parliametarian foot behind a wall, whilst the bulk of the Royalists were back towards their baseline.


I gave the two Parliamentarian units behind the wall a free shot, and then started the first turn. However on the first turn, only the four units nearest the wall could activate. On Turn 2 all Parliamentarian units could activate as normal. Royalist units had to dice, and were available on a 1-3. On Turn 3 all units on both sides move and activate normally.

The initial Parliamentarian surprise didn't seem to impress the Royalists much; the Royalists simply fell back so that they could regroup with the rest of their force.


The Parliamentarian horse moved forward.


They crossed the stream, and were engaged by their Royalist counterparts.


Meanwhile the Royalist foot formed up on their side of the stream, ready to take the fight to the Parliamentarians ensconced behind the wall.


The advanced, with the dragoons and clubmen swinging around the flank.


Meanwhile more Royalist foot had driven Parliament's dragoons back away from the farm covering their army's left flank.


The Royalist dragoons finished them off.


The cavalry action was also going the Royalists' way; one unit of Parliamentarian horse routed ...


... and then the other.


This now left the Parliamentarian foot holding off the Royalists. They held out for a while, but there was little they could do.


A Royalist push saw one of the units break, ending the battle.


The Royalists had a few units that had taken hits, but didn't lose any.

Once again I ran the Exhaustion Point based on units lost, not just hits inflicted, and whilst I counted a Commander as 6SP for calculating Exhaustion, loss of a Commander didn't count towards the break-point.

If I ran the battle again I think I would simply start both of the units in front of the wall with a strength point lost, and then proceed with Turn 1 from there. Also Parliament's right flank was probably too open, making it very easy for the Royalists to turn it, so a slight shift in the map might work. However the rules gave a perfectly fine game, and that's what's important. It felt good to be pushing lead around on a Saturday afternoon, even if the lead is paper.
Related Posts Plugin for WordPress, Blogger...