Showing posts with label ancients. Show all posts

Tuesday, 28 July 2026

A Complicated Man

We went to see 'The Odyssey' this weekend, and enjoyed it. 

And who doesn't go and see a film and feel inspired to put together some kind of game afterwards?

Now I did think that it would be possible to run a solo Galleys & Galleons game where a hero in a ship (or with a squadron of ships) has to cross a table dotted with hazards, and the rules would certainly allow that. It might not be a very interesting game, since the hazards would be static, but it has possibilities. 

However I ended up just setting up a straight galley fight using Galleys & Galleons. 

And then I fiddled with it slightly. Why not add some heroic elements?

So here we are. 

It's the Trojan War, or at least a version of it. The Trojans have sent a squadron of ships to harass the Greek supply lines. Agamemnon send Odysseus with the ships from Ithaca to intercept them.

Both sides had a single command consisting of a trireme flagship, four triremes and four biremes. All pretty standard so far. However I gave the Ithacans Odysseus in command, so his flagship counted as Charismatic, and had Expert Rowers. On the Trojan flagship was a priest of Poseidon, who counted as a Hydromancer. 

I set the terrain randomly (after laying an obligatory coastline), and it ended up with one small offshore island. Random positioning for the squadrons saw them approaching each other diagonally, with the Trojans being inshore. 

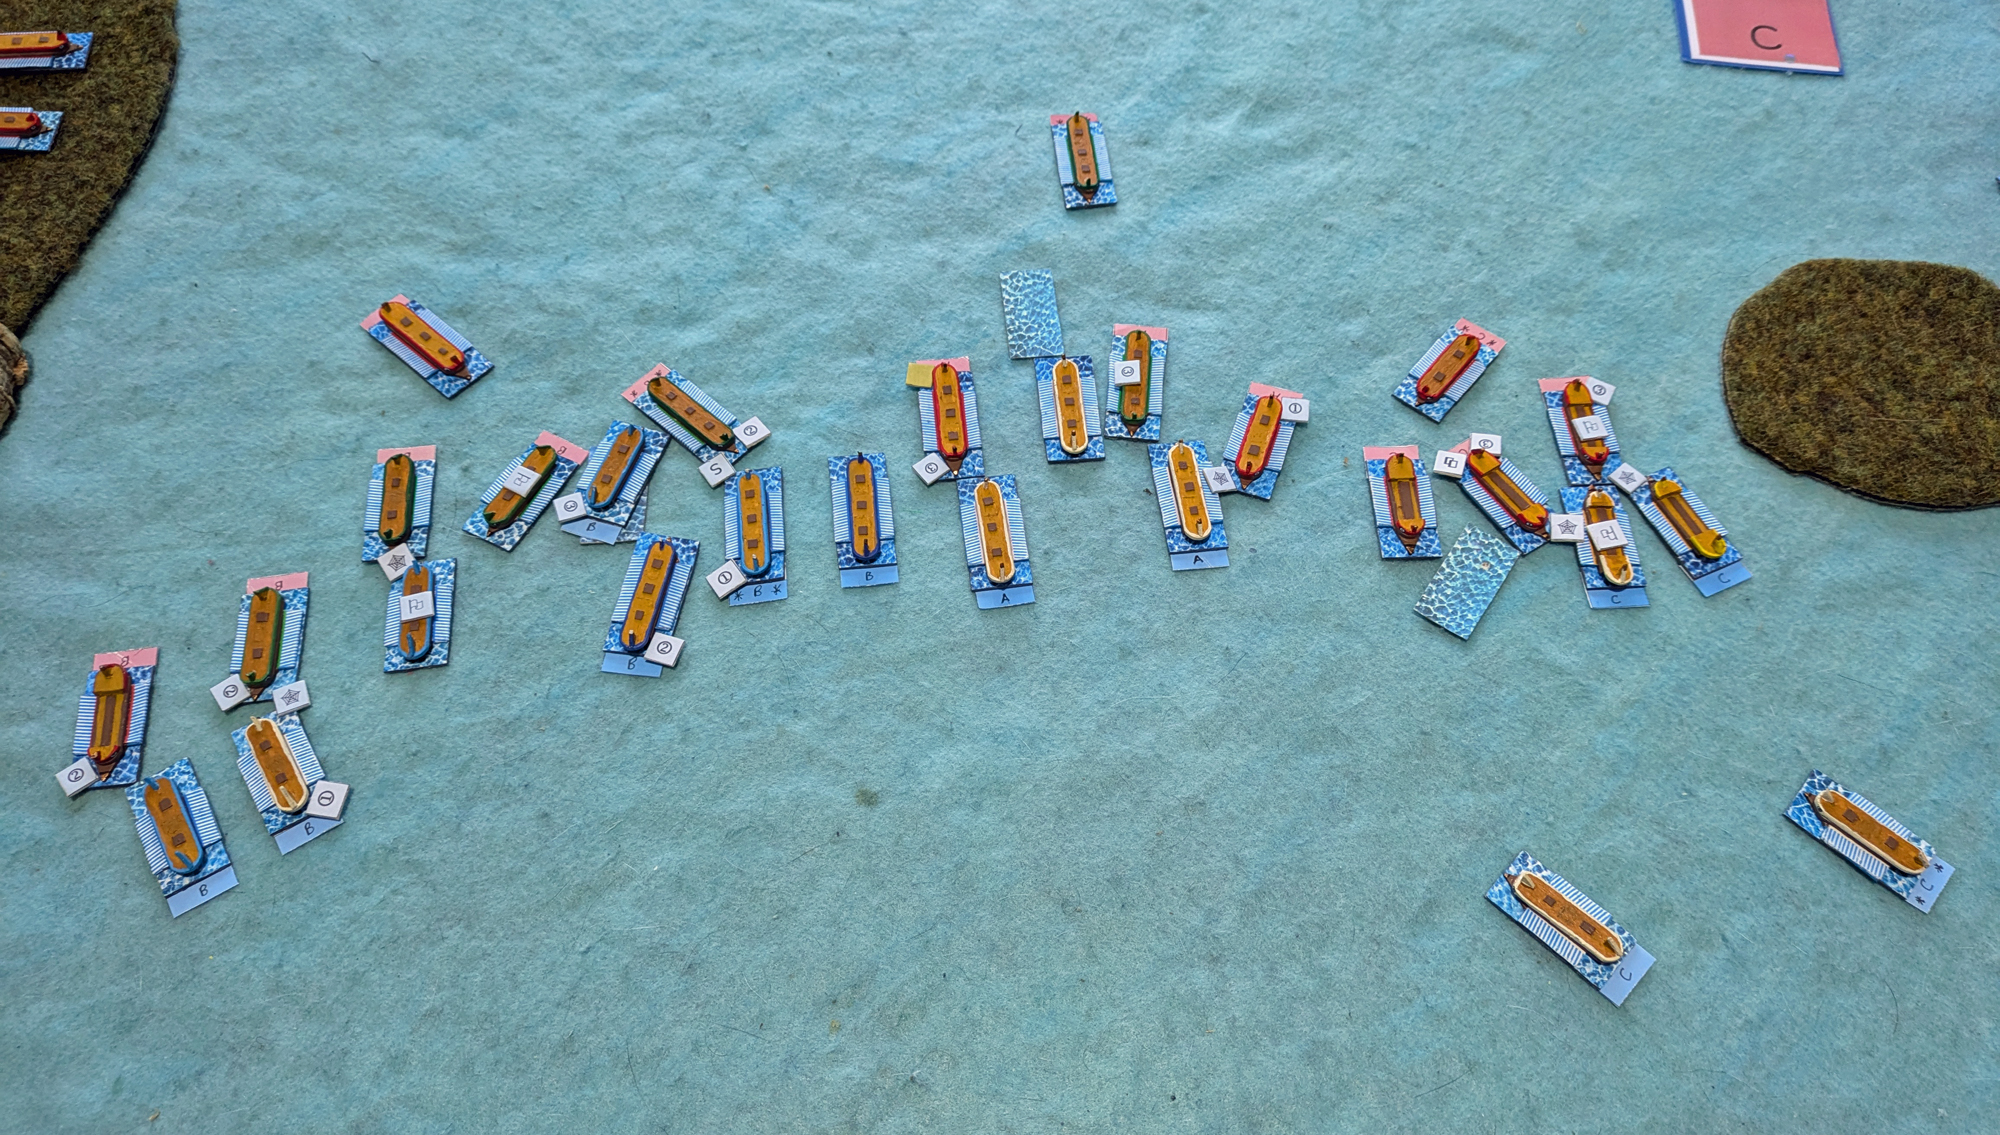
The Ithacans (foreground, in red) sent their biremes to the left of the island and the triremes to the right. The Trojans (green) had their triremes in the centre, with a pair of biremes covering each flank. 

Here's the position a couple of turns in. In both cases the flagship is to the rear of the triremes. 


The Trojan centre split, with some triremes going after the Ithacan biremes (top of picture) and others heading for an exposed trireme and bireme on the right. The priest of Poseidon used his power to drive back an Ithacan bireme. 

At the bottom right you can see the first attack of the game - a Trojan trireme rammed an Ithacan bireme scoring light damage.  


The Ithacan response was fast and deadly. Three triremes rowed fast and hard, ramming three enemy triremes. This heavily damaged one and crippled a third. 


Out on the Ithacan left one of their biremes rammed a Trojan bireme and took it after a short boarding action. It was rammed in turn, but survived. 


The Trojans struggled with activations and seemed to be pretty much paralysed. On teh next turn their flagship, now isolated, was rammed by three enemy vessels and reduced to matchwood. 


The Ithacans now began a simple process of mopping up. As with most of my galley fights I set the breakpoint at 50%, with a flagship counting as two ships. The Trojans had already lost four vessels on that basis. 


At the bottom right two Ithacan triremes attack a couple of Trojan counterparts. And to the left an Ithacan bireme finished off a crippled Trojan trireme, ending the action. 


So the Trojans lost four vessels including their flagship, and another was crippled. The Ithacans had a couple of vessels badly damaged, but that was it. Odysseus took no direct part in the battle, although his leadership bonus allowed his ships to do that effective initial strike that effectively saw the beginning of the end for the Trojans. 

It was a quick game, but I played it in bits whilst doing other things, so it filled in some time in a pleasant manner. I need to try more games with magic. 

Friday, 27 February 2026

Triumph!

Geoff has recently got hold of a copy of Triumph! and suggested we give it a try last night. 

For those that don't know, Triumph! grew out of one of those interminable schisms that happen every timeWRG update a rules set. One of the DBA updates upset a group of people enough that they wrote their own DBA update, filed off the serial numbers and published it as Triumph! So, as you can guess, Triumph! is basically DBA. Part of the fun of the rules is looking at how familiar BDA/DBM terms have been clumbsily renamed to avoid the set looking the same.

To be fair it's a nicely laid out set of rules, with proper paragraphs, sections and diagrams. I don't know how tight the language is in terms of covering situations, so can't comment on whether any ambiguity has crept in whilst trying to make them readable. We let Geoff run the game. 

We played Early Imperial Romans against Selucids. Armies are built using a simple points system - elements are 2, 3 or 4 points and you build an army with 48 points. Naturally we found ourselves juggling the army structure a little when we found ourselves one point over or under. 

I did like the card-based terrain deployment system. It's a neat idea, albeit one that requires a deck of special cards or several pages of lookups in the back of the rules. You choose your terrain, then number each piece. Then you randomly determine a layout that shows where on the table each  number must go. There are 36 layouts (I think).

Anyway, here are the armies all set up. Geoff played the Romans whilst I had the Seleucids. Dave watched and offered advice. 


My phalanx. Geoff has them based deep for ADLG, so they looked impressive and overly deep.


I started off well by losing my general. This has no battle-loss effect like in HOTT, and the general doesn't even count as more points like in DBA. You just have command difficulties for the rest of the battle.


My cavalry-based right flank got disrupted pretty quickly.


What saved me was my phalanx getting lucky and killing the Roman general, which left both armies starved of movement. 


We fought on and both reached the point where  decent kill would see us win. I had a go at some Roman auxilia on my left. Failed to kill them. 


Geoff had now flanked my phalanx, but they steadfastly refused to die. 


A useful run of PIPs - sorry, 'Command Points' - saw my cavalry get into action and kill some of Geoff's 


On the same turn some of my phalanx dies. We were now both over our breakpoints ...


... so it went down to who had gone over the least. That was me, by one point. So the Romans lost and I won a Pyrrhic victory.

What did we think? The three of us basically felt like we'd played a game of DBA with too much extra fiddle to make it fun. To be fair the other two play ADLG a lot, and I think that's just DBA that's been overcomplicated. But I think our view was that we weren't unhappy with the latest release of DBA when we wanted a small quick game, so Triumph! offered nothing new.

We did like that there was a troop type called 'Bad Cavalry'. Dave saw in as Bad in the Michael Jackson sense. I saw it as cavalry that needed to be punished. And did just that to it. 

If you don't like DBA but want to play DBA then Triumph! might be the rules for you. 

Monday, 1 December 2025

Ten Years Ago - December 2015

Something historical for this month's Ten Year time-machine post. Back in December 2015 we played a big DBA game recreating the battle of Chaeronea, using some lovely 15mm figures.


Here's the post:

Pikes & Hoplites - Chaeronea 338BC

And here's an arse:


Friday, 21 November 2025

Minoans vs Egyptians

I played in a big game of Art De La Guerre (ADLG) last night. I'm still not sure about these rules. I won't deny that the game rattled along nicely and gave a decisive result, but there's lots of fiddly factors which seem quite hard to memorise. But it's not unplayable and I'll admit that I enjoyed myself. I'll also admit that I still prefer DBA v3.0; I can live without chrome and detail in my ancients games.

Anyway, I'm not sure how many points we played, but we had four commands a side and around 34 troop elements each. Apparently that was a big game.

Geoff provided his Minoan Greeks whilst Dave brought along some contemporary flavour of Egyptians to oppose them.

Geoff and I took the Minoans whilst Dave and ... Dave were the Egyptians. Peter adjudicated.


My two commands. I had a large force of infantry covering our right-centre, consisting of spearmen and archers. On my right was our army's elite chariot strike-force. This faced their Egyptian opposite numbers and they pretty much stared at each other all game.


The Egyptians pushed forward aggressively, probably helped by the fact that their Libyan contingent was pretty impetuous. It charged my spearmen.


The initial rush saw some big holes appear in my line.


Geoff's armoured spearmen were attacked by Egyptians with various chopping weapons, and suffered pretty badly.


Meanwhile my spearmen had halted the Libyan attack and proceeded to wipe them out.


They were wiped out almost as rapidly as Geoff's spearmen


With our army hovering on the edge of a catastrophic morale failure I felt I had nothing to lose in committing my chariots. The fight was indecisive and after one round the rest of the Minoan army decided that it had had enough and fled. 

It wasn't a complete whitewash; I think we got the Egyptians to about 2/3rds of their breakpoint. Things had looked quite good on my flank. It was only when I looked to my left that I saw just how badly Geoff's troops were suffering. 

Anyway, and enjoyable game. Thanks to all who put it together.

Tuesday, 7 October 2025

Chariots At MOAB (Again)

Last year I headed up to MOAB to help Victor playtest a chariot-racing game he is working on. THis year I did it again.

You can read about the game in that link above or, at least, the version of it that we were playing last year. Victor has made a few changes since then, the biggest of which is that a lot of tests are now made on two dice, with adjustments upgrading or downgrading what type of dice you roll.

After sorting out our teams, what skills they'd have and what types of horses, we diced for initial positions off the start line. I'm Red. The ones at the back.


Frank with the Blue team got a good start, but the game does depend on your colour coming out of the initiative bag on the straight sections, and Blue just didn't appear for the first couple of laps.


I got some early moves and used my better chariot to come up and cause trouble. Alistair, with Green, had slipped his fast controllable horse teams into the inside lane and was planning on racing from there.  I rammed him, causing some damage which I hoped would cause him issues later.


I also brought on my Hortator to guide mt chariots through the dust, but he didn't really need to do much. Beside him you can see my Spartator as well. His job was to throw water onto the chariots or teams to cool them down. He risked being run down by other chariots. Mine was.


You can see two Spartators in action here and, in the background, the grid showing what dice have been drawn so far.


Craig brought one of his White team chariots to the fore. My second Red chariot was starting to drop back. I would have to spend some actions to keep it properly in the race.


A view from the rear. You can see Green doggedly holding the inside lane. No chariots had been lost, so it was hard for the rear-markers to find spaces to try and break into.


The grid, showing that we'd completed four of the seven laps.


Green made their run for the front. The middle lane is the best lane when it comes to adjudicating finishes, so getting to the front of it is a good place to be.


With one and a bit laps to go I got a couple of opportunities and used them to bring my second chariot - the one that had been running a safe race in the rear - down the inside track, and to then cut across in front of Blue.


I was then able to cut back to the inside lane, but couldn't get the actions to use that position to push in front of Green. However I was in a  decent finishing position, with a horse team that was fast on the finish.


Craig pulled into the outside lane as we finished the final straight. All three lead positions were occupied, so it would be a photo-finish. This involved a dice-off, with the modifiers to types of dice rolled being based on teh traits of teh horse teams, how blown they were and which lane the chariot was in. Alistair was strong in teh centre rolling 2D12s, I was rolling D10s on teh inside and Craig D6s on teh outside.

And yet it was Craig's 8 that beat my 6 and Alistair's 7 to give the White team and unexpected win. I had to be content with third place. 

There was plenty of discussion afterwards of things that could be changed. We felt that chariots didn't really seem that vulnerable; we expected a a couple of crashes but in fact every chariot finished. We considered some changes to increase the damage chariots took for certain things. The multiple dice types worked OK, but possibly slowed the game down, firstly because we didn't have enough of them so we were passing them around to each other but also because you couldn't roll the dice and then see if you needed to work out the modifiers afterwards (sometimes you know you've passed or failed without having to do the calculations). With varying dice types you need to do the calculations in order to determine what you're actually rolling. We also considered rules for bringing back the Spartator if he got killed on the assumption that a team would probably have a few of them on hand.

Anyway, it was a fun game with an spectacularly close finish.

As ever I hit what was left of the Bring & Buy (Monday at MOAB is pretty quiet) and picked up yet another boardgame.


'On The Origin Of Species' is from the same publisher that does 'First in Flight' - they seem to specialise in games with a science education theme - and is, oddly enough, not about evolution, despite the name. It is, however, about the groundwork of Darwin's magnum opus, with the players taking the part of naturalists discovering and documenting species in the Galapagos Islands. The art-work is lovely, but I haven't had chance to play it through yet. I'm hoping to fit in a game one evening this week.

Wednesday, 18 September 2024

All At Sea With The Romans

I got my ancient galleys out on Sunday and what started as 'I'll have a quick game to try out something' turned into a three commands a side big battle (in Galleys & Galleons terms, anyway). 

What I wanted to do was try out some Romans, using their legendary corvus boarding bridge. Now it's possible that this wasn't used for that long, if at all, but for the purposes of the game I let them have it. Galleys & Galleons does have specific rules for the corvus, but I've always thought that they were a bit clunky and didn't fit the general elegance of most of the game's mechanisms. And it's easy enough to create an acceptable facsimile of one using existing traits anyway.

Naturally the Romans were up against their traditional arch-enemies, the Carthaginians. I gave both sides six quinqueremes, six quadremes and four triremes, split into three commands. I semi-randomised the distribution of ships to make things interesting.

The Carthaginian ships were straight out of the rules, aside from the quadremes simply being Q3 C3 with ramming (as per previous games I've played) and their triremes having expert oarsmen.

The Roman triremes were given drilled soldiers. The quadremes and quinqueremes dropped ramming and added swashbucklers and drilled soldiers. So they were exceptionally good at boarding*.

Here's the two sides set up. The Roman ships are red and green and are on the right. Any other colour is Carthaginian. You can see the rough division of the fleets into commands.


Here's the position a couple of turns in. Close to the island opposing triremes are approaching each other.


And that's where the fighting started; a Carthaginian trireme rammed its Roman counterpart.


However the Romans boarded and evened things up.


More fighting and ramming.


On the other flank quadremes and quinqueremes faced off. The Romans inflicted a few hits with artillery as they approached.


In the centre the Carthaginians got the initiative and rammed the Romans. They got a couple of lucky hits which crippled opposing quinqueremes.


Battle was joined all along the line. With little sea-room the fighting was close and there was little maneuver to speak of.


A Carthaginian quadreme struck on the left, after the Romans boarded. But the Romans were suffering hits as well.


Intense fighting in the centre. A Carthaginian quadreme hit the red Roman quadreme in the centre of the picture, sinking it.


It sliced through the wreck and rammed one of the Roman command vessels as well.


You can see a few sunken ship markers now.


One of the Roman command vessels strikes.


The Roman flagship was now under attack. 


It was all too much for the Romans. I gave each ship a points value - 2 for triremes, 3 for quadremes and 4 for quinqueremes. This gave a total of 50 for each side. I considered a side defeated if it took 25 points of losses or more. The Romans reached 27 points. The Carthaginians had lost a mere 7.


The Romans were comprehensively defeated in what was, given the number of ships involved, a relatively short action. They certainly had the edge when it came to boarding, but the Carthaginians got some good rams in early on and the Romans never really got into the fight properly. However it was interesting to try two different fighting styles in this era and I'd like to give it another try with, maybe, fewer ships and more sea-room.

*If you subscribe to the view that the corvus made the ships unstable you could add the sluggish disadvantage and add in iron grapples. I  didn't.

Related Posts Plugin for WordPress, Blogger...