Wednesday 28 August 2019

A Big Adventure!

In my previous writeup of 4AD games I'd mentioned the role played by the halfling Palmerston in garnering riches and glory for his companions. Word of his exploits reached his home village, where cousins Dickson and Gowler decided that if he could become a successful dungeon adventurer, so could they. They set off for the nearest town, looking to hire a couple of bodyguards to take them on their first adventure. In a staggering display of tactlessness, one hired a Dwarf (Gunlom), whilst the other convinced an itinerant Elf, Cooinda, to join them. With their 'muscle' eyeing each other up suspiciously, they headed off on their first adventure to:

The Secret Redoubt Of Hatred


(Yes, I was using the random dungeon name generator again).
Heading north-east the party encountered a labyrinth of mostly deserted corridors. Their first encounter was a group of goblins, and the two halflings were somewhat perturbed when their hired dwarf failed to kill a single one of them. Cooinda took up the slack, and even the halflings accounted for a couple with their slings. Moving to the north-west they found some rooms, which were mostly unoccupied, but some of which were trapped. Minimal rewards lay beyond the traps though. Dickson surprised everyone when they encountered a group of hobgoblins, killing three of them with his small, weighted stick. They worked down to the south-west, and had a few more encounters, but nothing of note until they fought off some sentient slime and recovered a haul of gold pieces. They then found a secret door, which offered them a shortcut route back to the entrance, and some of the unexplored parts of the dungeon. After exploring the south-east sector of the dungeon, they headed back along the secret passage. Unfortunately they weren't the only ones who knew about it - a massive ogre surprised them, and in the ensuing fight, both Gunlom and Cooinda were smashed to a bloody pulp by the monster's club. The two halflings fled, and made it back to the outside world with a handful of gold pieces and a gem.

So not a massively successful start. They'd had a few encounters, but the treasure had been sparse, and what few items of real value they'd found were being carried by the dwarf and elf whose bodies they'd left behind in the dungeon.

Still, undeterred they sought out new bodyguards. A barbarian named Ubirr answered their advertisement, as well as another Elf, Whistler. This time they headed off to:

The Crooked Library Of The Simmering Pools


This was a disaster. Ubirr and Whistler spent the first few rooms dodging (or not dodging) traps. A crypt offered some gold once its skeletal guardians were defeated. Their biggest success came when they encountered some kobolds. Ubirr flexed his muscles at them, and they fled, dropping a valuable bracelet as they did so. Another trap was followed by the lair of a cockatrice. They'd taken the Elf along because he knew a spell which could turn anyone petrified by a cockatrice back to flesh. Needless to say that Whistler was the first to get turned to stone, followed by Dickson. Gowler and Ubirr managed to defeat the monster, but they had no way of  blessing their petrified comrades. They simply left Whistler's petrified body behind, and carried Gowler out of the dungeon. Their trip out was fraught with danger - a minotaur came sniffing around looking for halfling to eat, and another ogre accosted them at the entrance to the caves. Ubirr attacked it in a wild fury, and after taking a few hits the ogre decided that discretion was the better part of valour and fled.

Again, their haul of treasure wasn't great, and they had to spend some of it getting a local cleric to bless Dickson and return him to 'life'. But Ubirr had survived, and gained some experience, and the halflings felt that maybe their fortunes were looking up.

Not wanting to get caught out by the petrification issue again, they asked Litchfield, the Cleric, who had healed Dickson if he'd like to join their party. He decided that he would. After a suitable period of rest and recovery they set off to explore:

The Scarred Sanctum Of The Dispossessed


This was the adventure the halflings had hoped for. There were monsters to fight, it's true, but each fight yielded gold, scrolls and even some magical weapons. For the first time the party found the final boss of the dungeon - a medusa. And guess what? That's right. Dickson and Gowler were both turned to stone. With a sigh Ubirr and Litchfield dispatched the monster, and the halflings were restored by Litchfield's blessings. They explored a few more rooms, completing the dungeon, and headed home with actual riches and experience to show for their efforts. The high point of the adventure was when they were surprised by a Chaos Lord in a corridor. Instinctively Dickson and Gowler launched sling-stones at the dark shape before them, both scoring hits and causing the evil villain to flee in shock and surprise.

Well, I say experience. In fact their levelling up rolls had been abysmal. In an attempt to get more experience the first group to survive a dungeon intact went back underground, taking on:

The Unholy Armoury Of Damnation


(I played this one at about midnight in the departure lounge of Darwin airport. This is a great game for playing at midnight in the departure lounges of city airports.)

A ton of traps was what the party found. Of course. They met another medusa as well. This time they decided to parley, and the monster seemed happy to let them pass after some gold exchanged hands. Litchfield was pleased that his blessings could be reserved for something else. Some rats (both dead and alive) were dealt with easily, before the party encountered a group of Death Cultists. This was a hard fight, with no-one escaping uninjured, but the party prevailed, and stumbled into the lair of the dungeon's main monster - a dragon. If you've read the first set of adventures I'd played you'll know that battles with dragons have not always ended well, but in this case Ubirr and Litchfield pretty much killed it before it even knew they were there (the Barbarian's Rage ability is a real winner, despite only being allowed once per game). Its hoard was worth the fight, and the party left the small dungeon richer and more confident.

And so onto:

The Wretched Cathedral Of Pestilence


The first half of this dungeon seemed to be a lair of goblins, led by a Chaos Lord. The Lord's chamber was a secret one, and the party attacked him by surprise. But it didn't give them the edge they hoped it would, and in the ensuing fight they nearly lost Gowler. The halfling survived only by using a teleportation ring to escape. In the other half of the dungeon they found an incursion by Death Cultists, whose priest was the final boss. They killed him relatively easily, collecting a magnificent haul of treasure and useful scrolls. They then decided to explore just one. more. room. And encountered the bane of all adventurers - gremlins. In a moment, most of their precious magic items ans scrolls were gone. The halflings only retained their magic daggers by virtue of the Gremlins being distracted by the food they were carrying as well (a house-rule for the 'tasty snacks').

So at this stage, Ubirr and Litchfield are at Level 3, whilst the halflings are at Level 2. Given the number of adventures they've shared, you can see how bad their levelling up rolls have been*. The halflings have actually proved useful, with their luck finding useful short-cuts or valuable treasures when searching rooms, and sometimes creating useful combat openings with an initial volley of slingshots. They probably have one more basic dungeon left in them before the higher-level tables beckon.

The Invisible Gremlins seem a bit powerful, though. The party lost nine items to them, which is a lot of kit even for one as well-equipped as this one. Encountered early on in a dungeon they could be a real show-stopper. I might need to have a think about changing them a little.

*And also that I've been playing the levelling up from Minion encounters incorrectly; you are supposed to carry the tally of encounters across from adventure to adventure. By my reckoning they've missed two rolls from Minions, so I may do them now - that could see both halflings go to Level 3 as well.

Sunday 25 August 2019

Adelaide River War Cemetery

On our travels we passed through Adelaide River, and took some time to visit the war cemetery there. It's supposedly the largest in Australia, and provides resting places for many of the Commonwealth dead from that area of the world.


One section is devoted to civilians. It is dominated by the memorial to the ten people killed by the bomb which destroyed Darwin's post-office on 19th February 1942.


A large cross sits at the back of the cemetery, and there is also a memorial to those with no known grave.


On our return to Darwin we had a walk around the older part of the city, and set out to see if there was a memorial or marker for the post-office. We were in the right area (based on period maps) but having no luck, when our friend asked if we could do a detour into the Northern Territory parliament building, as there was a craft-shop there he wanted to visit.

We went in, and did the usual security check, only to be told that the craft-shop had, in fact, closed. Rather than waster the time we'd spent being scanned, we decided to have a quick look around the building.

This is the great hall.


And in a side passage we found this - all that remains of the bombed Darwin post-office. So our detour had, by pure good fortune, taken exactly where we wanted to go.


In the great hall is a small plaque marking the exact point on which the bomb fell.


We wandered down to the main Darwin harbourside as well. This is Stoke's Hill Wharf, which was also badly hit in the first 1942 raid. Now, like many harboursides, the area has been gentrified and geared up for tourism, but the wharf still looks operational up to a point.


Friday 23 August 2019

HOTT

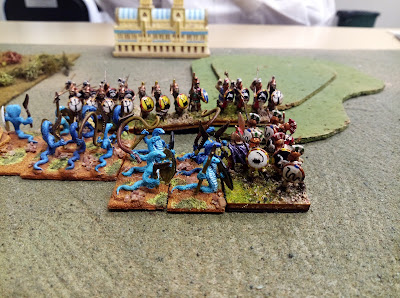
There's nothing better than a couple of games of HOTT on a Thursday evening. So that's what I did yesterday. Geoff wanted to try out is rebased Heroic Greeks. I used my Ophidians. I used the same army in both games - three Magicians, four Warband and two Shooters. Geoff used a Hero general, four Spears, two Knights and four Warband in the first game, but dropped two Warband in favour of a God in the second.

The first game. The Greeks defended in both games.


Ophidian magicians.


Geoff rushed the Ophidian archers with his chariots and peltasts.


Meanwhile the fast-moving Ophidian warriors attacked the Greek shield-wall.


It collapsed, and the warriors soon had the Greeks flanked and fighting hard.


Unfortunately the Greek chariots rolled up the Ophidian archers, and the magicians were now under pressure.


Achilles led his Myrmidons in a bold attack on the Ophidian supreme sorcerer, to win the battle for the Greeks.


On to the second game. The Greeks were fielding a God, so rather than wait for it I launched the Ophidians into a bold attack.


It could have gone better - Achilles took out a lot of the Ophidian warriors.


Ares appeared, and eyed up the Ophidian magicians; a bold move for any God in HOTT.


The Greek chariots were already engaging the snakey sorcerers.


Ares attacked the Ophidian general, but was held to a draw.


Nevertheless, he persisted, and the Ophidian general fell again.


This was a closer game. Although I lost my general, the Greeks had taken sufficient casualties that if they'd lost one more element in that last bound the losses would have been equal and the game could have continued. There were a few opportunities for a sneaky win on the cards in that situation (albeit one of them being Geoff rolling a '1' for PIPs and losing the 4AP the departing God was worth).

Thursday 22 August 2019

Expanded Tables For 'Four Against Darkness' - Part 2

This post features the second set of expanded tables for 'Four Against Darkness', and covers Vermin, Minions, Boss Monsters and Weird Monsters. Once again some entries are duplicated between the tables, where they are monsters that I either felt were essential to the setting, or were simply ones I liked enough that I wanted to have them feature in my dungeons.

You can find Part One HERE

When you encounter monsters of a particular type roll a D6. On a 1-3 use the appropriate table in the rules. On a 4-6 use the appropriate table here.

Vermin

1- 3d6 rats - See 4AD

2 - 2d6 cave ants. Level 2, treasure -1. If at the end of each of the party’s actions there are any cave ants left, an additional 1d3 cave ants are added. Reactions (d6): 1 flee, 2-3 flee if outnumbered, 4-6 fight.

3 - 2d6 goblin swarmlings, - See 4AD

4 - d6 large spiders, Level 3, Treasure: Normal. Characters taking a wound must save versus level 2 poison or lose an additional life. Due to the spiders’ webbing, the party may not withdraw from this fight unless they cast a Fireball spell to burn the webs. Reactions: always fight.

5 - 2d6 snakes Level 2, no treasure. Any character wounded by a snake must save versus level 3 poison or lose 1 additional life. Reactions (d6): 1 flee, 2-4 fight, 5-6 fight to the death.

6 - d6 slimes, level 3 no treasure. Always surprise the party and attack first. Since they drop from the ceiling they attack all party members. Crushing weapons attack slimes at -1. Immune to Sleep. Reactions (d6): 1-2 fight, 3-6 fight to the death.


Minions

1 - D6+2 skeletons or d6 zombies (50% chance of each) - See 4AD.

2 - d6+3 goblins.  - See 4AD

3 - 2d6 kobolds. Level 3, treasure -1. Kobolds are led by a Kaptain. They fight at Level 5 until at least one has been killed. Reactions (d6) 1-2 flee, 3 bribe (d6 gp per kobold), 4-6 fight.

4 - d6+1 orcs. - See 4AD

5 - 2d6 death cultists. Level 3, Treasure +1. Their fanatical attack means that all defence rolls are at -1. Reactions: Always fight to the death

6 - d3 ghouls. Level 4 undead, Treasure normal. Any character taking damage from a ghoul must make a level 3 poison save or be paralysed for the rest of the battle. A paralysed character attacks and defends at -2 for the rest of the battle, or until they heal at least 1 life. Reactions (d6): always fight.


Boss Monsters

1 - Wraith. Level 5 undead, 4 life points, treasure +1. When defending from an attack by a wraith, armour and shields offer no protection. Each hit from a wraith inflicts 2 life points of damage. Reactions (d6): 1 quest, 2 magical challenge, 3-6 fight, 6 fight to the death.

2 - Death Cult Priest. Level 5, 5 life points, 1 attack, 2 treasure rolls. The priest makes 1 normal attack in their round, but in addition one random character must save vs level 4 magic or automatically lose 1d3 life points. Reactions (d6): 1 magical challenge, 2 bribe (50gp), 3-4 fight, 5-6 fight to the death.

3 - Ogre or Orc Brute (50% of each). - See 4AD

4 - Wererat. Level 4, 4 life points, 2 attacks, treasure +1. At the beginning of the battle, the wererat will summon 3D6 rats (details as per the Vermin Table). The resulting creatures will fight to the death. One character must fight the wererat each round, the others must fight the rats until they are all dead. Reactions (d6) 1-2 bribe (3d6 gp), 3-5 fight, 6 fight to the death.

5 - Chaos Lord. - See 4AD

6 - Small Dragon. - See 4AD

NB - I play it that if a Small Dragon is rolled in a situation where it's not allowed, I roll on the Weird Monsters table instead, rather than reroll the Boss Monster. It saves getting the Dragon again.


Weird Monsters 

1 - Owlbear. Level 5, 4 life points, 2 attacks, normal treasure. When an owlbear is reduced to half of its life, its level goes up one rather than down. Reactions (d6): 1-4 fight, 5-6 fight to the death.

2 - Ooze. Level 4, 4 life points, 3 attacks, treasure -1. Crushing weapons attack an ooze at -1. Immune to Sleep. At the start of the ooze’s turn if it has at least 1 life left, roll a d6 to see how many life points it recovers: 1-2 none, 3-4 1 point, 5-6 2 points. It makes this roll before testing morale. Reactions: Always fight

3 - Golem. Level 5, 6 life points, normal treasure. Each hit from a golem inflicts 2 life points of damage. Immune to spells. Reactions: 1 quest, 2 puzzle (level 1d3+3), 3-6 fight to the death.

4 - Manticore. Level 4, 4 life points, 2 attacks, treasure +1. All characters at the beginning of the battle must defend versus a level 4 missile attack as the manticore fires a volley of darts from its tail. Reactions (d6): 1 flee, 2-6 fight

5 - Giant Worm. Level 5, 6 life points, no treasure. A giant worm always has surprise and goes first. When it appears it causes a Rockfall (see Special Events table). The battle then begins. Anyone rolling a '1' when defending against the worm takes 2 life points of damage. Reactions: Always fight.

6 - Cockatrice. Level 4, 4 life points, 2 attacks, treasure normal. All characters at the beginning of the battle must save versus a level 3 gaze attack or be turned to stone. Petrified characters are out of the game until a Blessing spell is cast on them. Reactions (d6): 1 flee, 2–5 fight, 6 fight to the death.


Monster Reactions

Some monsters are listed as 'Always fight to the death' or 'Always fight', whilst others have a mixture of Fight and Fight To The Death in their reactions. In the former case the reaction affects the monster regardless of the party's actions, whilst in the latter case the Fight To the Death option only gets triggered if the party wait and see what the monster does. So try this option. The party can choose to test for a reaction if the monster has something other than Fight and/or Fight To The Death as a possibility. This works exactly as described in the rules. If this option is not possible, or if the party simply choose to attack first, still roll on the reaction table. If the result is anything other than Fight To The Death, then the monster(s) will fight as normal and test morale when they reach half strength. If the result is Fight To The Death, then that's what the monster will do. This effectively streamlines the Always Fight reactions with other reaction possibilities, and also gives a point to those monsters whose only reaction possibilities are Fight and Fight To The Death, since at the moment there's no reason for the party to ever select waiting for a reaction as an option for such creatures.

Example: Look at the Golem above. If the party encounter one, then they have the option to wait for its reaction. On a 1 or a 2 it will offer a Quest or a Puzzle, otherwise it will Fight To The Death. If they choose simply to attack, then on a 1 or 2 the Golem will fight normally (testing morale at half life), otherwise it will Fight To The Death.

And a bonus game addition ...

Tasty Snacks

The halfling's tasty snacks can be substituted for up to 5gp worth of bribe, or they can be lost in place of one item stolen from the halfling by the Invisible Gremlins.


Wednesday 21 August 2019

The Darwin Military Museum

The second museum we visited in Darwin was the Military Museum. This has displays on a range of things relating to the military history of the area, but focuses primarily on WWII and specifically on the bombing of 19th February 1942, and the subsequent conversion of that part of the Northern Territory to a massive armed camp. The displays, interactive and otherwise, on the bombing are outstanding, and serve as a great starting point of anyone wishing to explore relevant locations around the city and territory. I'll be doing another post on a couple of locations related to the bombing.

In the grounds of the museum are a few vehicles and weapns. They aren't necessarily in a brilliant state of repair, and are possibly a bit random, but I took a few pictures.

For Airfix fans, here's your Buffalo.


Ship-mounted AA guns.


And the mighty Bofors.


Between two of the buildings is a small Japanese garden. I couldn't find any signage covering its origin, but there were three posts set up in it with what seemed to be memorials to Japanese servicemen.


The gong is unusual, but evocative.


The museum's outbuildings have displays covering various themes. In one covering WWII there was this gorgeous diorama of the Japanese task-force which launched the February 19th attack.


The museum is built around the location of two 9" gun emplacements. One was just down the road, and was too far to walk to (it was a very hot day and I was tired), whilst the other is in the grounds of the museum. It has a display inside it covering Australia's role in Vietnam, but has also been fitted out with a dummy gun to give a feel for how it would have looked.


There was a sign on the steps to the emplacement warning people that a python had been spotted somewhere in its vicinity earlier that day; welcome to tropical Australia.


One high point of the visit was bumping into an elderly gentleman who was chatting about a machine-gun in one of the cases. It turned out that his father was an observer in a Bristol Fighter during WW1. I have never really met anyone with that direct an association with my favourite era of air combat, and we spent a little time chatting about his father's experiences and the weaponry of the planes.

Anyway, if only for the displays on the Bombing of Darwin, this museum is well worth a visit.

Tuesday 20 August 2019

Expanded Tables For 'Four Against Darkness' - Part 1

Before I went on holiday I expanded the encounter tables for Four Against Darkness, in order to give myself more options during the two weeks during which I'd be playing it. What I did was take the existing tables for Special Events, Special Features, Vermin, Minions, Boss Monsters and Weird Monsters, and create a parallel table for each. When required to roll on the tables I would select the existing ones on a 1-3, and on a 4-6 I'd use the new table. I did include some existing encounters on the new tables; Orcs are ubiquitous, for example.

In this post I'll detail the new Special features and Special Events. In my encounter table I have tweaked the occurrences; Special features only appear in rooms, whist Special Events can occur in both rooms and corridors (the reverse of how the actual table is arranged). They are designed for the Level 1-3 adventures of 4AD - feel free to modify them for higher level delves.

Special Features

On a D6 roll of 1-3 use the table in the rules. On a 4-6 use this table.

1 - Shriekers: Each character must make a dodge roll at level 1+D3. If any character fails, the shriekers are awakened. Roll a d6: 1-3 Roll on the Wandering Monsters table. 4-6 The next time the party enters a room/corridor with occupants (Vermin/Minions/Boss/Weird) they are alerted. You automatically roll on the Reaction table for the encounter; you can't choose not to.

2 - Meditation Chamber: The first time the party enter the meditation Chamber roll a D6 for each character. If the score is greater than their remaining Life then they recover 2 Life. Unique.

3 - Storeroom: Roll d6x5. The party can search this room once and find items from the equipment list up to the value in GP of the number rolled.

4 - Dread Portal: The party may pass through the Dread Portal and end up in any mapped room/corridor they wish. However each and every time the party chooses to pass through it, roll a D6 for each member. On a '1' they are lost in the portal. From now on, each time you enter a new area, immediately roll a D6 for each lost party member. On a '6' they reappear at your current location. You may opt to stay in an area and wait for them to reappear; test for Wandering Monsters each time you roll. If you leave the dungeon, or all party members become lost in the portal, anyone lost is lost forever. The portal may be used any number of times. 

5 - Crypt: you may leave the crypt alone, or search it. On a 1-3 you awaken the dead – fight D6+2 skeletons (see Vermin Table). The skeletons have surprise and attack first.
Skeletons or no, you find 2D6x10 gold pieces

6 - Control Room: The traps of this dungeon are maintained from here. You may try to figure out the mechanisms by rolling against a d6+1 puzzle. For every failed attempt, test for wandering monsters on a 1-2. Wizards and rogues add their level to their puzzle-solving roll. If the puzzle is solved, reduce the Level of all traps encountered from now on by 1. Once only – treat further rolls as Puzzle Room.

Special Events

On a D6 roll of 1-3 use the table in the rules. On a 4-6 use this table.

1 - Rockfall. All characters must make a dodge save vs level 4 to avoid the rocks or lose 1 life. It now takes an extra turn to leave this area, whenever the party pass through it. 

2 - Wandering monsters attack the party. See 4AD rules.

3 - A Lady in White appears and asks you to complete a quest. If you accept, roll on the Quest table. If you refuse, she disappears. Ignore any further appearances of the Lady in White in the game. If you meet her again, treat this result as a wandering monster

4 - Trap! - See 4AD rules.

5 - You meet a wandering healer. See 4AD rules

6 - Lost! The party becomes disorientated. The lantern-bearer must make a save vs a level of 1 + the number of passages and or doors that lead into the current area. If they fail the party becomes lost, and their next move is determined randomly (it may take them back to an area they've already passed through). Make the same save in each area; the party moves randomly each turn until the save is made.

I also tried to rationalise the different types of save rolls, and which characters benefit from them, rather than have the rules written into each save. They are based on the comments on each character class in the 4AD rules.

Saves

All saves have a Level and Type. Modifiers for Type are as follows:

Dodge: Rogue +L, Halfling/Elf +1, Light Armour -1, Heavy Armour -2
Poison: Halfling +L, Barbarian +L/2
Magic: Wizard +L, Barbarian -1
Fear: Barbarian +L
Gaze: Rogue + L/2
Breath: All +L/2
If save involves Undead, a Cleric gets +L


In Part 2 I'll detail the expanded monster tables.

Monday 19 August 2019

Boats At The Museum And Art Gallery Of The Northern Territory

This post is pretty much a picture dump. Whilst on holiday we went to the excellent Museum and Art Gallery of the Northern Territory. This is exactly what you think it might be; a museum covering the history, nature and art of the Northern Territory, and it's well worth a visit if you're in Darwin.

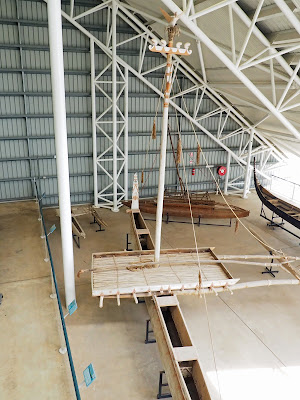
Tucked away at the back is a gallery of boats, and to me it was one of the highlights of the museum. It's a small, but eclectic collection of boats and canoes that plied the waters around the Territory and the southern parts of Indonesia. One carried refugees from Vietnam in the 1970s. As my wife said, they might not look like much, but they are the kinds of vessels you don't see in museums elsewhere, so I took it upon myself to take plenty of pictures.

Those who know my approach to modelling will know I'm more into impression than detail. I didn't note down much in the way of details of the vessels; I just took pictures that show off their shapes, styles and colour, simply so I can use them for ideas and inspiration (mostly for Galleys & Galleons).

I have tried to group the pictures together logically.

I loved this large outrigger vessel, and took lots of pictures of it


The information boards had pictures of the sail-plan.


I can't remember where this beauty originates from, but it's very junk-like. Look at the lovely tripod mast.


There were smaller canoes, in a variety of shapes, sizes and colours.


And this vessel took the prize for best paintwork.


This was one of my favourites; it looked like it had been made in someone's shed one weekend out of left-over wood.


Finally here's a picture showing the lovely Mrs Kobold, just to give you an idea of scale.


I hope the quantity of pictures makes up for any lack of detail about what they represent. If you're doing any gaming set down South-east Asia way, I hope there is some inspiration here for you.

Related Posts Plugin for WordPress, Blogger...