
 |
| The Diamond Goes It Alone |
I played solo, 700pts, six vessels a side. The vessels were as described in previous posts. I used a 2' x 2' board, with a ruler cut to half the length listed in the rules. I don't have a black cloth, so just went with the sand-brown one that was already on the table. It made for easier photos, of course.
I didn't have the ships on bases so didn't use the measurement conventions for them as listed in the book Each model had a designated point on it, to and from which all movement distances and ranges were measured. This point marked the actual location of the ship; the rest of the model was irrelevant.
On to the actual game. The report is long. Very long. If you just want my views on the game, scroll down to the section headed 'Thoughts'.
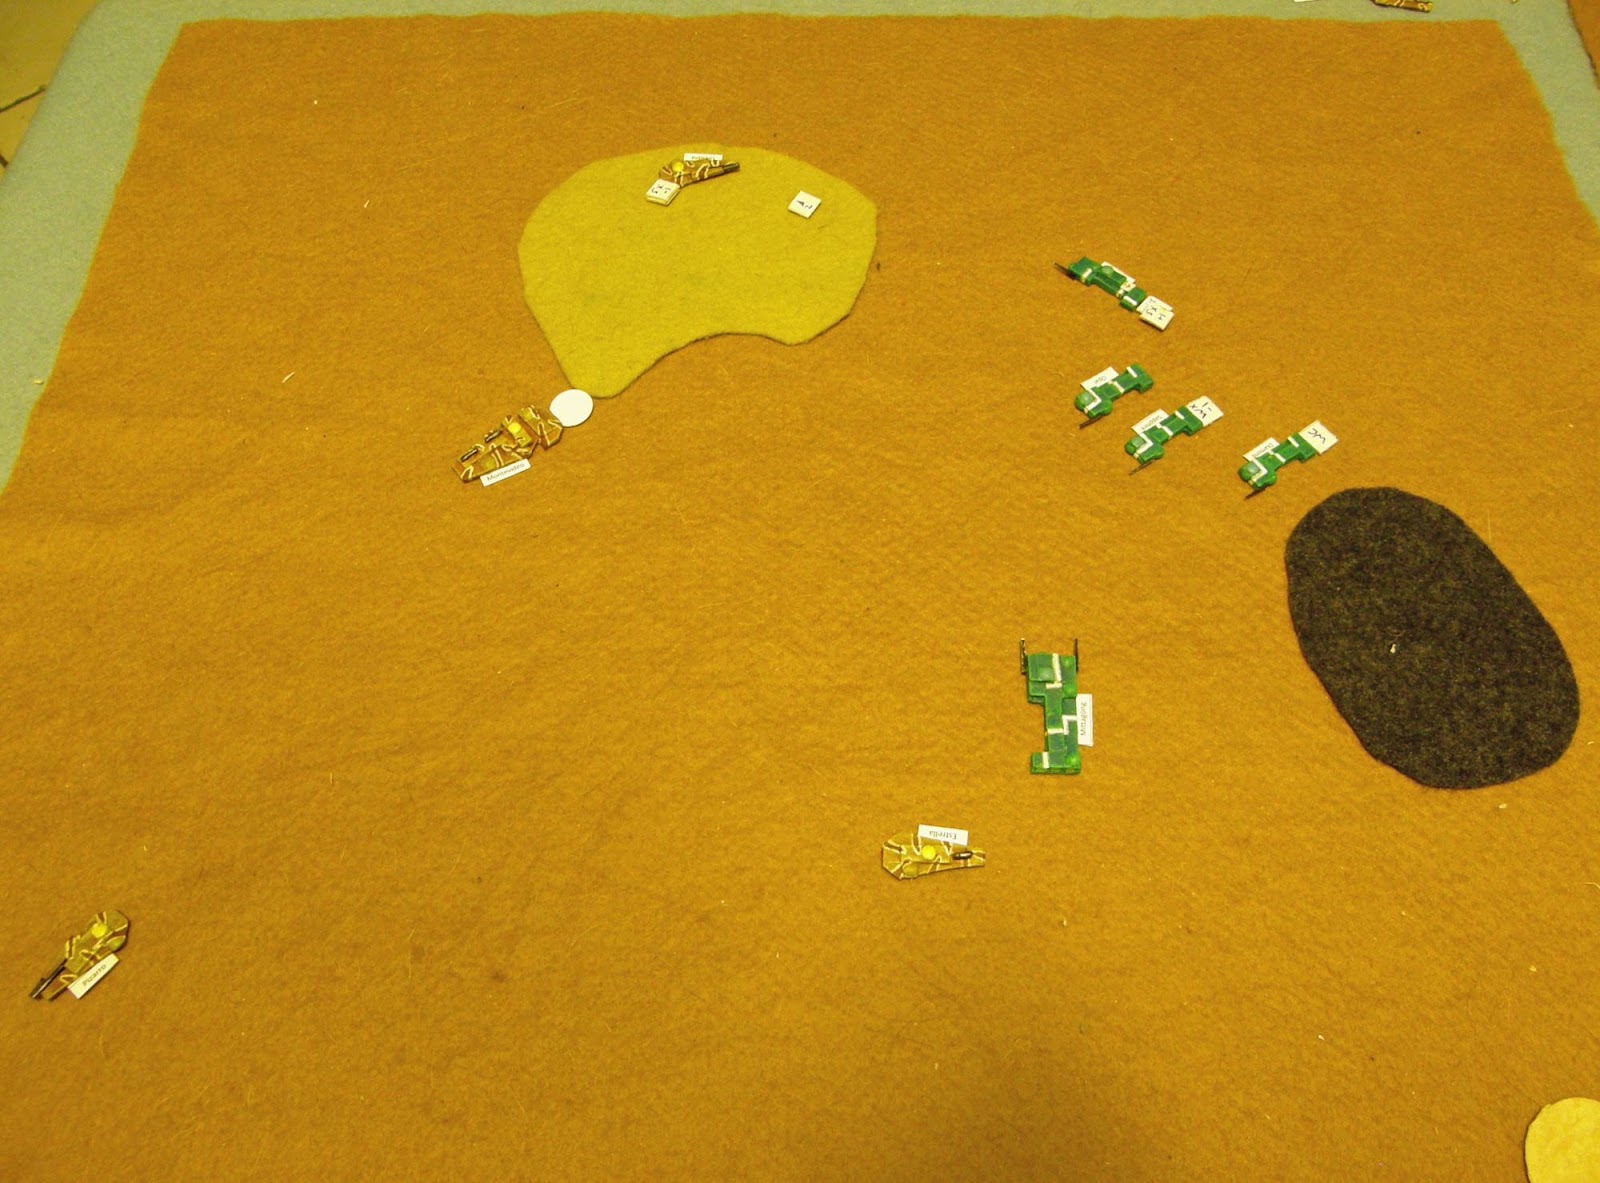
The League of Latin American Republics (LLAR) defended. I rolled on the terrain table and got a nebula, a dust cloud and a strength 1 pulsar. The pulsar was placed in the SE corner, the dust cloud to the E and the nebula to the NW. The Oceanic Union Defence Force (OUDF) chose the W edge. The LLAR deployed to the E, well away from the pulsar.
 |
| LLAR Deployed |
 |
| OUDF Deployed |
My long-shot of the setup ended up blurred. Sorry
In the following write-up I will list each ship in terms of how many dice I rolled to activate, followed by how many actions it got. So 3D/2A means 3 dice were rolled, for 2 actions.
The OUDF planned to cover the Mittagong with the two carriers, Leichhart and Flinder, whilst the three frigates Diamond, Sapphire and Opal would push through the nebula and attack the enemy ships, the idea being that the nebula would cover them until they could bring their short-range weapons to bear.
The LLAR planned to use the two gun frigates to attack the Mittagong and the carriers along with a series of missile volleys from the other ships. The aim was to take the Mittagong out of the fight as fast as possible.
In the report I will skip mention of compulsory moves unless they had a significant effect. In essence every ship makes at least one move per turn unless it chooses to come to a stop. No ship did in this game.
Ships are listed in the order they activated.
Turn 1 - OUDF
Flinders - 2D/1A - Launched fighters on a CAP mission around the Mittagong
Leichhardt - 2D/2A - Fired on overload at the Estrella. And missed.
Opal - 2D/1A - Moved
Sapphire - 2D/2A - Moved twice
Diamond - 2D/2A - Moved twice
Mittagong 3D/3A - One move, then a sensor scan on the Estrella followed by direct fire. Which missed.
At the end of the turn the frigates were entering the nebula. In the turnover the Flinders' fighters moved into position around the Mittagong.
Turn 1 - LLAR
Raya - 1D/1A - Launched missiles at the Mittagong.
Tiburon - 1D/0A - Nothing
Estrella - 2D/2A - Launched missiles at the Mittagong, followed by its external ordinance.
Pizzaro - 2D/2A - One move, followed by a shot at the Leichhart, causing a system damaged.
Orellana - 2D/2A - One move followed by a shot at the Leichhardt, which would have damaged it had the carrier's armour not protected it. The armour on the OUDF ships stopped many damaging hits through the game.
Montevideo - 3D/1A - Launched missiles at the Mittagong.
The LLAR ships benefited from the fleet control centre on the Montevideo, although this doesn't help the Montevideo itself.
In the turnover the missiles homed in on their target.
This was the position at the end of the first turn:

Turn 2 - OUDF
Diamond - 3D/2A - One move, followed by a shot at the Raya which missed.
Sapphire - 3D/3A - One move, followed by a full sensor scan of the Tiburon and an enhanced shot, which missed. The sensor scan followed by a shot was a standard attack of the OUDF, so I will list it as a FSS shot from now on. It takes two actions.
Opal - 3D/1A - It moved, and that was the end of the activation.
The Mittagong and the carriers could afford to hold off until the frigates were in a better position, so I activated the frigates first.
In the turnover the missiles continued to home in on the Mittagong.
Turn 2 - LLAR
Montevideo - 2D/1A - Fired more missiles at the Mittagong.
Raya - 2D/2A - Fired missiles at the Mittagong, then took a direct shot at the Opal which was stopped by the armour.
Tiburon - 2D/1A - More missiles for the Mittagong.
Estrella - 2D/1A - Missiles. Guess the target.
Pizzaro - 3D/0A - End of the activation.
There were a lot of missiles aimed at the Mittagong now.
This was the position at the end of the second turn:

Turn 3 - OUDF
Flinders - 3D/2A - The Flinders couldn't get close enough to the incoming missiles to use escort support, so it took an overloaded direct shot at the Orellana which missed.
Leichhardt - 2D/1A - Launched fighters on a CAP mission to protect the Mittagong.
Mittagong - 3D/2AP - FSS shot at the Orellana causing a weapons destroyed.
Diamond - 3D/3A - One move out of the nebula, then a FSS shot at the Tiburon, which missed.
Opal - 3D/1A - A shot at the Tiburon, which missed. End of the activation.
The carriers and the Mittagong were preparing for the first wave of missiles, so activated first. In the turnover the first two hit the Mittagong, but it was protected by two fighter patrols, its own point defence and the point defence support of the carriers. They didn't even get close.
 |
| Two missiles target the Mittagong, whilst two more close in. All four missed. The white counter shows that the Mittagong has raised shields. |
Turn 3 - LLAR
Pizarro - 3D/3A - A move followed by an overload shot at the Leichhardt. Once again the OUDF armour saved the day, converting a systems destroyed to a systems damaged.
Orellana - 3D/2A - An overload shot at the Leichhardt, which missed.
Raya - 3D/1A - Fired missiles at the Diamond. End of the activation.
The gun-frigates concentrated fire on the Leichhardt, whilst the other ships planned on picking off the Diamond with missiles. The latter failed through a failure to activate the first ship to try.
In the turnover phase two lots of missiles hit the Mittagong, for no effect, although it used up the last of the CAP fighter missions. A missile hit the Diamond, and also caused no damage.
This was the position at the end of Turn 3:

Turn 4 - OUDF
Diamond - 3D/2A - A FSS shot at the Tiburon, which missed.
Sapphire - 3D/2A - A FSS shot at the Tiburon causing weapon damage.
Opal - 3D/3A - An overloaded FSS shot at the Tiburon - systems destroyed
Flinders - 3D/3A - Now close to a volley of missiles it attempted escort support. Three shots, three misses.
Mittagong - 3D/2A - A FSS shot at the Pizarro, which missed.
Leichhardt - 3D/2A - First it repaired the weapons hit, then launched fighters on an attack mission.
In the turnover another missile hit the Mittagong. It would have caused damage, but the armour stopped it. There's no getting away from the fact that hardened armour is a useful special to have.
Turn 4 - LLAR
Raya - 2D/2A - Fired a point defence disrupter at the Diamond, which missed, then launched missiles at it.
Estrella - 2D/1A - Fired missiles at the Diamond.
Tiburon - 3D/2A - Repaired its weapons, then fired missiles at the Diamond.
Montevideo - 3D/3A - Fired on overload at the Sapphire. With its assault special this gave it a good factor, and it caused a weapons destroyed. It then launched missiles at the Diamond.
Pizzaro - 2D/1A - A shot at the Leichhardt, which missed.
Orellana - 3D/1A - A shot at the Flinders, damaging its weapons.
A lot happened in the turnover.
Fighters attacked the Orellana but had no effect. A missile hit the Sapphire, causing weapon damage; armour prevented a weapons destroyed. Three missiles targetted the Diamond, one of which was from the rear. Two weapon damaged hits became a single weapons destroyed. The third missile also caused a weapons destroyed, putting the Diamond onto weapons critical. This left it in a rather odd position; the Diamond has a CV of 2. Two weapons hits would cause a -2, putting it on a CV of 0. But weapons critical has the effect of halving the CV, which puts the Diamond back up to 1. This is only an issue with a CV of 2, but it is an oddity.
Here are the missiles targeting the OUDF frigates:

At the end of turn four this was the position. As you can see the markers were starting to build up:

Turn 5 - OUDF
Flinders - 3D/2A - Launched fighters on a combat mission, then took a direct shot at the Orellana, which missed.
Leichhardt - 2D/0A - End of the activation.
Not a good move for the OUDF; their frigates were closely engaged with the LLAR ships, and didn't get any actions.
In the turnover two lots of fighters went for the Orellana; two weapon damage hits translated to a weapons destroyed. This stacked with the previous one to leave the frigate on weapons critical.
Turn 5 - LLAR
Orellana - 3D/2A - Two moves, in an attempt to get away from the fighters.
Pizarro - 2D/1A - A direct fire shot into the rear of the Leichhart scored 8 to 2, which would have destroyed the carrier. But the armour shifted it to 8 against 3, which just caused weapons destroyed.
Raya - 3D/1A - A move, then the end of the activation.
Nothing significant happened in the turnover. And I forgot to take a photo.
Turn 6 - OUDF
Leichhardt - 2D/1A - Launched fighters on a combat mission.
Mittagong - 3D/0A - Appalling bad luck saw the OUDF turn end again. Their frigates were in danger of flying off the board due to failed compulsory movement.
In the turnover fighters from the Flinders attacked the Orellana, causing systems damage.
LLAR - Turn 6
Estrella - 3D/3A - Moved and launched missiles at the Leichhardt, then took a direct shot at the Leichhardt. This would have destroyed it, but for the armour again. But a systems destroyed became a crew panic.
Tiburon - 2D/2A - Moved, then fired missiles at the Flinders.
Montevideo - 3D/1A - Fired missiles at the Flinders.
The LLAR cruiser and missile ships had now passed the inactive OUDF frigates, and were turning onto the Mittagong and the carriers.
In the turnover two fighters attacked the Orellana causing weapons damage, whilst a missile caused weapons damage on the Leichhardt. The Leichhart was now in a very bad way.
I took a photo at this point, but it's too blurry to use.
OUDF - Turn 7
The Leichhardt took a morale test, and suffered a systems damage from it which took its Q to 7. So it engaged its warp-drive and fled.
Flinders - 3D/3A - A failed escort support on some nearby missiles, then two moves into the dust cloud to get protection from them.
Mittagong - 3D/3A - One move, then a FSS shot at the Tiburon which missed.
Diamond - 2D/2A - Two moves, turning around in an attempt to get back into the fight.
Sapphire - 3D/2A - Repaired weapons, then a move.
Opal - 3D/1A - Moved.
In the turnover fighters inflicted systems damage on the Orellana.
LLAR - Turn 7
Tiburon - 2D/0A - And that was it.
In the turnover the Raya moved off the table and out of the fight. I assume that ships which leave the table are lost. The Flinders was hit by a missile, causing a weapons damaged which cascaded to a weapons destroyed.
This was the position at the end of turn seven. In the bottom right you can just see the pulsar, which had no effect on the game at all, aside from the fact that both sides avoided that part of the table; a pulsar causes ships near it to suffer combat penalties.

OUDF - Turn 8
Mittagong - 3D/2A - A FSS shot at the Tiburon, causing weapons damage.
Flinders - 3D/3A - Two moves, then launch fighters on a combat mission.
Opal - 3D/3A - One move got it closer to the Tiburon, then a FSS shot caused systems damage, which cascaded to crew panic. the Tiburon got two morale passes and stayed in the game.
Diamond - 3D/2A - A FSS shot at the Tiburon missed.
Sapphire - 3D/3A - A moved, followed by a FSS shot at the Tiburon, causing weapon damage.
In the turnover fighters and missiles moved, but nothing contacted.
LLAR - Turn 8
The Tiburon failed its morale and fled.
Orellana - 2D/1A - Repaired weapons damage
Estrella - 3D/3A - Two moves got it to the rear of the Mittagong, where it launched missiles at close range.
Montevideo - 3D/0A - Once again the flagship let the side down. Most LLAR ships were beyond the range of the fleet control centre at this stage.
In the turnover missiles went into the rear of the Mittagong and the Flinders. The Mittagong was saved by its shields from its first damage of the game. The Flinders would have been destroyed, had it not been for, yes, its armour. It still took a systems destroyed.
And here's the position at the end of turn eight.
Turn 9 - OUDF
Mittagong - 3D/0A - Oh dear.
In the turnover fighters attacked the Orellana, but missed.
Turn 9 - LLAR
Estrella - 2D/0A - Oh dear again.
Nothing happened in the turnover, and whilst ships had moved I didn't take a picture because nothing significant happened.
Turn 10 - OUDF
Opal - 3D/2A - A FSS shot at the Estrella missed
Sapphire - 3D/2A - A FSS shot at the Estrella missed
Diamond - 3D/2A - A FSS shot at the Estrella missed. Do you see a pattern here?
Mittagong - 3D/2A - Two moves in an attempt to close up on the Montevideo.
Flinders - 2D/1A - Launched more fighters.
In the turnover the fighters engaged the Orellana and caused weapons damage.
Turn 10 - LLAR
Montevideo - 3D/2A - Launched missiles and external ordinance at the Sapphire.
Pizarro - 2D/1A - Moved, as it was well away from the fight.
Estrella - 2D/1A - Fired missiles at the Diamond.
Orellana - 3D/0A - Just a compulsory move, which lef tit wide open to the fighters attacking it as they could now move into its rear.
In the turnover fighters attacked the Orellana, but missed.
Missiles went for the Diamond and caused weapon damage.
And here we are at the end of ten turns:

Turn 11 - OUDF
Diamond - 3D/2A - After repairing weapons damage it fired into the rear of the Estrella causing weapon damage.
Opal - 3D/1A - A shot into the rear of the Estrella caused another weapon damage, cascading it to a weapon destroyed. Both ships used compulsory movement to get into the rear shot position.
Sapphire - 3D/0A - Nothing more to say.
Turn 11 - LLAR
Montevideo - 3D/3A - A move, followed by missiles at the Sapphire.
Pizarro - 3D/2A - An overload shot at the Sapphire missed.
Estrella - 3D/1A - Fired missiles at the Sapphire.
Orellana - 3D/1A - Repaired its weapon damage.
In the turnover two missiles hit the Sapphire. A system damage cascaded to a systems destroyed, and it took a weapon damage as well.
At this point I'd had enough. Playing solo can be quite taxing, and I wanted to record the game whilst it was fresh as well. It was obviously good for a few more turns, and I just didn't have the time or energy to play them through.
It was hard to say who was winning. The game swung from one side to the other, although I think the OUDF's ability to resist damage would just outweigh the LLAR's ability to inflict it. Both capital ships were totally undamaged and the Montevideo hadn't been targetted once.
Thoughts
I found it very hard to get effective damage on ships. This could be a function of their design - the armour on the OUDF ships saved them countless times, whilst their low firepower meant that they couldn't inflict serious hits on the LLAR vessels. But I can't help thinking that the damage cascade effect has too many steps, leaving ships as ineffective hulks that still can't quite be finished off. I wonder if any system damage on top of a crew panic, or weapon damage on top of a weapon critical should just finish the ship off. This would require an rewrite of the morale failure effects though.
Let me emphasise a point in the paragraph above; hardened armour is very good. It saved three OUDF ships from destruction.
I do wonder if some of the problem is that hits are diluted between systems and weapons, with no direct penalty for total accumulated damage.
There were specials I didn't use. The point defence disrupter was fired once, and the force disrupters were never used. I do wonder if, in fact, the rules have too many specials with similar abilities. Obviously it makes for variety, but it does make it hard to remember what each ship can do. Part of the reason I created standard 'doctrines' for my two fleets was to have as many specials in common across ships as possible.
Whilst it's a free ability, escort support didn't seem up to much. But perhaps I was unlucky.
Whilst it's a free ability, escort support didn't seem up to much. But perhaps I was unlucky.
The activation system certainly made for an interesting game; it was quite tricky deciding where to go first, and risk ending the turn. I'm not sure about ships on compulsory failed movement going in a straight line, though; running off the table or into a planet seems too much of a possibility.
You end up with a lot of markers on the table. Damage could be written on the data sheet, of course, which would save having those markers, although it does make it easy to see which enemy ships are vulnerable. And it's not a bad way of seeing what state your own ones are in as well. I didn't come up with an obvious way to keep track of which ships missiles were targetted on, or which ship launched fighters; for fighter bays this isn't an issue, as a ship can keep launching fighters, but light fighter hangars only allow one counter per ship. I sometimes lost track of which carrier a counter belonged to.
I love the terrain. It breaks up the table, and actually has an effect on the game as well, both good and bad. A couple of times a ship was able to use dust or a nebula to avoid a sticky situation.
I came up with a number of questions, which I have sent directly to the author. I won't bore you with them here.
On the whole I'm keen to try Void and Stars again, but may try some different ship designs. I wonder if fewer ships, built to more points, would give a more decisive game.
I've sent sent off to be a playtester for this as I do enjoy a starship game.
ReplyDeleteWhat strikes me initally about this is the amount of counters and markers. This is one of the reasons I've been really put of the Dystopian Wars stuff by Spartan Games. Although there is no record keeping on paper there are lots of counters, markers and different weapon systems to keep track of. For instance you hav to keep track of fuel on fighters and bombers using a little dice or some such.
As I said in the report the damage markers could be skipped, and damage tracked on the data sheets. The fighter and missile markers have information recorded on them, but could still be made attractive.
DeleteI have no ida what the Dystopian Wars game is like, but the figures are gorgeous. They are compatible with Epic 40K stuff; I have a pack of their tanks for a long-term Epic 40K HOTT project I'm working on; beautiful castings and not too expensive.
(Their land battle-group packs would translate into HOTT armies - Landship Behemoths, Artillery, Heavy Tank Knights and Light Tank Riders.)
Thanks for the report!
ReplyDeleteWe have the Hardened Armor to be useful, but not as many times as yours. It may be the lower CV values as you mention. I will keep an eye on it.
jp
Very nice report! Thanks for sharing!
ReplyDeletePS: thanks for following my blog!
Greetings
Peter
http://peterscave.blogspot.com/