Tuesday, 11 June 2019

Farmhouse Attack

I tried another ad hoc Trench Hammer game over the weekend. Once again I gave each side an identical platoon, then allowed them to add one specialist squad after the terrain and victory conditions had been determined.

I randomised the terrain, and generated the following objectives:

British - Destroy a German unit by assault and kill a leader.

German - Destroy two British units and hold the ruined house at the end of the game.

Both sides added an additional bomber squad - the British because of their requirement to score a kill through assault and the Germans because they had to capture a defended building.

As with the previous game I rolled a random barrage as a complication.

Here's the setup from behind the German position. They had a tough task ahead of them, with an advance across mostly open ground to the objective, whilst the British had shellholes, buildings and woods as cover.


With no secure positions from which to launch softening up fire, the German plan had to be a simple, rapid attack. A bomber squad led by a sergeant went straight for the ruined farmhouse, whilst a second squad approached it through a wood. Their LMG squad covered them from a hill (out of shot).


The British were covering their squad in the farmhouse with a Lewis gun squad in a wood. This took fire, and was soon looking weak, so the Germans switched their attack to clear them instead. It meant that once the farmhouse was captured it could be more easily held. The British squad was quickly eliminated.


Meanwhile the German rifle-grenadiers managed to eliminate the farmhouse defenders, leaving the objective completely open.

The British were having a tough time of it at this stage. Their activation roll after the Germans made their first move was abysmal and, to make matters worse, the random barrage was hitting their units hard. The Germans needed a lot of luck, and they got it.
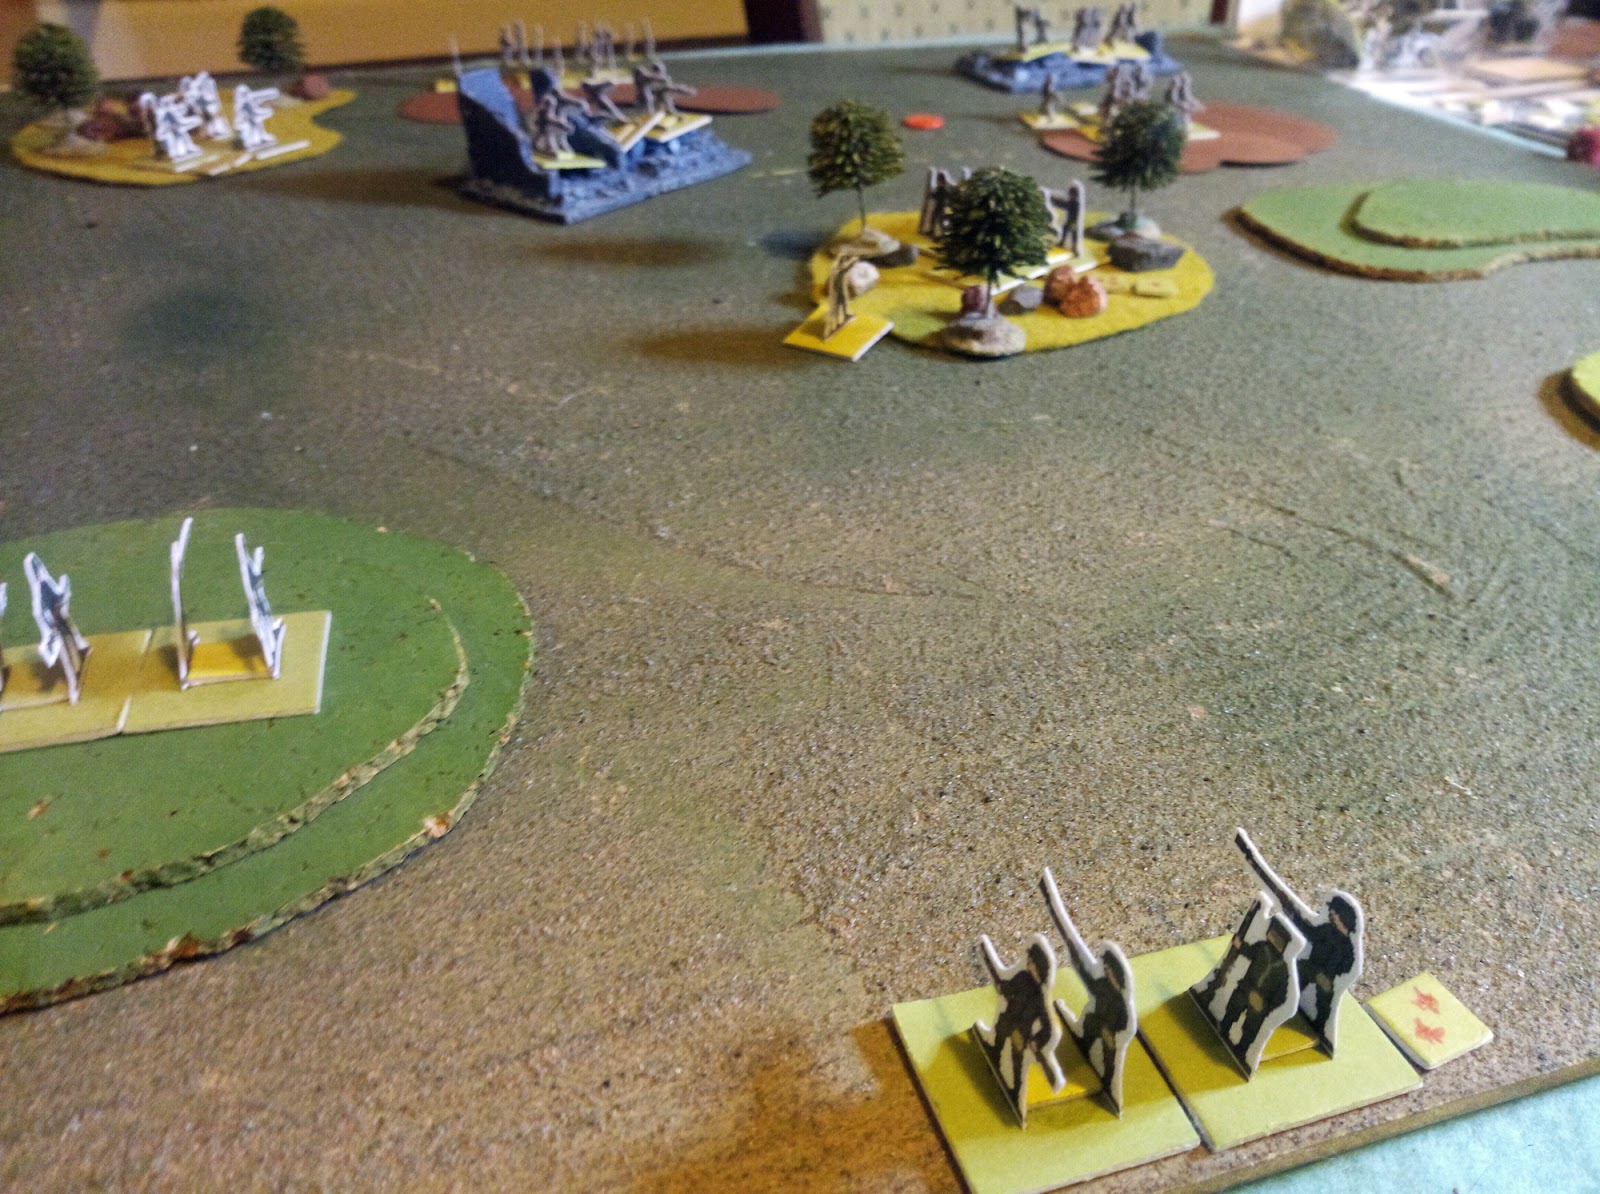

On the other flank the British were moving up bomber squads to assault the German rifle squad covering that side of the field, and achieve their assault objective. The artillery barrage saw them pinned down in some shell-holes instead. More bad luck for the British.


The German squad in the woods had cleared that flank, but was weakened so badly that the British platoon commander was able to drive them off with his revolver.


With the objective cleared of British troops, though, the Germans moved up to occupy it. The bomber squad in the woods regrouped and recovered, whilst the LMG squad advanced to provide covering fire.


The Germans occupied the objective. The British had one chance to oust them, and launched an assault with one of the bomber squads on the other flank, covered by rifle-grenade fire. This saw the German squad destroyed, giving the British the first of their victory conditions.


It was now the final turn. The Germans had to retake the farmhouse to avoid a draw, and not lose a leader to avoid a loss. They assaulted the ruins with the LMG squad, riskily throwing in the leader to improve their chances. They failed, and the squad was destroyed ...


... but against the odds the platoon commander managed to escape to cover under heavy fire.


The end. The Germans had destroyed two British squads, but failed to hold the objective. The British scored a kill via assault, but both German leaders survived. The fight was a draw.


Given the poor German starting position, a draw was pretty good going for them. Bad luck early on for the British, both in terms of activation rolls and from random artillery fire, saw the Germans able to quickly seize the initiative, and almost pull off a win. Only that final bold assault on, and steadfast defence of, the objective by the British bomber squad staved off defeat.

I ran the game with the rules changes outlined HERE. Specifically I used the change to the way assault damage is run, with the side scoring the most damage inflicting the full number of hits, whilst the losing side only scores half hits. This helped prevent mutual destruction situations, although winners were still generally too battered to consolidate their position for long. Still, it generally felt better. I want to try a game with some assault squads next and see if I can balance them up a little better.

Friday, 7 June 2019

Trench Hammer Modifications

When I've played Trench Hammer I've been using a couple of minor variants from the rules, plus a couple of bits lifted from the Squad Hammer Core rules.

The latter is the ranges. the 6" Assault and 12" Firefight ranges seem quite large for a 2' square board, so I have used the ranges from Core - 3" Assault and 9" Firefight. This allows more long-range 'softening up' fire without return fire. This change may have knock-on effects in terms of leader command radii and some other rules, but I'm still thinking about those.

Another change is to the Regroup action. In Core this simply allows the unit to recover 2 hits, whereas in Trench Hammer you roll three times against current damage. The Trench Hammer version is more random, and therefore interesting, but the Core version is easier to apply. I have created a compromise. A unit using a Regroup action rolls a D6. On a 1 they recover 1 hit, on a 6 they recover 3 hits, otherwise they recover 2 hits.

On to my own variants:

(i) There are a few ways units can recover hits - Regroup, Withdraw and leadership. Regardless of which method is used, a unit cannot recover to zero hits; they must always be on at least 1 hit once they have taken damage.

(ii) All halved damage is rounded UP, not down.

(iii) Similar to the above, any hit always scores at least 1 damage, regardless of damage modifiers. eg A a unit firing with 1D3 has taken 6 hits, so does -2 damage. If it rolls 2 damage, this scores 1 hit, not zero. Basically if you score a hit, it has some effect on the target.

(iv) Rifle grenades ignore the cover modifier for shell-holes in the same way they do for trenches (and in the same way grenades treat them).

One more variant is lifted from Jozi's Tin Man blog - the half damage adjustment for trenches does not apply to assaults. A unit in a trench still gets the -3 modifier to hit, but only halves damage from long-ranges fire or firefights.

I have been considering whether to switch to the Core rules for assaults, but I'm not sure about it. In Trench Hammer both units in an assault roll to hit as if they were shooting at each other and score damage if they hit. The highest damage wins the assault, but it's possible for both units to take considerable damage. In Core the two units roll a D6 with modifers, and the difference is the damage the highest scoring unit inflicts on the lowest scoring. Basically only one side takes damage. I prefer this latter method of dishing out damage, but still like the Trench Hammer method of rolling to hit followed by rolling damage. What I'm considering is this:

Both units roll to hit simultaneously.

If neither hits, the assault is a draw. Both units take 1 hit and fight again (which could result in another draw).

If one unit hits, it scores damage on the other, which must then retreat as well.

If both units hit they roll damage. The side which scored the highest damage wins, and inflicts that full amount on the opposing unit. The winner takes half of the damage inflicted by the loser. In the event of a tie on damage, each side inflicts 2 hits on the other, then fights again (including new hit rolls).

Finally I have been looking at the unit profiles for Bombers in relation to Assault squads. It seems to me that Assault squads don't really offer any specific advantage over Bombers. Bombers score a +1 damage in assaults, and can ignore certain cover modifiers, but also count as a normal Rifle squad. An Assault squad is restricted in firing (firefight or assault only) and only scores 1D3 damage if not assaulting. Their one bonus is that they are more likely to score more damage on an opponent in assault combat, although their average damage isn't a lot different from that of Bombers. Basically Bombers are a Rifle squad with something extra, whilst an Assault squad has a limit balanced by something extra. I'm still deciding what extra bonus to give to Assault squads to make them worth using for, well, assaults, instead of Bomber squads. One possibility is to have them count a draw as a win if both units score a hit; this would give them an edge over other types of squad, with only other assault squads forcing them to a draw, which feels right in a way.

Phew! It feels good to get all that off my chest.

Burlesque Update #5

This Thursday is not only a missed wargaming night, but a missed wargaming night on the 75th anniversary of D-Day. But with two days to go before the first performance, we need the rehearsals.

This past week has seen us finishing off costume bits and getting the accessories together. I even spent an evening in front of the TV (watching Jason Statham in 'The Meg') sewing elastic loops onto skirts and ribbon ties onto bras. Most of my sewing previously consisted of reattaching buttons, so I'm moving up in the world.

I have also been ruthlessly rehearsing the group routine. Taking on two routines was always going to be hard, but it was obvious I'd not practiced the group routine as much as my solo. I have now rectified this, and hopefully won't be making any silly mistakes on the night.

This week's biggest event was that we were picked up by the local paper. Mae, headmistress of our burlesque school, has been working hard on the promotional side of things, and sent them a press release. They talked to her and picked up that not only was I performing (the only guy to be doing so) but that my wife and daughter would be taking part as well. So they decided to make that their 'angle'. And here we are; stars of our very own article after a cold and wet 9am photoshoot at the venue we'll be performing at:


Photo by Robert Peet via The Illawarra Mercury
(The headline isn't totally true - only I'll be wearing fishnets on the night.)


So this is it. When I write next week's report we will have performed our group routine twice and I will have made my solo debut. I'm nervous, but I'm looking forward to it. 

Tuesday, 4 June 2019

Trench Hammer Encounter

I fancied trying a bit of Trench Hammer again so set up a game this evening.

Rather than run a specific scenario I decided to do an encounter on a random terrain and drive the game with the Mission Objectives in the optional rules. I gave both sides a basic platoon: rifle squad, bomber squad, LMG squad, rifle grenade squad, officer and sergeant. I then rolled for objectives for both sides and allowed them to choose one additional squad for their force.

I created a random complication table as well. Roll a D6:

1 - It's foggy. Roll at the end of each player's turn. On a '6' the fog lifts. Until then, the maximum range for any firing is 12" and Firefights take place at 6" only*.

2 - It's muddy. Mud is covered in the rules.

3 - Artillery! There's an artillery barrage nearby and the battlefield is being hit by stray shells. Place a marker in the centre of the table at the start of the game. At the end of each player turn roll a red D6 and a white D6 on the table. The marker moves in a line equivalent to that from the red dice to the white dice and a distance in inches equal to twice the score of the white dice. The nearest unit within 3" of its new position takes 1D3 hits.

4 - Big Push. At the start of each player's turn roll a D6. On a '6' that player receives reinforcements starting from any point on their board edge. The first reinforcement will be a Rifle Squad. The second can be a Bomber Squad or LMG Squad. Subsequent reinforcements are Rifle Squads.

5 - Surprise Encounter - Neither side is prepared to meet the other. Both sides roll a single D6 for activations for the duration of the game.

6 - Roll Twice, treating further results of 6 as no complication.

As stated above the terrain is random. I divided the 2' x 2' board up into 6" squares and diced to see if each contained terrain and what type of terrain it was. I ended up with this; a line of hills down the centreline of the table, with one shell-hole filled gap. There were a couple of shattered woods and a ruined house on the German baseline.

The British had to inflict damage on the Germans, and destroy at least two of their units. They added an HMG to achieve this. The Germans had to inflict damage, and capture an objective in the British half of the field, holding it for one turn. The only viable option was the wood just on the others side of the ridge. They added an assault squad.

The Germans were stuck having to attack over a ridge, making it difficult to use support weapons. The British were stuck with limited cover on their side, but with objectives that just consisted of scoring casualties could wait for the Germans to come to them.

The random complication was stray shells from a nearby barrage.


British activations for the first two turns were terrible, leaving them pretty much immobile as the Germans organised for their attack. They pushed a bomber squad into the objective.


The Vickers MG kept up a steady and deadly fire on the German LMG squad, leaving it scrambling to reorganise for much of the early part of the game. The German grenade launchers couldn't suppress the British gun.


The Germans made a bold rush for the objective. Their bomber squad was driven off having achieved nothing, but the assault squad pushed the British out and seized the wood.


Unfortunately they had to hold it against the firepower of most of the British platoon. A rifle squad in the shell-holes provided what covering fire it could.


The German squad was eliminated, having failed to hold the objective for long enough. The bomber squad reorganised and moved into position for another go.


The German support was doing better. They quickly eliminated both the Vickers HMG and the British grenade-launchers. This would allow them to bring up the rest of their troops safely, but time was running out.

The British pushed their bomber squad back into the objective.


The German LMG moved up and eliminated the supporting rifle squad ...


And the bombers went in again. Each squad wiped out the other.


In the last turn the British LMG squad tried to stop the Germans moving onto the objective, but failed. Strictly, though, I'd said that the objective had to be held for a whole enemy turn, and the game ran out before that was achieved. So I gave the Germans half points for it.

The German grenade launchers finished off the British LMG.


This mean that, in practice, the British had won, having inflicted the damage they needed to, plus eliminating two enemy units. They lost all of their units though. I suppose really it was a bloody draw.

I have a few thoughts on minor rules changes, which I will cover in another post.

Update: I realise that I forgot to mention the barrage. This swung across the British lines, but missed their troops, before moving along the German back edge (if the barrage moved off the edge of the table I brought it back on at the equivalent point on the opposite edge). It did some minor damage to some of the German support troops, and probably delayed the recovery of their LMG squad for a turn. Finally it scored a hit on the British LMG squad on the last turn. So it was annoying, but not overly critical. Which is how it should be in a game like this.

*I am shifting to Squad Hammer Core ranges - 3" for Assaults and 9" for Firefights.

Sunday, 2 June 2019

The Battle of Ayohuma

After his defeat at Vilcapugio in October 1813, General Belgrano rested and reorganised his troops as best he could, but his army was short of both experience and, crucially, artillery. Against the advice of his officers, he advanced against the Royalist army under Joaquin de la Pezuela. Pezuela's army was in a strong position, with its flanks protected by hills and front protected by a gully. Despite being outnumbered, outranged, outclassed and outgunned, Belgrano attacked.

He lost. The Royalist army compromised his right flank, a cavalry assault against the Royalist right failed and a frontal assault by his infantry was shot to pieces by artillery and the Royalist infantry as it struggled past the ravine.

The survivors struggled back to Tucuman, where Belgrano resigned his command, it being taken up by Jose de San Martin.

Given the setup - an inferior force attacking an enemy in a strong position - this didn't seem worth setting up and playing, but John Fletcher's 'Liberators' book has it as a scenario, and I thought it was trying at least once. I used the OOB from his scenario, and came up with the following forces for Liberated Hordes:

Royalists - General Pezuela (Good)
3 x Militia Infantry
5 x Regular Infantry
2 x Militia Cavalry
2 x Regular Artillery
1 x Regular Skirmisher

Republicans - General Belgrano (Poor and predictable)
5 x Militia Infantry
4 x Regular Infantry
2 x Militia Cavalry
1 x Regular Cavalry

Both forces consist of around 3,000 men.

I went with this setup. Republicans are in the foreground. All of the hills are bad going, as are the gullies.


The Republicans opened with the traditional cavalry charge. The aim was to get the horse across the gully before the Royalists got into a good position beyond it. Belgrano himself accompanied the cavalry, but was pragmatic enough to lead the regular reserve rather than the front-rank militia.


The Republican infantry advanced in a fragmentary manner, hampered by the rough terrain. The cavalry crossed the gully and engaged the Royalists ...


... but were repulsed, the militia units quickly routing. General Pezuela moved to lead his cavalry in what he hoped would be a crushing counter-attack.


The Republican infantry advanced steadily in the centre, and in support of their shattered cavalry wing.


Disaster! Pezuela found himself trapped in the gully and was slain as the cavalry he was with routed.


The Republicans pushed forward against the leaderless Royalists. But all the Royalists had to do was stand and shoot, and they did it well.


The Republicans charged, but were repulsed.


On the Republican left their cavalry had finished off the Royalist horse, but the militia infantry supporting it would have to be dealt with as well before a flanking attack could roll up the exposed Royailst line.


The cavalry victory came too late though. The two armies exchanged musketry in the centre, and the Republicans came off worse.


The Republican centre fled, and the battle was lost.


So the result was much the same as the historical battle, although the Royalists did lose their general and all of their horse.

Related Posts Plugin for WordPress, Blogger...