One of the things with embarking on a project to play 52 different games during the course of a year is that it has me thinking about games in my collection if not played for a very long time. And this post is about one of them.
Last week I was idly glancing along the bookshelves for something to read one evening and I happened upon 'The Greatest Raid Of All' by C.E. Lucas Philips. I bought and read it years ago because I'd enjoyed the game this post covers, and started reading it again. Naturally I was less than halfway through when I realised that I was going to have to get the game out again.
'Raid on St. Nazaire' is a solitaire game from Avalon Hill published in 1987 and covers the British commando raid on the German-held French port aimed at destroying the massive dry-dock there. It's a perfect subject for a solitaire game; you get to run run a a meticulously planned mission whilst your enemy simply tries to stop you and pops up in locations you're never entirely expecting.
The game itself has a beautiful mapboard, with an aerial view of the port and its facilities overlaid by a series of areas and connecting lines. The shape of the area determines its types (Open, Building, Ship, U-Boat Pen), whilst different lines show the movement costs of moving along them. The areas are numbered, which is used in a few game mechanics, and some colour is used to show the arcs of fire of certain weapons.
Here's the game set up ready to go. The Germans have all of their shore-batteries and flak guns in position, but no troops. Those appear bit by bit through the game as the alert level of the defenders increases.
And here are the attackers - a flotilla of boats and one destroyer - heading up the Loire Estuary.
The game starts at the point where the Germans realise that something is up and open fire..
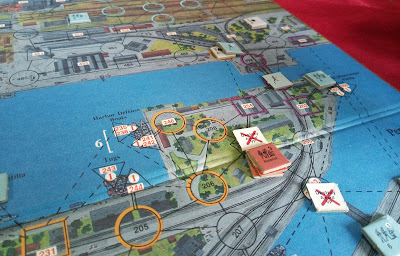
And open fire they do. This is the result of first round of firing from the Germans. The British have to endure two fire phases; one representing various long-range guns around the port, and then another from the guns actually positioned on the board. Each round of firing lasts until the Germans either miss (and they hit on a 5 or less a lot of the time) or they've taken twelve shots. Those twelve shots can do a lot of damage. They get bonus shots at ships on fire and one free shot at the HMS Campbeltown as well.
Anyway, one of my vessels was sunk, another on fire and several were forced to evade, delaying their approach to the target.
I did have one stroke of luck on the first turn. In the first harbour zone sits Sperrbrecher 137, a moored ship with two nasty guns on it. Nock's torpedo boat zipped in and sank it on the first turn, depriving the Germans of the two guns that provide a lot of the firepower in that zone, and giving me my first victory point.
The vessels forged onwards. You have to move the Campbeltown as fast as you can towards the dry-dock; the game pretty much hinges on you ramming it and landing the ship's complement of commandoes. Amazingly the destroyer took very few hits.
The same couldn't be said for the smaller vessels. I took an absolute pasting.
The naval phase of this game is similar to 'B17: Queen of the Skies' in that you basically take damage and can do very little to mitigate against it Essentially it's an involved way of randomising which commandoes you will actually get to land, and where.
The Campbelltown rams the Southern Caisson. Whether the attack is successful or not is determined at the end of the game. All you can do is ram it as fast as possible, hope to survive long enough to scuttle the ship and hope that the dice are kind to you - doing those things give you good positive modifiers though.
The first commandoes disembark - six teams from the Campbeltown, and two from a couple of boats at the Old Mole. The latter commandoes had to immediately deal with a German gun in their landing zone, although fire from the ships had fortunately disrupted it, so it was a simple demolition task.
An overview of the game. There are at least three vessels on fire in this shot. The sea was a mess.
In desperation I sent one of the torpedo boats that wasn't carrying any commandoes into the Avant Port. If it survived the gunfire directed at it then it could launch a torpedo at the lock-gates there, removing the need for the commando team assigned to them to attack there and leaving them open to other targets. And even if it didn't survive then it would draw the fire of a lot of German guns and give the boats in the Outer Harbour a better chance of getting through and unloading their troops.
It was sunk pretty quickly.
The commandoes from the Campbelltown moved towards their targets - the winding gears for the caissons, the Northern Caisson itself and pump house. Destroying all of these, plus the Southern Caisson nets you 40 of the 80 points you need for victory. The southern Winding House was destroyed quickly and efficiently. The Pump House is harder though, as two German guns are sited on or around it.
A torpedo boat took out one of the sets of lock-gates. Meanwhile two commando teams landed near the Old Entrance, with their target being the other set of lock-gates.

The Campbeltown's commandoes dealt with the Pump House. Fire from the flotilla suppressed one of the guns, making it an easy target for one commando team, whilst another team used grenades to take out the second gun. The commandoes pushed forward to the northern end of the dry-dock.
There are two types of commando team in this game - Assault and Demolition. The latter carry explosive charges and can blow things up, but they all have a pre-designated target, and must take that out first before taking on targets of opportunity. They get a penalty in combat. Assault teams get a combat bonus, and carry grenades, and are there to protect the Demolition teams from the Germans, either by drawing fire, or going on the offensive.
The Germans appear as counters of varying strengths in random places, and the strengths get higher as the game progresses. They then move towards the nearest commandoes, although how much movement they can make on a given turn is dependent on a die roll, and smaller units will ten to be less active than larger ones. In this picture a number of decent 4-strehgth units are converging on the commandoes trying to set charges on the Northern Caisson

In theory the ships should sit around to evacuate the commandoes. But it's unlikely any would last long enough, so I pulled out the survivors. This would leave the commandoes to surrender, escape the board and hope to make it to Spain or simply die. There are VPs for bringing survivors home, but they're not massive.
Anyway, the four vessels still afloat made a run for it.
The commandoes from the Old Mole were having a tricky time. Their targets are the series of swing-bridges and lock-gates that link the Avant Port to the main St. Nazaire Basin. Destroy them and the Basin becomes tidal, restricting U-Boat operations from the port. But the Germans were active in this part of the board, and the commandoes had their work cut out simply fighting them off. They kept eliminating units, but more would appear before they could get into position and plant explosives.
A team of commandoes from the Campbeltown arrived to reinforce them.
The situation got more desperate, but charges were eventually planted on the two swing-bridges.
The bridges were destroyed, but the commandoes were now in a bad way and fell back. They did manage to take out the power station as well, though.
At the dry-dock the commandoes there were in a lot of trouble with mounting casualties. They had set charges but there had been issues, and it took several turns before the two targets were finally destroyed. In the time a steady flow of Germans had whittled the teams down. I called the game at this point; there were no commandoes with viable VP targets they could reach and destroy before being overwhelmed by the German defenders.
Next morning the Campbeltown blew up and destroyed the Southern Caisson.
Two boats got home, one carrying some survivors from one of the others.
For the loss of almost the entire force I scored 57 VPs of demolitions, plus a couple more for the survivors who got home - 59VP in total. The game's target is 80VP. Historically the real raid scored 53VP.
I achieved the primary objective, though; the Normandie Dock was totally destroyed, so there'd be no Atlantic holiday for the Tirpitz.
Like a lot of solo games this one involves a lot of die rolls. However it's surprisingly light on charts; a few of the key ones can even be memorised and all of them are on the board itself. The younger me who bought this game would rattle through it, but my brain has slowed down now, so whilst I enjoyed playing this game, I don't think it felt as magical as those plays 30 or so years ago. It is an excellent solitaire game, though, and the land part leaves you making lots of important small decisions about how to respond to a rapidly changing situation whilst staying focused on your goals. It's a shame that the ship part is a long die-roll lottery, although to be fair I imagine it mimics the real situation quite well.
Worth buying if you find it for sale though, if only for the beautiful map.


If you are ever in Falmouth Cornwall, there is an interesting memorial to the St Nazaire raid - I'm not sure if many of the ship's crew / raid veterans are left to still attend the occasional ceremony https://www.warmemorialsonline.org.uk/memorial/143050https://www.warmemorialsonline.org.uk/memorial/143050
ReplyDeleteI really like those old AHGC solo games, I particularly enjoyed Pattons Best.
ReplyDeleteIt's an excellent game... Great write up!
ReplyDelete