Wednesday, 27 November 2024

Midgard Heroic Battles

Last Thursday Dave and Gary played a game of the new Midgard fantasy rules, whilst others of us spectated. Dave Brown has written this excellent survey/review of the rules. I took a few pictures of the game, which was between Dwarves and Undead. 

"So what’s with this new Midgard thing?

The ‘Midgard, Heroic Battles’ rules come from the Two Fat Lardies' stable / Reisswitz press, authored by James Morris being a rank-and-flank set covering – as per the sub-title - ‘Historical, Legendary and Fantasy Battles in the age of heroic deeds’.

Legendary’ as described by the author has overlap with what I call ‘semi-historical’, where an army has via myth accreted a few fictional elements while otherwise being true to historical sources. An example being the Alexander romances where his army contains what you would expect in a 4th-3rd Century Makedonian force but adds Amazon riders, Roman archers and an eagle-powered vehicle.

It’s not clear to me what should or should not be called a review of a set of rules, but the following may fit your definition. For such a new set, released less than a week ago, I clearly have limited experience to draw upon.

Firstly the author and supporters have produced a series of you-tube clips walking through a game and a website spells out various basic data such as base sizes and so on.

Form and Content

As to form, the rules are 131 pages available in hard copy or a PDF. The author has flagged on-line support for things like army-builder spreadsheets, extra scenarios and army lists. A Facebook page and the Lardies forum can be scouted for more support and discussion.

The rules are superbly produced with original artwork, well-executed page design, crisp and clear diagrams to explain rules and photos of units. At the back of the rules are a two-page QRS.

To quibble, I reckon 10-20 pages could have been knocked out and the presentation quality maintained (and therefore print and post cost reduced) and some captions describing the photographed units would have been a nice edition. The units and figs are actually for the game – it’s surprising how many rules include pics that are not.

Any set of rules has three audiences; people thinking about purchase, players learning the rules and experienced players.

For the first group, the book has enough ‘shelf presence’ to attract buyers, not that I know if it will be available in bricks and mortar shops or how on-line sample pages will manifest.

A significant positive is the commitment to being model-agnostic and pragmatic on basing. I, like a number of my playing group, change rules not basing.

The suggested basing for 25-32mm figs is units all on a 12cm frontage (so 2 x DBx). A wise choice to go large here, if nothing else for the simple reason that you can use existing armies based narrower and put troops on movement trays, spacer bases and so on – but going in the other direction may be an impossible deal-breaker.

It seems the rules have already been something of a bridge to players of the various fantasy / historic skirmish games, that use singly-based figs, to try a rank-and-flank game by putting such figs on unit bases – temporarily or otherwise.

The number of figs per base is not relevant, to further remove a barrier to entry.

For learning players, the clarity of writing, superb presentation and examples mean that it’s easy to comprehend and play. I found that one read-through and a watch of the You-tube clips was enough to play out a game with no major confusions or errors. It has an index and table of contents.

Will experienced players find the game has enough depth, balance, challenge and ‘re-playability’ – ask me in a year or so or charge up your crystal ball. However, the published and proposed scenarios are a good start to cultivating long-term interest, albeit they are not my priority cup of tea.

Content

Rules are best judged against their design philosophy and Midgard makes a clear statement about emphasising the roles of ‘Heroes’ being the troop leaders / generals / magicians.


Early chatter on-line suggests a significant proportion of players intend to play historical armies, where the detail on generals’ / heroes’ traits would presumably be dialled down.

The game is presented as a roughly 10-15 unit army + 3-4 heroes and options to expand force size. Units are bunched in a "Contingent', commanded by a particular hero.


The rules suggest an ‘evening’s’ game-time at 300-400 points (reflecting roughly the unit number noted above) A good rule of thumb is to add 30-60 minutes to rules authors’ projected game length – so compute that any way you like.

Troops are classified into five broad troop types and some sub-types;

Warriors, - Heavy Infantry – Heavy Infantry with missiles – Formed Archers - Horde
Skirmishers, - Shooters - Light Infantry
Heavy riders, - Knights - Medium Cavalry
Light riders, - Scouts – Nobles & Light Chariots
Monstrosities, - Giant - Elephant & Mammoth – Dragon – Flying Beast - Artillery

The rules have a dozen or so sample army lists and an open-points system (with type limitations on traits), and notes on mutually exclusive traits, for you to build your own forces.

Heroes / commanders are markers that can join units and have limited individual combat capacity – but they can challenge others to single combat.

Units and Heroes can have a variety of traits, either by virtue of their type (all light riders Evade etc) or added for flavour. Indeed the traits drive unit and army flavour. Troop quality is pushed into traits rather than a simple numerical value for elite to raw, or whatever.

Only Pikes appear as a non-missile weapon-trait and armour sits as a separate quality on a 2-5 rating, high being good, 3 sorta average.

Limited access to magical weapons and missiles are catered for but not heroes’ magical armour for some reason.

Units have typically 2-4 Stamina ie hit points and heroes 1-4. Unlike say the ADLG ancients rules, with similar hit strengths, hits can not be generally recovered. Troops at half lost strength take significant negatives.

Shooting is less likely to cause stamina loss while combat can see units lose several in a single round – or all of them if outmatched.

The game sequence is a reasonably simple u-go / i-go. Command is via unit tests, often not required early in the game, some functions such as 2nd moves, tests to stay in place having been shot at and so on require a 3-6 command test dice throw.

The game is largely bucket-of-dice, all being D6, for combat and shooting. Measuring is in ‘Spear-throws’, being base widths. You can pre-measure.

A key part of the game is ‘Mighty deeds’ effectively action / commands of hero /generals which broadly speaking can be spent to buy re-rolls of command / morale throws.

Thus a unit failing to make a 2nd move can be prompted by spending a mighty deed and dicing again.
Generals / heroes have 1-4 mighty deeds, which are replenished each turn, they can also be used to trigger some traits, add dice to a combat where the hero is leading a unit and a variety of other things such as casting magic or avoiding hits.

Armies / ‘forces’ fight within a global morale system known as Reputation. A force’s reputation total is a function of the reputation value of its component units and leaders – when these die the army reputation is reduced by their value.

A force with no reputation left has lost the battle. Unlike many similar systems for global morale you can gain reputation / morale by your heroes doing bold things such as leading charges.

The units ‘grouped’ under a hero do not have a separate morale / reputation limit or test. I wonder if the rules developers were tempted to telescope Reputation and Mighty deeds into one thing.

How Does It Play?

The first observation is it feels and plays as a unit game not an element game. While units are best advised to support and co-operate they don’t do so in such a direct way as per an element game. And with a relatively small unit count you lose some of the higher-order features of a multi-element game.
There are enough here-and-there exceptions to broad rules that you may well be tripped up from time to time. And it’s not immediately clear why some of the exemptions are needed, why can’t troops evade more than once in a turn, why does turning to face preclude a further move.

The author has stated the rules are not intended for competition games – which is usually a red flag for a set being underdone in some areas – however the rules do look solid and well drafted enough that competition / pickup games will not be a problem within some parameters.

(There are a few sections that look like they need clarification but I’ll put those in a separate post once I double check. Some typos are rearing their inevitable heads.)

The relatively limited command system, no hidden troops and a max of only a second move per unit per turn (with no options for ‘brigade’ moves to keep troops together for important early turns) suggest sweeping manoeuvre and wrong-footing the other side will be limited. All the games I’ve seen depicted look a shade predictable - you can see where the troops will likely go and where they will form a battle line.

The multi-step turn sequence, combat sequences and command tests by individual units means the projected 6-turn game nominated in scenarios is on the money and frontal slogs look common.
That’s not so say the game is over-predictable, it’s just that the decision points will be risk / reward of timing of matchups and exposing heroes, and Mighty deed management.

I suspect the value in the game is that it will generate a player-base and that it is really intuitive to pick up and play.

The optimum appears to be playing at the higher points cost to allow greater troop diversity and army differentiation via specialist troops - and to maximise where the player decision points are – in the scrum of attack risk / reward, supporting unit deployment, hero and mighty deed management. 
Do I recommend them, yes. Will I play more games and cook up army compositions, also yes.
Are they ‘better’ than competing rules – that might depend on your use for historical or legend / fantasy and frankly it’s too early for my view on that.


I had no involvement in the rules development or previous contact with the author. The publisher / distributor sent me and many other non-UK early purchasers our copy with a partial postage subsidy – many thanks again for that."

Wednesday, 20 November 2024

Tracking Things In Atteint!

Sometimes I have shower-thoughts on things that weren't even on my radar when I got into the shower.

Probably too much information, but this post is the result of one. The other day I started thinking about my jousting game Atteint! in the shower, and was reminded that I hadn't really got a way to track the bits of in-game information that I liked. I've tried using a sheet for each player with counters that track various values, and I've tried simply doing it by writing on a piece of paper. The latter works best, but some statuses - the Marshal, Favours of the Ladies' Court and the knight's current Focus - change in a way that's awkward to track.

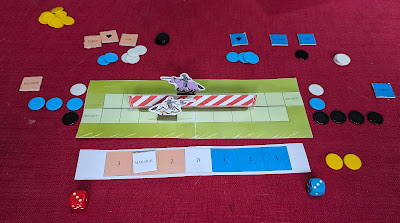
Anyway, my shower-thought was that I should go all Euro game on the problem, and use a ton of counters. I made a few counters for tracking some of the stuff and then switched to my coloured counters for the rest. A couple of days ago I tried it all out, and this is the setup:


White counters are Aim, blue are Balance and black are Force. Each knight starts a pass with one of each. As they add to the values they add counters to their pile. There are card counters marked 'Aim', 'Balance' and 'Force'. They are used to show the knight's current focus. The counter with the heart on it is the Favour From The Ladies' Court. You can only ever have one of these at a time. I also added a track for the Marshal; that starts at 0 and then slides one way or the other as knights gain points,

The above picture shows a pass at the start. This next picture shows a pass a couple of turns in. The White Knight already has a Force of 4, whilst the Purple Knight has 3, but has Aim and Balance of 2 as well.


This shot shows the first pass of a joust. White has nothing but Force to show for it, whilst Purple has 3 in each of Aim, Balance and Force, as well as a Favour.

That said, both knights missed and no points were scored.


The second pass. Both knights had good scored in their attributes, and Purple still has a Favour. You can also see that White has one point in his favour with the Marshal.

Purple has two yellow tokens. I use those to show points. In the second pass White missed again, but Purple scored a hit and managed to break his lance too.


The third pass. Purple piled on the speed hoping to force the pass as quickly as possible. With two points in hand he could afford to miss so long as White did as well. White didn't really get his act together. Both knights missed, so Purple won the joust 2-0.

On the whole this wasn't an exciting joust, but it did show off how the markers work. Yes, it's a lot of clutter but it was straightforward to use and a lot easier than moving stuff around on a chart or crossing things out on a piece of paper.

I ran a few more jousts afterwards, some using skills, and they did manage to be more exciting. And all ran smoothly thanks to the counters.

Friday, 15 November 2024

Up The Yazoo

I set up a two-player game of Galleys & Galleons last night for Caesar and I. Moving well out of the period covered by the game I revisited a scenario I played several years ago covering the first fight of the CSS Arkansas on the Yazoo River.

On 15th July 1862 the ironclad ram CSS Arkansas was proceeding down the Yazoo River, when it ran into a squadron of Union vessels; the armoured gunboat Carondolet, the timberclad gunboat Tyler and the ram Queen of the West. In the action that followed, the Carondolet was run aground, and the other two ships ran back to the safety of their own fleet back on the Mississippi. The Arkansas followed them, running the gauntlet of the whole Union fleet before finding safety under the guns of Vicksburg.

I used a board 36" long, with the river roughly 24" wide (plus a couple of small islands). Unlike the older scenario I didn't bother with current, as I wanted to keep things simple.

Here's the CSS Arkansas:
Q3 C4 - Heavy Bow Chasers, Heavy Stern Chasers, Ironclad, Ramming, Steam Engine

The Arkansas was supported by a group of Confederate soldiers which could be placed on any riverbank after all ships had deployed.

Confederate Regiment:
Q3 C1 - Bastion (but they fire a regular full broadside, not heated shot)


Here are the Union ships. From front to back:

USS Tyler
Q4 C3 - Chaser Guns, Reinforced Hull, Steam Engine

USS Queen Of The West
Q4 C3 - Ramming, Shallow Draft, Steam Engine, Unarmed

USS Carondolet
Q4 C4 - Heavy Bow Chasers, Heavy Stern Chasers, Ironclad, Shallow Draft, Steam Engine


The Union force has a higher points value than that of the Confederates. However their quality is low and with no flagship it would be difficult to coordinate them. This was to simulate the fact that in the actual action they were surprised and performed pretty badly. 

The victory conditions were vague. The Arkansas basically has to run past the Union force and escape off the other end of the board. But we felt it had to cause a reasonable amount of damage, if not disable, at least one Union ship in order to claim a victory.

Although technically all ships would have had steam up we started everybody stationary so they had to use activations to start moving. This would help break up the Union force since not all their ships would necessarily act every turn.

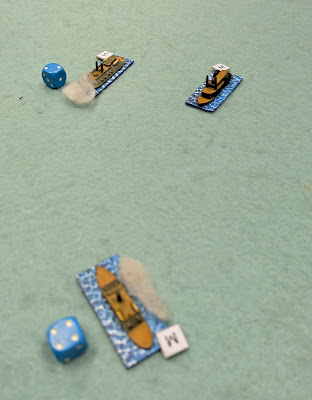
Caesar took the Union. He ran Queen of the West down the centre of the river to go for an immediate ram on the Arkansas. Tyler and Carondolet moved to provide gunnery support. I sent the Arkansas after Carondolet hoping to ram it; go big or go home!

Arkansas fired the first shot, a broadside at Queen of the West that failed to score any significant damage.


Carondolet fired its bow guns but the shots bounced off the Arkansas's armour.


Queen of the West was closing for a ram and I wasn't sure I could avoid it. So being bold I pre-empted the attack and turned towards the Union steamer, ramming it in my turn. The Queen of the West too heavy damage. I fired my guns as I closed, and the Queen of the West found itself with damaged engines as well.


Tyler came up on one side, but again the armour on the Arkansas was up to the job and it remained undamaged.


However a broadside from the Carondolet did inflict a hit.


Out of control the Queen of the West sheared off away from the fight. Arkansas turned an ran full-tilt at Carondolet, ramming it amidships and inflicting serious damage.


A broadside from the Confederate vessel forced the Queen of the West to strike, and its crew abandoned it.


Having forced one vessel to strike and badly damaging an enemy ironclad, the Arkansas sped on down the river.


Caesar fired one last shot from the stern guns on the Carondolet, and inflicted a lucky hull hit on the Arkansas (it was nearly a hole below the waterline in fact).


Unfortunately confusion due to the damage meant that the Carondolet was out of control, and it ran head-on into the riverbank.


The Arkansas could repair one of the damage points inflicted on it, and had taken no special hits. It steamed on the its next adventure. Meanwhile the Union had lost Queen of the West and Carondolet was hard aground. This was very much a Confederate victory.


We set it up and swapped sides. Could Caesar cause more havoc than I had with the Arkansas?


Caesar used his troops on the shore far more often than I did. They were mostly ineffective but did inflict a lucky hit on the Tyler.


The Arkansas fired a long-range shot at Carondolet. Caesar brought the ironclad over to that side of the river in order to avoid teh dangerous ram Queen of the West on the other side.


I had sent the Carondolet to the fore to engage the Arkansas, whilst trying to bring Queen of the West in on the flank. Tyler was to hang back in case the Arkansas broke through.


Carondolet was rammed and badly damaged.


There followed several turns whilst the Union ships blundered around, mostly trying to avoid colliding with each other as the Arkansas slipped past them. However with only some mostly repairable damage inflicted on the Carondolet, Caesar turned the Confederate ship back towards teh fight in order to do something more significant.


He tried to ram Carondolet again, but ...


... missed! Carondolet and Arkansas passed and exchanged broadsides to little effect.


It was at this point that the troops on shore managed to inflict a hit on the Tyler.


Carondolet began the long process of turning back into the fight. Meanwhile the Arkansas went after the Queen of the West. I'd managed to close up for a magnificent ram, but then blown the activation roll to make the final turn. Queen of the West now found itself under the guns of the Arkansas, and suffered for it.


Arkansas rammed the steamer, but only inflicted light damage.


However Queen of the West was in serious trouble. A parting shot from the Arkansas set it on fire, and the burning ship left the battle to explode quietly further upriver.


Meanwhile Tyler was in all kinds of trouble as a series of activation failures saw it stuck in the shallows and taking damage.


Only the Carondolet was left to fight the Arkansas. I moved forward to cross its bows.


I failed to get a rake (due to my own blunder - I fired a long-range broadside and then didn't get enough activations on the next turn to reload and fire a full raking broadside), but did manage to score a hit on the Arkansas.


The Arkansas rammed Carondolet, but only inflicted light damage.


Caesar took a gamble as teh ships parted and went for all three activations, despite being damaged. He rolled a '1', forcing a roll on the All At Sea table. And another '1' saw the Arkansas strike! The damage it had taken was too much for the crew!


Tyler had extricated itself from the shallows and begun repairs. Carondolet could repair a lot of the damage it had taken as well. But the Arkansas was lost.


With only the Queen of the West sunk we called this one a Union victory.

Galleys & Galleons is really not designed for warfare in this period. But it gave us a fun game. When I played it before both actions ended quite quickly; I was pleased that in both games yesterday lasted a decent amount of time and could have gone either way.

The models are 1/1200th, mostly from Navwar but Tyler is from a long defunct company called Zodiac. The soldiers are 1/300th figures from Heroics & Ros, with an Irregular Miniatures gun.

Friday, 8 November 2024

Flag Tag

We played Gaslands last night. What started off as a scheduled two-player game so June could try out a new build and use her new terrain turned into a five-player game. The scenario we rolled was Flag Tag, in which each team has a flag in their own area of the arena and where you score points for running over other teams' flags. The first team to score three points wins.

Here's the arena we set up, showing June's new terrain pieces. To the left you can see Declan's two-car Idris team. Left bottom is my two-vehicle Verney team. Mid right is June's new Mishkin vehicle. Mid-right is Craig's Scarlett vehicle. Hidden behind a piece of terrain top-centre is Caesar's three Mishkin buggies.


Away we go! I was running Bulls on Parade (a truck with a grabber arm) and Snakecharmer (a bike with satnav). The orange counter you can see is one of the flags. You can see Declan's team heading for the gate here, and one of Caesar's buggies coming the other way.


Declan deftly swerved to pick up Caesar's flag. When a flag is collected it is replaced at the start of the next gear phase.


I ran close to some wrecked vehicles to pick up Declan's flag. You can see my bike in action here as well.


Thunder McCar - June's Mishkin performance car. It has a electric-arc projector on the back, a weapon we'd not used before.


Craig's Scarlett desperados took out one of Caesar's buggies.


Thunder McCar took out another with it's rear mounted electrical weapon. The shot bounced onto my truck doing a massive 12 points of damage to it. Fortunately I had armour and survived but was left with one hit!


Vehicles in action!


Bulls On Parade grabbed Declan's Black Dog and threw it around a bit. Destroyed it too. My bike picked up Caesar's flag.


At this stage we had a few vehicles destroyed or badly damaged, and one drop-out (Craig had to leave early). Everyone had picked up two flags. I know I didn't document all of the collections, but they'd happened.

Anyway, June was after Caesar's purple flag. So was I. But it was Declan's respawned Black Dog that zoomed in from nowhere to collect it for the win.

An entertaining scenario all round. Not depicted was the sheer number of mines and caltrops being dropped by various teams. Made for a tricky time navigating the arena.

Related Posts Plugin for WordPress, Blogger...