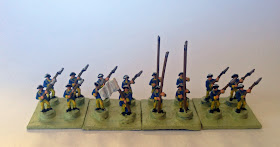
Here are the Swedes. The pikemen proved to be relatively easy to make from the basic Risk musketeer figure, although I suspect the soft plastic of my knock-off copy figures helped a bit there, as it made the cutting and clipping simpler. I have left the flag white; I'll do them all in one go. And, if I ever get any more infantry, I may make standard bearers from them instead, as the figures I am using, clipped from the guns, aren't that outstanding.
Here are some Russians. The brown blob in the middle is an unpainted mounted officer; I'll do him along with the test cavalry units, which are next.
Here's some painted stands along with some unpainted ones, so you can see where I started from. I gave them a basic white undercoat, then painted the whole figure in the base uniform colour before doing the 'detail'.
Opposed units. The bases are temporary; I will do proper base texture once the whole lot are painted.


These units look all right to me. I see you have simply carved off the muskets and glued the pikes to the left hand. It works. But my preferred method is to drill through both hands with a little hand drill or a pin (if I can) and drive through slender modelling wire. This ensures a secure hold - very robust - and of course doesn't do the look any harm, neither,
ReplyDeleteIf drilling through both hands is impractical, then just drill through the raised left hand. The modelling wire 'pike' can then be shoved through vertically with the butt on the ground as if being held like a staff. Casual variations in angle will give quite an artistic effect. The result is also quite robust.
I've done this operation on many plastic figures to create pikemen and flag bearers from other types.
Cheers,
Ion
The pike is not just resting onto the ground - I drilled a small hole in the base, and the pike is pushed into that. Thus they are pretty solid.
DeleteNice looking troops!
ReplyDeleteimpressive upgrade! Any special preparations to get the paint to stick to the plastic?
ReplyDeleteNot really - just a basic white undercoat. However I painted the whole figure in the base colour (blue or green) as well. They'll get one or two coats of varnish once I have enough of them done to justify getting the spray-can out :)
DeleteI'm surprised how well those Risk figures come up and they'll do nicely in our Maurice games. I always expect to see garish pink and pastel plastics, so properly painted figures will take some getting used to. Great looking units, Alan. I'm not sure other readers on this post realise how small these figures actually are, so drilling hands, etc. does not strike me as being practical. Good idea with a hole in the base though. Can't wait to see the finished armies!
ReplyDelete